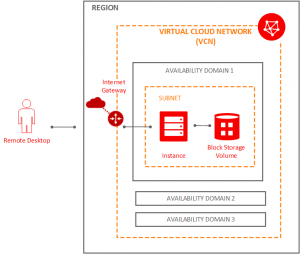
The cloud computing services offered by Oracle Corporation are commonly known as Oracle Cloud. The Oracle Cloud offers servers, storage services, networks, and more that get delivered to the customers using a global network that consists of several data centers managed by Oracle Corporation. Each cloud of Oracle Corporation is deployed in a region where each region consists of three availability zones that are fault-independent. There are individual data centers inside each of these availability zones, and these data centers are isolated in terms of power and network.
Oracle Virtual Cloud Networks (VCNs) offers private and customizable cloud networks in Oracle Cloud Infrastructure (OCI). Like a traditional data center network, the Virtual Cloud Networks (VCN) provides complete control over their cloud networking environment. This includes creating subnets and route tables, assigning private IP address spaces and configuring stateful firewalls. Some of the features offered by Virtual Cloud Networks are:
- Site-to-site connectivity,
- Flexible IP assignments,
- Flat cost, high-speed connectivity, etc.

Before a user can launch an instance, they must create a Virtual Cloud Network (VCN) with subnets. Users can launch their instances into one of the subnets of the VCN and connect to it. A subnet is a subdivision of the Virtual Cloud Network. The subnet in Oracle Cloud infrastructure helps to direct traffic according to a route table. For this tutorial, we will access the instance over the internet using its public IP address so that the route table will direct traffic to an Internet gateway. The subnet in Oracle Cloud also uses a security list to control traffic in and out of the instances.
Prerequisites
Before creating the Virtual Cloud Network, we need to create a compartment for the network. If the user doesn’t have a compartment, follow the steps mentioned in the “Choose a Compartment on Oracle Cloud Infrastructure” tutorial to create and choose a compartment for the resources.
Create a Cloud Network and Related Resources
The Oracle Cloud Console offers two choices for their customers when creating a VCN: to create only the Virtual Cloud Network (VNC) or create the VCN along with several related resources that are necessary if you want to launch an instance immediately. To help the user get started immediately, follow the below procedure to create the Virtual Cloud Network and its related resources.
1. Log in to the console and go to Networking.
2. Then, click Virtual Cloud Networks.
3. Make sure that the Sandbox compartment (or the compartment designated for the user) is selected in the Compartment list on the left.
4. Click Networking Quickstart.
5. Next, choose VCN with Internet Connectivity, and then click Start Workflow.
6. Enter the following details:
- VCN Name: Enter a name for the Virtual Cloud Network. The system will incorporate this name into the names of all the related resources that get automatically created. It is recommended to avoid entering confidential information as VCN name.
- Compartment: This field will default select the current compartment of the user. If not already selected, they can choose the compartment in which they want to create the VCN and related resources from the drop-down list.
- VCN CIDR Block: Specify a valid CIDR block for the Virtual Cloud Network in this field. For example: 10.10.0.0/16.
- Public Subnet CIDR Block: Specify a valid CIDR block for the subnet in this field. The value must be within the Virtual Cloud Networks CIDR block. For example: 10.10.0.0/24.
- Private Subnet CIDR Block: Specify a valid CIDR (Classless Inter-Domain Routing) block for the subnet in this field. This value must be within the VCN’s CIDR block and should not overlap with the public subnet’s CIDR block. For example, 10.10.1.0/24.
- Users can accept the defaults settings for all other fields.
7. After that, click Next.
8. Next, review the list of resources that the workflow will create. Also, note that the workflow will set up route table rules and security list rules to enable basic access for the Virtual Cloud Network (VCN).
9. After the review, click Create to start the workflow.
10. Once the workflow completes, click the View Virtual Cloud Network button to view the created VCN and its resources.
Now, the Virtual Cloud Network is created along with the following resources and characteristics:
- NAT gateway.
- Internet gateway.
- A Service gateway with Oracle Services Network access.
- A regional public subnet with Internet gateway access. This public subnet uses the VCN’s default route table and default security list. Instances created in this subnet may optionally have public IP addresses.
- A regional private subnet with NAT gateway and Service gateway access. This private subnet uses a custom route table and custom security list that the workflow has created. Instances created in this subnet can’t have public IP addresses.
- Users can use the Internet and VCN Resolver for DNS.
Conclusion
This tutorial presents the steps to create a Virtual Cloud Network (VNC) in Oracle Cloud Infrastructure. Hope this tutorial was helpful, and do reach out to us if you have any query or suggestions.


