Vultr offers cloud servers with elastic SSD storage for all their customers. Vultr provides an advanced cloud platform to deliver hosting services and cloud infrastructure for businesses and developers. Vultr fascinates users with 100% SSD storage, One-click deployment, and fully automated and dedicated servers. Vultr also offers a user-friendly dashboard with a very reasonable price tag when compared to its competitors. Vultr’s feature and the affordable price tag make it a trustworthy option for limited-budget and small-scale ventures.
Hosting custom-built applications in Vultr instances will need a change in the default configuration. If these applications use a custom port, users also need to open the port in the Vultr server’s instance. This tutorial explains different methods to open a port in the Vultr server.
When to Open a Port in Vultr Server?
By default, specific ports, such as the mail port 25, are not open in the Vultr server. Often, some server owners would like to make the email server work on port 25 itself. In such cases, users need to open port 25 on the Vultr server manually.
Additionally, if the user’s server has a custom application that listens on a specific port, say 2828, this also requires modification at the firewall level.
Also, our support engineers often configure SSH on ports other than 22 due to security reasons. Here, we make SSH listen on a custom port and make that port open in the server.
Methods to Open a Port in Vultr Server
In Vultr, server traffic depends mainly on the firewall policy. There are different methods to open a custom port on the Vultr server. Firewall modifications are really critical and require experience. Any bad firewall rules can mess up the working of the entire server.
>> Note: Making Vultr applications or services network ports public is a significant security risk. We strongly advise only allowing access to those ports from trusted networks. Suppose users need to access applications outside of a trusted network for development purposes, do not allow access to those ports using a public IP address. Instead, use a reliable and secure channel such as an SSH tunnel or a VPN.
Method 1: Using iptables
In order to open a port in the Vultr server is by modifying the iptables rules on the Vultr server. These firewall rules take effect immediately. Therefore, any wrong firewall rule can completely lock out the user from the Vultr server.
In order to allow a port on a Vultr server, execute the following command:
# iptables -A INPUT -p tcp --dport <port number> -j ACCEPT
In order to allow port 25 on a Vultr server, execute the following command:
# iptables -A INPUT -p tcp --dport 25 -j ACCEPT
After adding the firewall rule, the mail service will listen on port 25 of the Vultr server.
Method 2: Using the Vultr Firewall Service
Vultr server offers a website-based firewall solution. In this method, packet filtering occurs at a higher level on the network and, therefore, reduces resource usage on the server. Users can manage this firewall service from the Vultr control panel.
In order to set up this firewall service, log in to the Vultr control panel and create a firewall group. After creating the firewall group, add the desired rules into it. There are separate rules for IPv6 and IPv4 address types in this method. For example, in order to open SSH port 22, add the rule as shown below.
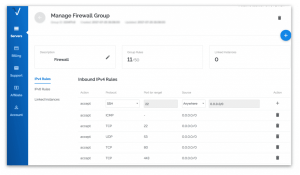
Similarly, when the user needs to open port 25 for the mail service, choose the protocol as TCP and add the rule to allow port 25. Also, in some accounts, the user needs to get approval from Vultr Support to allow port 25 access on the server.
Method 3: Using Firewall Utilities like UFW, CSF
Managing the Vultr server ports using iptables requires some expertise in firewall rules. For Vultr server owners requiring additional security, firewall utility tools like UFW, CSF, etc., can be used to open ports. They allow more refined rule customization and come in handy in managing the Vultr server traffic.
In Vultr servers, UFW gets installed by default. The syntax to open a port is:
$ sudo ufw allow <port number>/<optional: protocol>
Therefore, in order to open port 25, execute the following command:
$ sudo ufw allow 25/tcp
Similarly, when the Vultr server has CSF (Config Server Firewall), users can modify the csf.conf inside the /etc/csf directory. After that, configure the necessary ports in the csf.conf file.
However, in the Vultr server having CentOS 7 instances, users must first disable the default firewall application called firewalld to make CSF work properly, or else, it will conflict with the working of CSF.
Conclusion
This tutorial presents the different methods to open a port in the Vultr server. Hope this tutorial was helpful, and do reach out to us if you have any queries or suggestions.