
Hyper-V is Microsoft’s hardware virtualization product. It lets the user create and run a software version of a system called a virtual machine. Each virtual machine acts like a complete system, running an operating system and programs. When the user needs computing resources, virtual machines will provide more flexibility, help save money and time, and are a more efficient way to use hardware than just running one OS on physical hardware.
Hyper-V runs each VM in its own isolated space, which means the users can run more than one VM (virtual machine) on the same hardware simultaneously. Users might want to avoid issues such as a crash affecting the other workloads or giving different groups, people, or services access to various systems. In this tutorial, we will learn the steps to create a virtual machine with Hyper-V and install an operating system in the new VM.
>> Note: Users will need a .iso file for the operating system that they would like to run on the VM. If required, users can grab the evaluation copy of Windows 10 from TechNet Evaluation Center.
Create a Virtual Machine with Hyper-V Manager
In order to create a VM with Hyper-V manager, follow the below steps:
1. Open the Hyper-V Manager by either pressing the Window’s key and typing Hyper-V Manager in the search field or by finding Hyper-V Manager in the user’s applications.
2. In Hyper-V Manager, click Action >> New >> Virtual Machine to bring up the New VM (Virtual Machine) Wizard.
3. After that, review the Before You Begin content and click the Next button.
4. Then, provide the virtual machine with a name.
>> Note: This is the name of the Hyper-V used for the virtual machine, not the system name given to the guest OS (operating system) that users will deploy inside the VM (virtual machine).
5. Select a location where the user will store the virtual machine files, such as c:\virtualmachine. Users can also accept the default location. Click the Next button when done.
6. Select a generation for the system and click the Next button.
Generation 2 VMs were introduced with Windows Server 2012 R2 and provided a simplified virtual hardware model and additional functionality. Users can only install a 64-bit operating system on Generation 2 virtual machine.
If the new VM (virtual machine) is configured as Generation 2 and will be running a Linux distribution, the secure boot will need to be disabled.
7. Select 2048 MB for the Startup Memory value and leave the Use Dynamic Memory option selected. Click Next.
Memory is shared between the VM running on the host and a Hyper-V host. The number of VMs that can run on a single host is in part, dependent on available memory. Users can also configure a virtual machine to use Dynamic Memory. When it is enabled, dynamic memory reclaims unused memory from the running VM (virtual machine). This step will allow more virtual machines to run on the host.
8. On the Configure Networking wizard, select a virtual switch for the virtual machine and click the Next button.
9. Provide the virtual hard drive with a name, select a location or keep the default, and finally, specify a size. Then, click the Next button when ready.
A virtual hard drive offers storage for a virtual machine similar to a physical hard drive. A virtual hard drive is required to install an operating system on the virtual machine (VM).
10. On the Installation Options wizard, select the Install an operating system from a bootable image file option and then choose an operating system .iso file. Click the Next button once completed.
11. When creating a virtual machine, users can configure some operating system installation options. Some of the options available are:
- Install an operating system later: This option makes no additional modifications to the VM (virtual machine).
- Install an operating system from a network-based installation server: This option is unavailable unless the user has connected the virtual machine to a network switch. In this configuration, the VM (virtual machine) will attempt to boot from the network.
- Install an operating system from a bootable image file: This option is similar to inserting a CD (compact disc) into the physical CD-ROM drive of a physical system. In order to configure this option, select a .iso image. The system will mount this image to the virtual CD-ROM drive of the virtual machine. The boot order of the VM is changed to boot first from the CD-ROM drive.
12. Review the virtual machine details and click the Finish button to complete the virtual machine creation.
# Set VM Name, Switch Name, and Installation Media Path.
$VMName = 'TESTVM'
$Switch = 'External VM Switch'
$InstallMedia = 'C:\Users\Administrator\Desktop\en_windows_10_enterprise_x64_dvd_6851151.iso'

# Create New Virtual Machine
New-VM -Name $VMName -MemoryStartupBytes 2147483648 -Generation 2 -NewVHDPath "D:\Virtual Machines\$VMName\$VMName.vhdx" -NewVHDSizeBytes 53687091200 -Path "D:\Virtual Machines\$VMName" -SwitchName $Switch

# Add DVD Drive to Virtual Machine
Add-VMScsiController -VMName $VMName
Add-VMDvdDrive -VMName $VMName -ControllerNumber 1 -ControllerLocation 0 -Path $InstallMedia

# Mount Installation Media
$DVDDrive = Get-VMDvdDrive -VMName $VMName

# Configure Virtual Machine to Boot from DVD
Set-VMFirmware -VMName $VMName -FirstBootDevice $DVDDrive
Create a Virtual Machine Using PowerShell
In order to create a virtual machine using PowerShell, follow the below steps:
1. First, open up the PowerShell ISE as an administrator user.
2. Execute the following script to create a VM with Hyper-V on a Windows 10 system:
Complete the Operating System Deployment
In order to finish building the VM (virtual machine), the user needs to start the VM and walk through the OS installation.
1. Double-click on the virtual machine to launch the VMConnect tool in the Hyper-V Manager console.
2. Click on the green Start button in VMConnect. This button is like pressing the power button on a physical system. Users may be prompted to Press any key to boot from CD or DVD.
>> Note: Users may need to click inside the VMConnect window to ensure that their keystrokes are sent to the VM (virtual machine).
3. The VM (virtual machine) will boot into setup, and users need to walk through the installation like they would on a physical system.
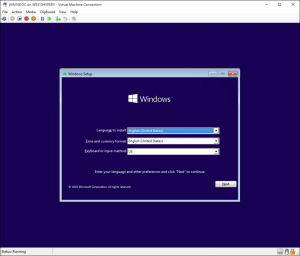
>>Note: Unless the user is running a volume-licensed version of Windows, they need a separate license for Windows running inside a VM (virtual machine). The virtual machine’s OS is independent of the host operating system.
Conclusion
This tutorial presents the steps to create a virtual machine with Hyper-V on a Windows 10 system and install an operating system in the new VM. Hope this tutorial was helpful, and do reach out to us if you have any queries or suggestions.


