
Xen is a bare-metal or Type 1 hypervisor that will create logical pools of system resources so that many VMs (virtual machines) can share the same physical resources. It allows users to run multiple operating systems on host computers to enable virtualization. Xen lets the user share hardware resources of the same system among multiple operating systems concurrently. Users can run multiple operating systems on the same hardware resources.
Xen’s operation takes place directly above the hardware layer and below the host system’s operating system. It create a virtualization layer on top of the operating system that provides a platform for users to create virtual machines. Xen also manages and links the hardware resources with the virtual machines directly. Xen hypervisor is responsible for memory partitioning, controlling and executing VMs (virtual machines), CPU scheduling, etc. The operating systems running in VMs (virtual machines) interact with the virtual resources as physical resources.
Features of Xen
Some of the key concepts of the Xen architecture are:
- Xen can run multiple operating systems (OS) in its own virtual machine (VM).
- Xen offers full virtualization.
- Instead of a driver, Xen provides a lot of great stuff that happens in the Xen daemon, named xend.
Requirements
- Red Hat Enterprise Linux 5.x, CentOS 6.x/7.x, Ubuntu 12.04, Ubuntu 14.04 (x86 or x86_64), AlmaLinux 8.x, or Scientific Linux 5.x installed.
- Update the system, yum / apt-get
- Storage to create the VPS (DomUs) disks.
- CPU that supports virtualization.
Partition Scheme
| Partition | Size | Description |
| / | 80-100 GB | Root partition containing all hardware node OS files, OS templates, and ISOs. |
| SWAP | 4 GB | Paging partition for the Linux-based operating system. |
| Storage | All the remaining space on the hard disk | This partition can be used to create either File-Based Storage or Logical Volumes for the VPS (DomUs). |
Supported Storage Types
Some of the storage types supported by Xen are:
- Logical volume managements (LVMs)
- Thin Logical volume management (LVM)
- File
- Zettabyte File System (ZFS)
- ZFS Compressed
- Zettabyte File System Thin (Zettabyte File System)
- ZFS Thin Compressed
Install Virtualizor
1. Open a Shell terminal, such as PuTTY, and log in to the server via SSH.
2. After that, execute the following command to download the install.sh script:
# wget -N http://files.virtualizor.com/install.sh
3. Modify the permission of the install.sh script by executing the following command:
# chmod 0755 install.sh
4. Execute the following command to install the Virtualizor for Xen. Replace user@email.com in the below command with the actual email address of the user.
# ./install.sh email=user@email.com kernel=xen
Installation Parameters
Some of the parameters that users can use in the above command to customize the installation are:
- email: The email address of the admin user.
- kernel: Users can specify the Kernel in which the Virtualizor should be installed using this parameter. In this case, it is Xen.
- noos: If the user does not want to download the DomU operating system for the DomU, then they can add noos=true as a parameter in the above command.
- beta: If there is a newer version of Virtualizor available and the user would like to test it, then in the above command, add beta=true as a parameter.
- (Optional) lvg: If the user uses Logical volume management (LVM) for the Virtual Private Server (VPS) storage, then add this parameter.
- license: If the user installs Virtualizor on the internal network, they must provide a valid license key. In order to get an internal license key, users will need to open a support ticket with the Virtualizor team.

5. Finally, reboot the server after the installation.
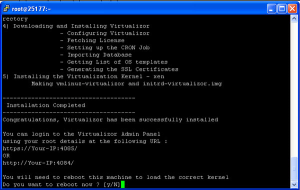
After the installation, users can log in to the Admin panel to create and manage Storage and Virtual Servers on their server.
>> Note: The installation process will get logged inside the /root/virtualizor.log directory.
Log in to the Softaculous Virtualizor Admin Panel
In order to log in to the Softaculous Virtualizor Admin Panel, visit any of the following URLs. Replace <Server IP> with the IP address of the user’s server.
https://<Server IP>:4085/
http:// <Server IP>:4084/
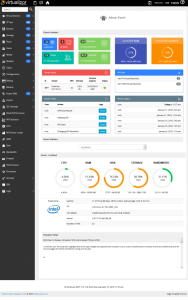
Log in to the server as a root/admin user. The dashboard of the Admin Panel will look similar to the one shown below:
Create Storage
In order to create storage in Virtualizor, follow the below steps:
1. First, log in to the Virtualizor Admin Panel as a root user.
2. Navigate to Storage >> Add Storage from the left panel.
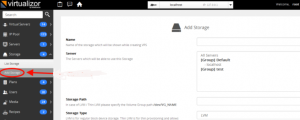
3. Fill in all the required details and click the Add Storage button to define the storage.
Set Domain-0 Memory
The user must set the Domain-0 (Hardware Node) memory in the GRUB so that there is no memory ballooning of Domain-0 causing a lack of RAM for the virtual servers. Users can set the Domain-0 (Hardware Node) memory by editing the /etc/grub.conf file and adding the following content to the file.
dom0_mem=512M
For example:
title Ubuntu (2.6.18-194.26.1.el5xen)

root (hd0,0)

kernel /boot/xen.gz-2.6.18-194.26.1.el5 dom0_mem=512M

module /boot/vmlinuz-2.6.18-194.26.1.el5xen ro root=LABEL=/1

module /boot/initrd-2.6.18-194.26.1.el5xen.img
Also, users can set the memory anytime by executing the following:
# xm mem-set Domain-0 512
Set Ports
Virtualizor uses ports from 4081 to 4085. If there is any firewall restricting these ports, users will need to allow these ports. For that, execute the following commands:
For RHEL & CentOS 7+

# firewall-cmd --zone=public --permanent --add-port=4081-4085/tcp

# firewall-cmd --zone=public --permanent --add-port=5900-6000/tcp

For RHEL & CentOS < 7

# iptables -I INPUT 1 -p tcp -m tcp --dport 4081:4085 -j ACCEPT

# iptables -I INPUT 2 -p tcp -m tcp --dport 5900:6000 -j ACCEPT
>> Note: If the user will use Webuzo templates for virtual machine creation, allow ports from 2002 to 2005.
Virtualizor Network in XEN ubuntu
Virtualizor will automatically create a viifbr0 bridge. The viifbr0 bridge detects the IP, Netmask, and GATEWAY from the interface; eth0 is the default. Users can modify it from the configuration from the admin panel as per their requirement:
Hence if the user wants to modify the above file, they will need to restart the Virtualizor network. For that, execute the following command:
# service virtnetwork restart
>> Note: The server’s entire network will restart after executing the above command.
Stop Command :
# service virtnetwork stop
Start Command :
# service virtnetwork start
Conclusion
This tutorial presents the steps to install Softaculous Virtualizor for Xen. Hope this tutorial was helpful, and do reach out to us if you have any queries or suggestions.


