
Terraform is a free, open-source infrastructure as Code (IaC) software tool that users can use to build, change, and version infrastructures efficiently and securely. Terraform can manage both popular and existing service providers and custom-build solutions. The Terraform infrastructure could handle low-level elements like networking, computing, storage instances, and high-level elements, such as DNS entries, SaaS features, etc. Users can host various manages of Terraform infrastructure over Google Cloud Platform, AWS, Microsoft Azure, or on-prem within the private clouds like OpenStack, Apache CloudStack, or VMWare vSphere. Terraform can also provide support with multi-Cloud by having a single workflow for every Cloud.
Amazon Elastic Compute Cloud (EC2) offers scalable computing capacity for AWS Cloud users. It eliminates the need to invest in hardware up front to deploy and develop applications faster. Users can use Amazon EC2 to launch, configure, and manage virtual servers, security networking, and storage. It also offers virtual computing environments, known as instances, for its users. Amazon EC2 enables users to scale down or up instances to handle changes in requirements or spikes in popularity, reducing the need to forecast traffic. In this tutorial, we will learn about the steps to provision an AWS Elastic Compute Cloud (EC2) instance using Terraform.
Prerequisites
The following needs to be pre-installed in the system before starting with this tutorial:
- An AWS account with admin access.
- The Terraform command-line interface (CLI) version 0.149 + installed.
- The AWS command-line interface installed
- An AWS access key ID
In order to configure the AWS command-line interface from the terminal, execute the following command and make sure to enter the Secret Access Key and AWS Access Key ID when prompted.
$ aws configure
The above command will save the user’s AWS credentials in a file at %UserProfile%\.aws\credentials on Windows and ~/.aws/credentials on Linux/macOS.
Setup Terraform Configuration
In order to define a single Amazon Elastic Compute Cloud (EC2) instance, users need to write their first Terraform configuration. For that, follow the below steps:
1. First, create a directory for the Terraform configuration, as each configuration must be stored in its own working directory.
$ mkdir learn-terraform-aws-instance
2. Execute the following to switch into the newly-created directory.
$ cd learn-terraform-aws-instance
3. After that, create a file under this directory to define the infrastructure.
$ touch main.tf
4. Open the created main.tf file using any of the text editors.
$ vi main.tf
5. Paste the following configuration to the file.
>>Note: The AWS AMI ID used in this configuration is specific to the us-west-2 region. If the user would like to use a different region, choose an AMI ID specific to the region by following these instructions.
terraform {
  required_providers {
    aws = {
      source  = "hashicorp/aws"
      version = "~> 3.27"
    }
  }

  required_version = ">= 0.14.9"
}

provider "aws" {
  profile = "default"
  region  = "us-west-2"
}

resource "aws_instance" "app_server" {
  ami           = "ami-830c94e3"
  instance_type = "t2.micro"

  tags = {
    Name = "ExampleAppServerInstance"
  }
}
6. Then, save and exit the configuration file.
Initialize the Directory
After making any changes, such as creating a new configuration, deleting an existing configuration, etc., users need to initialize the directory. For that, execute the following command:
$ terraform init
The above command will download and install the providers defined in the configuration, such as the AWS provider in this case. Terraform will download the AWS provider and install it in a hidden subdirectory of the current working directory, named .terraform. The above command will also print out which version of the provider was installed. Then it will create a lock file named .terraform.lock.hcl, which specifies the exact version of the provider that is used so that the user can control when they want to update the providers used for their project.
Format and Validate the Configuration
It is recommended to format the configuration file consistently. In order to format the configuration, execute the following command:
$ terraform fmt
The above command will automatically update configurations in the current directory for consistency and readability. As an output for the above command, Terraform will print out the names of the modified files, if any.
Then, execute the following command to ensure the user’s configuration is syntactically valid and internally consistent.
$ terraform validate
Create the First Infrastructure
In order to create an infrastructure in Terraform, execute the following command:
$ terraform apply
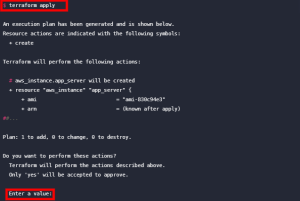
The above command will print out the execution plan, which describes all the actions Terraform will do to change the user’s infrastructure to match the configuration before applying it.
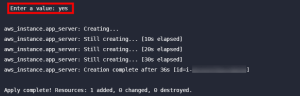
If the user is okay with the execution plan, type yes at the confirmation prompt to proceed. This plan will take a few minutes to complete since Terraform waits for the Amazon Elastic Compute Cloud (EC2) instance to become available.
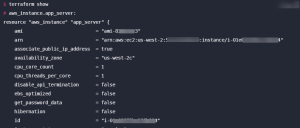
Inspect State
When a configuration is applied in Terraform, it will write data into a file called terraform.tfstate. In this file, Terraform stores the IDs and properties of the resources it manages to update or destroy those resources in the future.
The state file is the only way Terraform can track which resources it manages. This file often contains sensitive information, so the user must store their state file securely and restrict access to only trusted team members who need to manage the infrastructure. It is recommended to store the Production state files remotely with Terraform Enterprise or Terraform Cloud.
In order to inspect the current state of the resource, execute the following command:
$ terraform show
Sample Output:
Manually Manage State
For advanced state management, Terraform offers a built-in command called terraform state. Users can use the below command to list the resources in their project’s state.
$ terraform state list
aws_instance.app_server
Conclusion
This tutorial presents the steps to provision an AWS Elastic Compute Cloud (EC2) instance using Terraform. Hope this tutorial was helpful. Please do reach out to us if you have any queries or suggestions.


