
oVirt is an open-source and free virtualization management platform designed to manage virtual machines, networks, compute, entire enterprise infrastructure, and storage resources. oVirt offers the live migration of virtual machines and disks between storage and hosts. Also, oVirt uses the Kernel-based Virtual Machine (KVM) and is built upon Gluster, PattenFly, libvirt, and Ansible as some community projects.
oVirt is under GPLV2 License. The oVirt engine frontend is developed with the GWT web toolkit, and the backend is written in Java. oVirt consists of two basic components, oVirt node, and oVirt engine. The process of oVirt installation on Ubuntu is really easier.
The oVirt Guest Agent provides the information, actions, and notifications between the oVirt web interfaces and the guest. It provides Machine Name, IP Addresses, Operating System, Network, Installed Applications, and RAM usage to the web interface. oVirt also provides Single-On, so an authenticated user to the web interface does not need to authenticate over and over again when connected to a virtual machine.
The oVirt announced the support for Ceph storage via OpenStack Cinder in version 3.6.1. A few years later, that announcement was deprecated after the introduction of cinderlib support in 4.3.0. Users can use it as storage for the whole data center. In this tutorial, we will learn the steps to use Ceph only storage for the oVirt data center.
Self-Hosted Engine on Ceph
In order to use Ceph for a Self-Hosted Engine, the user needs to create an image and expose it as iSCSI from the Ceph system. For that, follow the below process:
Prerequisites:
- A Ceph instance that is up and running.
- Deploy a three nodes Ceph Pacific instance in the environment.
- Ensure that the hardware is matching at least the minimum requirements.
- Use 3 hosts with 16 GB RAM and 8 cores, but it is just a test environment.
- Open the Ceph firewall ports by executing the following commands:
 # firewall-cmd --zone=public --add-service=ceph-mon

 # firewall-cmd --zone=public --add-service=ceph-mon --permanent

 # firewall-cmd --zone=public --add-service=ceph

 # firewall-cmd --zone=public --add-service=ceph --permanent
- At the end of the installation, if Ceph reports the following:
health: HEALTH_WARN

            mons are allowing insecure global_id reclaim
Solve the above issue by executing the following command:
# ceph config set mon auth_allow_insecure_global_id_reclaim false
- Finally, execute the following commands to install the Ceph dashboard:
# dnf install ceph-mgr-dashboard

# ceph mgr module enable dashboard

# firewall-cmd --zone=public --add-port=8080/tcp

# firewall-cmd --zone=public --add-port=8443/tcp

# firewall-cmd --zone=public --add-port=8443/tcp --permanent

# firewall-cmd --zone=public --add-port=8080/tcp --permanent
Enable iSCSI support:
In order to enable iSCSI support in Ceph, follow the below steps:
1. First, enable the ceph-iscsi repository savings (https://download.ceph.com/ceph-iscsi/3/rpm/el8/ceph-iscsi.repo) in the /etc/yum/repos.d directory.
2. Next, add the following lines to the repository file that we just downloaded:
[tcmu-runner]

gpgcheck=0

baseurl=https://4.chacra.ceph.com/r/tcmu-runner/master/06d64ab78c2898c032fe5be93f9ae6f64b199d5b/centos/8/flavors/default/x86_64/

enabled=1

name=tcmu-runner packages
3. Execute the following commands to open the necessary ports:
# firewall-cmd --zone=public --add-port=5000/tcp --permanent

# firewall-cmd --zone=public --add-port=5000/tcp

# firewall-cmd --zone=public --add-service=iscsi-target --permanent

# firewall-cmd --zone=public --add-service=iscsi-target
4. Create the iSCSI configuration file (/etc/ceph/iscsi-gateway.cfg) and configure the iSCSI gateway by adding the sample contents in the below Git repository:
https://github.com/ceph/ceph-iscsi/blob/master/iscsi-gateway.cfg_sample
5. Finally, expose the target using the gwcli command. After that, users can deploy a self-hosted engine pointing to this iSCSI target attaching to the volume exposed there.
Attaching a Ceph pool as Managed Block Storage Domain
Now that the engine is up and running, users can attach a Ceph pool to be used as Managed Block Storage Domain. For that, follow the below steps:
1. On the Ceph side, create a pool to be used by the oVirt engine and ensure that it has the application set to rbd.

2. Then, prepare the hosts and the engine with the needed packages. For that, follow the instructions mentioned in the oVirt documentation for setting up Cinderlib documentation.
3. Execute the following command to reconfigure the oVirt engine to use cinderlib, if not done before:
# engine-setup --reconfigure-optional-components
4. Then, Enable managed block domain support if the user is using a cluster level older than 4.6 by executing the following command:
# engine-config -s ManagedBlockDomainSupported=true
>> Note: The above step is not required if the user is using cluster-level 4.6 as the Managed Block Domain support is enabled by default, starting with this version.
5. Next, copy the /etc/ceph directory from the user’s Ceph node to the oVirt engine host.
6. Execute the following command to change the ownership of the files in the /etc/ceph directory on the oVirt engine host:
# chown ovirt /etc/ceph/*
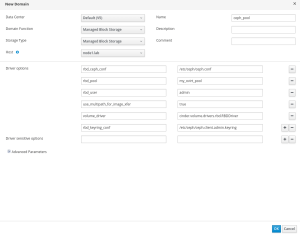
7. Then, manually add the following key/value pairs within the storage domain creation to configure the managed blog device for Ceph:
rbd_ceph_conf: /etc/ceph/ceph.conf

rbd_pool:

rbd_user: admin

use_multipath_for_image_xfer: true

volume_driver: cinder.volume.drivers.rbd.RBDDriver

rbd_keyring_conf: /etc/ceph/ceph.client.admin.keyring
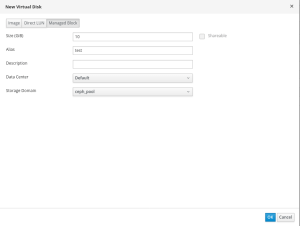
8. Now, create volumes for the virtual machines from the Storage section of the oVirt engine, as shown below:
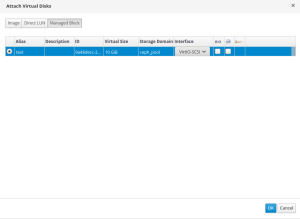
9. After that, attach the disk to the above created VM by selecting the Managed Block tab and choose the disk from the list:
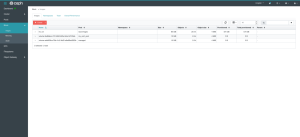
10. Finally, users can view the volume details in the Block >> Images section on the Ceph side, as shown below:
Conclusion
This tutorial presents the steps to use Ceph only storage for the oVirt data center. Hope this tutorial was helpful, and do reach out to us if you have any queries or suggestions.


