Virtualizor is a web-based Virtual Private Server (VPS) Control Panel offered by Softaculous Ltd. Virtualizor supports OpenVZ, Xen HVM, Xen PV, Virtuozzo, Xen, Linux KVM virtualization, and more. Users can access the Virtulaizor Control Panel from http://www.virtualizor.com/. Users can deploy and manage Virtual Private Server (VPS) on servers only with a single click. Some of the features offered by Virtulaizors are high availability, easy installation, 24/7 support, multilingual, automated backups, and more.
Virtualizor offers PowerDNS management, ACL User management, Cluster management, Storage management, free SSL utility, etc. Virtualizor also provides WHMCS/Blesta integration via a module that helps Virtulaizor users develop and maintain WHMCS/Blesta and the Control Panel. This integration also helps with fully automated Virtual Private Server (VPS) creation and management. In this tutorial, we will learn how to use Softaculous Virtualizor to create or clone an existing Virtual Private Server (VPS).
Notes:
- Create a VPS (Virtual Private Server) of Minimum size for Linux operating system templates because OS template size equals the VPS disk space.
- Create only one standard ext 3/4 FS partition in Virtual Private Server while installing the operating system from an ISO so that Virtualizor can perform operations.
- Install all necessary software on the VPS that the users are going to clone.
- Stop VPS (Virtual Private Server) gracefully.
Steps to Create or Clone an Existing VPS
1. First, Log in to Softaculous Virtualizor Admin Panel as an admin or root user. In order to log in to the Softaculous Virtualizor Admin Panel, visit any of the following URLs. Replace <Server IP address> with the actual IP address of the user’s server.
https://<Server IP address>:4085/
http:// <Server IP address>:4084/

The dashboard of the Virtualizor Admin Panel will look similar to the one shown below:
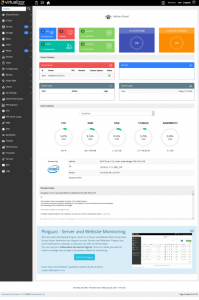
2. Go to the Media section and click the Create Template option.
3. Next, choose the VPS ID from the list for which the user wants to create the template.
4. Once the template is created, it will get automatically added to the Virtualizor >> Media >> OS templates section so the user can use it to create VPSs on the user’s server.
5. Users can check the template creation logs in the /var/virtualizor/log/createtemplate.log file on the server where the VPS gets hosted.
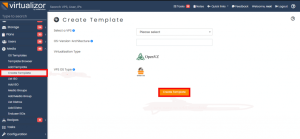
Configuration Option
In order to configure the OS template, the user needs to fill in the following details:
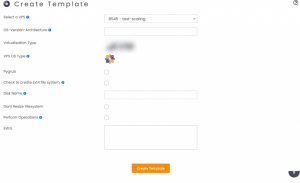
- OS-Version-Architecture: Operating System template name. Template name must be in the format: OS-Version-Arch for OpenVZ 7 CT. For example: <Operating System>_Webserver-6.5-x86_64.
- pygrub: PyGrub enables the user to start the Linux domUs with a kernel inside it instead of a kernel that lies inside the filesystem of the dom0. If the user wants to enable pygrub for the template, tick the checkbox (Only for Xen VPSs only).
- Check to create an ext4 file system: By default ext3 filesystem is created. As the name suggests, tick the checkbox if the user wants to create an ext4 file system for the template.
- Disk Name: The Drive is sda. Xen templates specifically require the xvda to be specified as the Disk name by default.
- Don’t Resize Filesystem: If checked, Virtualizor will not resize the File system of the VPS, which is created from this template.
- Perform Operations: For operations like changing network settings, users will perform root password for the VPS (Virtual Private Server) created from this template only if this checkbox is checked while creating the template. However, users can change it anytime after the OS template is created by editing the template.
Windows Template
>> Notes:
- Create a VPS (Virtual Private Server) of Minimum size because the OS template size equals the VPS disk space (15Gb).
- Install all necessary software in the VPS (Virtual Private Server). (Optional)
- Shutdown Windows from RDP/VNC.
Create VPS Using ISO Image
- Users will need to create VPS using their Windows ISO and attach the virtio drivers as the secondary ISO for the VPS: https://github.com/virtio-win/virtio-win-pkg-scripts/blob/master/README.md
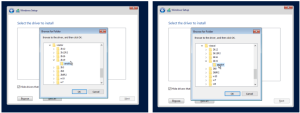
- If the drivers fail to load the disk in vnc while booting the VPS, then the user can use the following steps to detect the VPS disk:
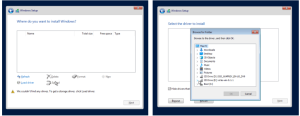
- Users can then go with either the viostor or vioscsi directory.
Removing System Reserved Partition While Installing OS from the ISO
1. First, Click on the new partition and simply select the apply option without changing any value.
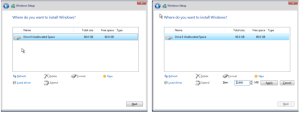
2. Next, delete the newly created partition (partition 1) and proceed with the installation of the 2nd listed partition, which is now partition 1, as shown in the last image.

Conclusion
This tutorial presents the steps to use Softaculous Virtualizor to create or clone an existing Virtual Private Server (VPS). Hope this tutorial was helpful, and do reach out to us if you have any queries or suggestions.


