Windows Azure, lately renamed Microsoft Azure in 2014, is a public cloud computing platform offered by Microsoft to build, manage, and deploy services and applications through a global network of data centers. Azure provides a range of cloud services, such as analytics, compute, networking, storage, and more. Azure is a public cloud provider with solutions including Software as a Service (SaaS), Infrastructure as a Service (IaaS), and Platform as a Service (PaaS). Azure is a flexible, fast, affordable, and reliable cloud computing platform. The capabilities and pricing of this platform make it one of the best public cloud offerings in today’s market.
Users can open a port or create an endpoint to a virtual machine (VM) in Microsoft Azure by creating a network filter on a VM network interface or a subnet. Users can place these filters, which control both outbound and inbound traffic, on a network security group attached to the resource that receives the traffic.
This tutorial demonstrates the steps to create a network filter that uses the standard TCP port 80. We assume that the user has already started the appropriate services and opened any operating system firewall rules on the virtual machine (VM). After the user has created a virtual machine that’s configured to serve web requests on the standard TCP port 80, they can perform the following:
- Create a network security group.
- Create an inbound security rule allowing traffic and assign the settings values:
- Destination port ranges: 80
- Source port ranges: * (allows any source port)
- Priority value: Enter a value less than 65,500 and higher in priority than the default catch-all deny inbound rule.
- Associate the network security group with the subnet or VM network interface.
Using the Azure Portal
In order to open a port to a virtual machine (VM) with the Azure portal, follow the below steps:
Step 1: Sign in to Azure Portal
First, sign in to the Azure portal using the below URL:
Step 2: Create a Network Security Group
- Search and select the resource group for the virtual machine (VM), choose Add, then search for and select the Network security group option.
- Then, click the Create button.
- After that, the Create network security group window opens, as shown below.
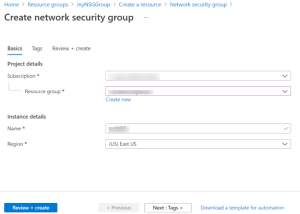
- Enter a name for the user’s network security group and select or create a resource group, then choose a location.
- Finally, select the Review + create button to create the network security group.
Step 3: Create an Inbound Security Rule
- Select the newly created network security group.
- Then, choose the Inbound security rules option from the left menu and click the Add button.
- Users can limit the Source, and Source port ranges as needed or choose the default (Any) setting.
- Users can also limit the Destination details as required or leave the default (Any) settings.
- After that, select a standard Service from the drop-down menu, such as HTTP. Users can also choose Custom settings if they want to provide a specific port to use.
- (Optional) Then, change the Name or Priority. The priority will affect the order in which the rules get applied: the lower the numerical value, the earlier the rule is applied.
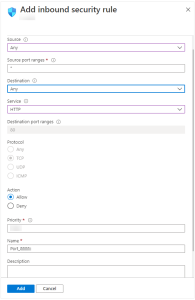
- Finally, click the Add button to create the rule.
Step 4: Associate the Network Security Group with a Subnet
The final step is associating the user’s network security group with a specific network interface or a subnet. For this tutorial, we will associate the network security group with a subnet. For that, follow the below steps:
- First, select the Subnets option from the left menu, and then select the Associate option.
- Select the user’s virtual network, and choose the appropriate subnet from the drop-down.
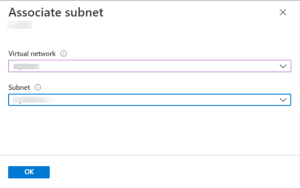
- Finally, click the OK button.
Using the PowerShell
In order to create a Network Security Group and ACL rules, users need the latest version of Azure PowerShell installed. Follow the below steps to open ports and endpoints to a VM using PowerShell.
First, log in to the Azure account by executing the following command:
Connect-AzAccount
In the following examples, replace the parameter names with the user’s own values. Example parameter names include the Resource Group, Network Security Group, and Virtual Network details.
Then, create a rule with New-AzNetworkSecurityRuleConfig. In this tutorial, we will create a rule named myNetworkSecurityGroupRule to allow TCP traffic on port 80, as shown below:
$httprule = New-AzNetworkSecurityRuleConfig `

    -Name "myNetworkSecurityGroupRule" `

    -Description "Allow HTTP" `

    -Access "Allow" `

    -Protocol "Tcp" `

    -Direction "Inbound" `

    -Priority "100" `

    -SourceAddressPrefix "Internet" `

    -SourcePortRange * `

    -DestinationAddressPrefix * `

    -DestinationPortRange 80
Next, create the Network Security group with New-AzNetworkSecurityGroup and assign the HTTP rule that the user just created as follows. The following will create a Network Security Group named myNetworkSecurityGroup:
$nsg = New-AzNetworkSecurityGroup `

    -ResourceGroupName "myResourceGroup" `

    -Location "EastUS" `

    -Name "myNetworkSecurityGroup" `

    -SecurityRules $httprule
Now, assign the created Network Security Group to a subnet. The following example will assign an existing virtual network named myVnet to the variable $vnet with Get-AzVirtualNetwork, as shown below:
$vnet = Get-AzVirtualNetwork `

    -ResourceGroupName "myResourceGroup" `

    -Name "myVnet"
After that, associate the created Network Security Group with the subnet with Set-AzVirtualNetworkSubnetConfig. The following example will associate the subnet named mySubnet with the Network Security Group, as shown below:
$subnetPrefix = $vnet.Subnets|?{$_.Name -eq 'mySubnet'}

 Set-AzVirtualNetworkSubnetConfig `

    -VirtualNetwork $vnet `

    -Name "mySubnet" `

    -AddressPrefix $subnetPrefix.AddressPrefix `

    -NetworkSecurityGroup $nsg
Finally, update the virtual network with Set-AzVirtualNetwork. In order for the changes to take effect, execute the following command:
Set-AzVirtualNetwork -VirtualNetwork $vnet
Conclusion
This tutorial presents the steps to open ports to a virtual machine (VM) with the Azure portal and PowerShell. Hope this tutorial was helpful, and do reach out to us if you have any queries or suggestions.


