Apache CloudStack is a free and open-source Infrastructure as a Service (IaaS) platform that orchestrates and manages pools of the network, storage, and other computer resources to build a private or public IaaS compute cloud. Apache CloudStack allows any IT service provider to offer public cloud services to their customers. It can also be used by companies who wish to offer hybrid and private cloud services to their users. In this tutorial, we will learn the steps to add primary storage in an Apache CloudStack using the user interface (UI). To provision or scale-up Cloud infrastructure at any time, one of the important steps is to add the primary storage.
System Requirements for Primary Storage
Hardware Requirements:
- Any standards-compliant SMB, iSCSI, or NFS server that is supported by the underlying hypervisor.
- The storage server should be a machine with a large number of disks. A hardware RAID controller should ideally manage the disks.
- The minimum required capacity depends on the user’s needs.
When setting up primary storage, follow these restrictions:
- Users cannot add primary storage until a host has been added to the cluster.
- Suppose the user doesn’t provision shared primary storage. In that case, they must set the global configuration parameter system.mn vm.local.storage.required to true, or else they will not be able to start the virtual machines (VMs).
Adding Primary Storage
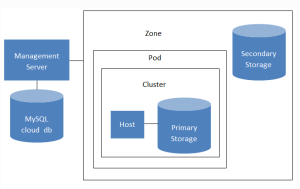
When a new zone is created, the first primary storage is added as part of that process. Users can add primary storage servers at any time, such as when adding additional servers to an existing cluster or adding a new cluster.
Note that when using preallocated storage for primary storage, ensure there is nothing on the repository (For example, users should have an empty SAN volume or an empty NFS share). Adding the storage to Apache CloudStack will destroy any existing data.
>> Note: Users can add primary storage at the zone level through the Apache CloudStack API (Application programming interface). Adding zone-level primary storage is not yet supported through the Apache CloudStack user interface (UI).
Once the primary storage is added at the zone level, users can manage them through the Apache CloudStack user interface (UI). To add primary storage at the zone level, follow the below steps:
1. Log in to the Apache CloudStack user interface. The CloudStack user interface is available in popular browsers, including IE9, IE8, IE7, Firefox 4, Firefox 3.5+, Safari 5, and Safari 4. To log in to the UI, use the below URL. Substitute <management-server-ip-address> with the user’s own management server IP address.
http://<management-server-ip-address>:8080/client
2. Choose Infrastructure from the left navigation.
3. On the Zones page, click View More and select the Zone in which the user wants to add the primary storage.
4. Click the Compute tab.
5. Click the View All option from the Primary Storage node of the diagram.
6. After that, click the Add Primary Storage button.
7. Provide the following details in the dialogue. The required information varies depending on the user’s choice in Protocol.
- Scope: This field specifies whether the primary storage is available to all hosts in the Zone or only for the hosts in a single cluster.
- Pod: This field specifies the pod for the storage device. Visible only if the user chooses Cluster in the Scope field.
- Cluster: Specify the Cluster for the storage device in this field. It is visible only if the user chooses Cluster in the Scope field.
- Name: Specify the name of the storage device in this field.
- Protocol: For XenServer, choose either iSCSI, NFS, or PreSetup. For KVM, select SharedMountPoint or NFS. For vSphere, choose either NFS or VMFS (iSCSI or FiberChannel), and for Hyper-V, select SMB.
- Server (for iSCSI, NFS, or PreSetup): Specify the storage device’s DNS name or IP address.
- Server (for VMFS): Specify the DNS name or IP address of the vCenter server.
- Path (for NFS): Specify the path that the user wants to set as the exported path from the server in NFS.
- Path (for VMFS): In vSphere, this should be the combination of the datastore name and the datacenter name. The format is “/” datacenter name “/” datastore name. For example, /cloud.datacenter.VM/cluster1datastore”.
- SMB Username (for SMB/CIFS): This field is only applicable if the user has selected the SMB/CIFS provider. The account’s username must have the necessary permissions to the SMB shares. Also, the SMB user must be part of the Hyper-V administrator group.
- Path (for SharedMountPoint):. With KVM, this is the path on each host where the user likes to mount this primary storage. For example, “/mnt/primary_storage”.
- SMB Password (for SMB/CIFS): This field only applies if the user has selected the SMB/CIFS provider. This will be the password associated with the account.
- SMB Domain (for SMB/CIFS): This field only applies if the user has selected theSMB/CIFS provider. This field specifies the Active Directory domain that the SMB share should be part of this domain.
- Target IQN (for iSCSI): In iSCSI, this is the IQN of the target. For example, iqn.1956-03.com.sun:02:01ec8bb579-1271678983.
- SR Name-Label (for PreSetup): Mention the name-label of the SR that has been set up outside the Apache CloudStack.
- Lun # (for iSCSI): This field detail specifies the LUN number of iSCSI. For example, 3.
- Tags (optional): Mention the list of tags for this storage device separated by commas. It must be an equivalent set or superset of the tags on the user’s disk offerings. The tag sets that the users specify on primary storage across clusters in a Zone should be identical. That is, if cluster A provides primary storage with T1, T2, and T3 tags, then all other clusters in that Zone must also provide primary storage with T1, T2, and T3 tags.
8. Finally, click the OK button.
Conclusion
This tutorial presents the steps to add primary storage in an Apache CloudStack using the user interface. Hope this tutorial was helpful, and do reach out to us if you have any queries or suggestions.


