Apache CloudStack is a free and open-source Infrastructure as a Service (IaaS) platform that orchestrates and manages pools of the network, storage, and other computer resources to build a private or public IaaS compute cloud. Apache CloudStack allows any IT service provider to offer public cloud services to their customers. It can also be used by companies who wish to offer hybrid and private cloud services to their users.
In this tutorial, we will learn the steps to configure Amazon Web Services Interface on the Apache CloudStack server.
Amazon Web Services Compatible Interface
Apache CloudStack can translate Amazon Web Services (AWS) API calls to native Apache CloudStack API calls so that users can continue using existing Amazon Web Services-compatible tools. This translation service offered by CloudStack runs as a separate web application in the same tomcat server as that of the management server of CloudStack, listening on a different port. The AWS compatible interface provides the Elastic Compute Cloud SOAP and Query APIs and the Simple Storage Service (S3) REST API.
>> Note: The Amazon Web Services Compatible Interface service was previously enabled by separate software called CloudBridge. But it is now fully integrated with the CloudStack management server.
Limitations
Some of the limitations of AWS compatible interface are:
- It is only supported only in zones that use basic networking.
- AWS compatible interface is available in fresh installations of Apache CloudStack and won’t be available through an upgrade of previous versions.
- Features such as Elastic Load Balancing (ELB) and Elastic IP (EIP) are only available in an infrastructure with a Citrix NetScaler device. Users accessing a Zone with a NetScaler device will need to use a NetScaler-enabled network offering (ELBNetworkOffering and DefaultSharedNetscalerEIP).
Supported API Version
- The AWS Elastic Compute Cloud interface complies with Amazon’s WDSL (Web Service Description Language) version dated November 15, 2010, available at http://ec2.amazonaws.com/doc/2010-11-15/.
- The interface is compatible with the AWS Elastic Compute Cloud command-line tools, such as EC2 tools version 1.3.6230, which can be downloaded at http://s3.amazonaws.com/ec2-downloads/ec2-api-tools-1.3-62308.zip.
Enable the AWS S3 and AWS EC2 Compatible Interface
The software that provides Amazon Web Services API compatibility is installed along with Apache CloudStack. Users must enable the services and perform some setup steps before using them.
1. Make sure to set the global configuration parameters for each service to true.
2. Create a set of Apache CloudStack service offerings with names that match the Amazon service offerings. Users can do this through the CloudStack UI as described in the Administration Guide.
Warning: Be sure that we have included the Amazon default service offering, m1.small, and EC2 instance types that they will use.
3. If the user did not already do so when they set the configuration parameter in step 1, restart the Management Server by executing the following command.
# service cloudstack-management restart
Enabling the Service
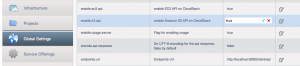
To enable the S3 and EC2 compatible services, users need to set the configuration variables to enable.s3.api and enable.ec2.api to true. Users do not have to enable both at the same time and enable the ones which they need. Users can do this via the API or the CloudStack GUI by going in Global Settings.
The below snapshot shows how to use the Apache CloudStack GUI to enable these services:
Using the Apache CloudStack API, the easiest is to use the integration port to make unauthenticated calls. Set the port to 8096 in Global Settings and subsequently call the updateConfiguration method. To do so, execute the following commands:
http://localhost:8096/client/api?command=updateConfiguration&name=enable.ec2.api&value=true

http://localhost:8096/client/api?command=updateConfiguration&name=enable.ec2.api&value=true
Once we have enabled the services, restart the server.
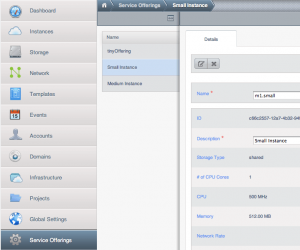
Create AWS EC2 Compatible Service Offering
Users will also need to define compute service offerings with names compatible with the Amazon Elastic Compute Cloud instance types API names, such as m1.large, m1.small. Users can do this via the Apache CloudStack graphical user interface (GUI). For that:
- Go to the Service Offerings section and select Compute offering.
- After that, either create a new compute offering or modify an existing one.
- Finally, ensure that the name matches an Elastic Compute Cloud (EC2) instance type API name.
Modify the AWS API Port
The AWS API always listens for requests on port 7080. If the user prefers AWS API to listen on another port, they can change it as follows:
- First, edit the /etc/cloudstack/management/server.xml, /etc/cloudstack/management/server-nonssl.xml, and /etc/cloudstack/management/server-ssl.xml files.
- In each file, find the tag <Service name=”Catalina7080”>. Under this tag, locate <Connector executor=”tomcatThreadPool-internal” port= ….< and change the port to whatever port they want to use.
- Then, save the files.
- Finally, restart the Management Server.
Users will have to re-enable the services and update the port if they have re-installed the Apache CloudStack.
AWS API Command-Line Tools Setup
To use the AWS EC2 command-line tools, the user must follow these below steps:
- Ensure that the user has the correct version of EC2 Tools. The supported version is available at http://s3.amazonaws.com/ec2-downloads/ec2-api-tools-1.3-62308.zip.
- After that, set up the AWS Elastic Compute Cloud environment variables. Users can do this every time they use the service or set them up in the proper shell profile.
- Then, replace the endpoint (that is, EC2_URL) with the proper address of the user’s Apache CloudStack management server and port.
- Finally, execute the following in the bash shell:
$ export EC2_CERT=/path/to/cert.pem
$ export EC2_PRIVATE_KEY=/path/to/private_key.pem
$ export EC2_URL=http://localhost:7080/awsapi
$ export EC2_HOME=/path/to/EC2_tools_directory
Using Timeouts to Ensure AWS API Command Completion
The Amazon Elastic Compute Cloud command-line tools have a default connection timeout. When used with Apache CloudStack, a longer timeout might be needed for some commands. If the commands are not completing due to timeouts, users can specify a custom timeout. They can add the following optional command-line parameters to any Apache CloudStack-supported EC2 command:
Specifies a connection timeout (in seconds)

--connection-timeout TIMEOUT


Specifies a request timeout (in seconds)

--request-timeout TIMEOUT


Example:

ec2-run-instances 2 –z us-test1 –n 1-3 --connection-timeout 180 --request-timeout 180
Conclusion
This tutorial presents the steps to configure Amazon Web Services Interface on Apache CloudStack. Hope this tutorial was helpful, and do reach out to us if you have any query or suggestions.


