
Vultr’s One-Click WordPress application offers everything a user needs to launch their website with minimal effort. To deploy a Vultr server, choose a server location, select the size, and click Deploy Now. Vultr’s server will get deployed in less than a minute, and then the users are ready to set up WordPress.
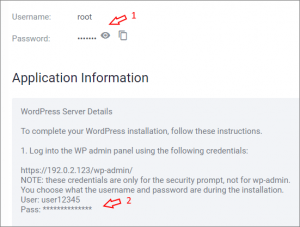
To follow this installation guide, customers must have two sets of user credentials on the Server Information page. First, the root login (1), which is used for SSH and console access, and the security user (2) protects the admin section with a password before entering the admin credentials for WordPress. In this tutorial, replace www.test.com and 191.0.2.123 with the user’s site name and IP address.
Step 1: Install SSL Certificate
We always recommend customers install an SSL certificate on their server, but this step is optional. For better service and security, register a domain name and install an SSL certificate. If the user plan to use a commercial SSL certificate, check out the Commercial SSL section below.
If the user skips this step, they need to substitute the server IP address for www.test.com. Also, they will encounter a certificate security warning, which they need to proceed past to complete the setup.
Install a Free Let’s Encrypt SSL certificate
- First, register a domain name and create a DNS record for the server’s IP address. To create a DNS record, consult the DNS provider for more instructions.
- Once the DNS propagation is completed, the name will be visible throughout the internet. Propagation usually happens quickly but could take up to 48 hours in some scenarios.
- Connect to the server via SSH or console using the root login.
- Next, install the SSL certificate with certbot. Replace the domain name and email with the user values. The below command will create a multi-domain certificate for both the bare domain name and the “www” server name. Certbot will report success messages when completed.
# certbot --nginx --redirect -d www.test.com -d test.com -m admin@test.com --agree-tos --no-eff-email
If the user wishes to skip this step now and install HTTPS later, they may need one of the popular WordPress plugins to force all content to HTTPS, which fixes any WordPress links that are unencrypted and stored previously. By default, certbot is installed on Vultr’s One-Click WordPress.
Install a Commercial SSL Certificate
- Obtain a certificate from a certificate authority for the domain.
- Replace the server.key and server.crt files in the /etc/nginx/ssl/ with the commercial certificate.
- After that, reboot the server.
# reboot
Step 2: Log in to WordPress Admin Area
- First, log in to the WordPress admin area by using the following URL. Replace www.test.com in the below URL with the actual domain name or IP address if the user did not register a domain name.
https://www.test.com/wp-admin/
- If the user did not install an SSL certificate initially, they would receive a privacy warning for the server’s self-signed certificate. It is safe to proceed. It’s also possible to complete this step using the HTTP URL, but they are not secure enough.
http://191.0.2.123/wp-admin/
- Enter the security user credentials in the Sign-in pop-up window. This extra security protects the user’s server while they install WordPress. Users can disable this pop-up after the installation is complete by following the directions mentioned in the remove wp-admin security section.
Remove wp-admin Security
This script has been removed from the system and is no longer required for One-Click WordPress deployments after June 2021. The Vultr’s One-Click WordPress has an additional security prompt for the /wp-admin/ page. To remove this feature, run the following remove-htaccess.sh script.
# /opt/vultr/remove-htaccess.sh
After executing the above script, the user will no longer see the extra security pop-up when logging into the WordPress dashboard.
Step 3: Run the WordPress Wizard
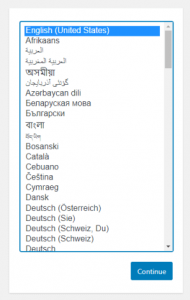
- First, choose a language from the drop-down and click Continue.
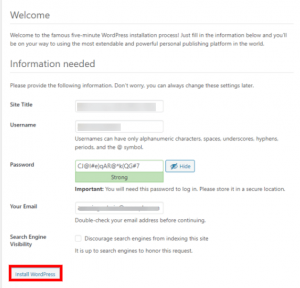
- Enter the site name, email address, and username. Make a note of the suggested password, or enter a preferred password. After filling in the details, click the Install WordPress button.
- After the installation is completed, log in to the WordPress dashboard using the created username and password.
Step 4: Set the Domain Name
To set the domain name in the WordPress dashboard, follow the below steps:
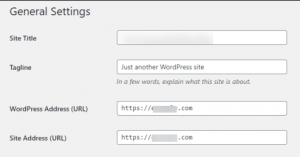
- First, log in to the WordPress dashboard and navigate to Settings >> General.
- After that, edit the Site Address (URL) and WordPress Address (URL) to match the user’s domain name.
- Finally, click the Save Changes button.
WordPress stores complete URLs in the database. If the user creates content before changing the site URL, some pages in the website may have incorrect links. If the user has this problem, make a backup and consider using a database search-and-replace plugin.
Conclusion
This tutorial presents the steps to configure one-click WordPress in Vultr. Hope this tutorial was helpful, and do reach out to us if you have any query or suggestions.


