VMware is a California-based company that develops a virtualization platform for IT infrastructure. VMware was established in 1998 and is well known for its vSphere VMware Hypervisor. The vSphere VMware Hypervisor enables Virtualization for any type of architecture. Five different IT experts developed VMware software in the year 1998.
VMware develops various software applications related to Virtualization and is one of the leading virtualization software providers in today’s market. VMware formally launched VMware Workstation as its first product in 1999.
CentOS (Community Enterprise Operating System) is an Operating System with its own identity and is one of the widely used Linux distributions available for free in the world today. CentOS powers many webservers globally and is based on Red Hat Enterprise Linux (RHEL). In this tutorial, we will learn the steps to install CentOS 8.2 in VMware workstation 15 Pro.
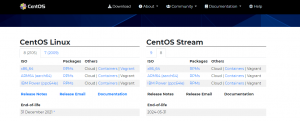
CentOS Download Options
On the official website home page, click Get CentOS Now to get the CentOS installation media. On the official website, users can view two download options which are listed below:
- CentOS Linux: Download size around 7.7 GB. This is the desktop version with a graphical user interface (GUI) and contains the standard Linux packages, which comes pre-configured with any desktop version of the Linux Operating System such as Python, C, Ruby, PHP, and more.
- CentOS Stream: Download size around 7 GB. CentOS Stream is a rolling-release Linux distribution that exists as a midstream between the downstream development for Red Hat Enterprise Linux (RHEL) and the upstream development in Fedora Linux.
Install CentOS 8.2
To install CentOS 8.2 in VMware workstation 15 Pro, follow the below steps:
Step 1: Open VMware Workstation
This tutorial hopes that VMware workstation 15 Pro is already installed in the system. Open VMware Workstation from the Windows Start menu or the desktop if the user has a VMware Workstation icon on the desktop.
Step 2: Create a New Virtual Machine
To launch the wizard to create a new virtual machine:
- Click on the Create a New Virtual Machine button or go to File and click New Virtual Machine.
- After that, a Welcome to the new Virtual Machine Wizard dialogue box will open.
Step 3: Welcome to the New Virtual Machine Wizard dialog box Appears.
In this dialogue box, users can select the way they want to create the VM. Usually, users either select the default settings or choose Typical. Users can choose the Custom option if they want to set advanced options such as compatibility with older Virtual Machines, controller type, SCSI, etc. In this tutorial, we will select the default options. For that, select the typical option and click Next.
Step 4: Browse to the ISO Image
Generally, VMware Workstation automatically detects the OS and initiates Easy Install. In the latest version of VMware Workstation 15 Pro, the Red Hat Enterprise Linux 8 ISO image will be available for an easy install. On the next section, click browse to select the downloaded CentOS 8.2 ISO file and click Next.
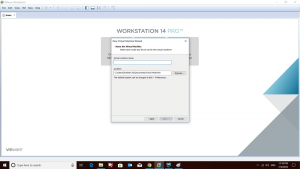
Step 5: Enter Virtual Machine Name
In the next section, enter the virtual machine name or accept the default. In the Location section, mention the file path where the Virtual machine files will get created. Click on Browse to select a new location to store the VM files or choose the default. Then, click Next to move to the next setup page.
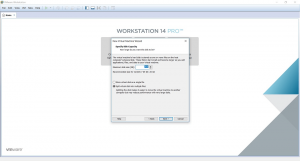
Step 6: Specify Disk Space
In the next section, specify the disk space. Users can select the default settings or can allocate more if they plan to install applications later on. Make sure to check the split virtual disk into multiple files check box. Then, click the Next button.
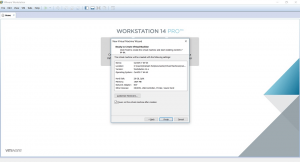
Step 7: Ready to Create Virtual Machine
Now the user will be able to view the ready to create Virtual Machine dialog box. With this, the installation process will start. For that, follow the below steps:
Click the Finish button to start the installation process. At this stage, users need to add additional RAM and CPU to their Virtual Machine. The default setting is 1 GB RAM and 1 CPU Core. It is recommended to increase the RAM only if the user has sufficient memory on their system.
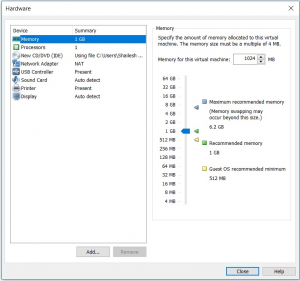
- To increase the RAM, click the Customize Hardware before clicking the Finish button. Move the slider to expand the memory.
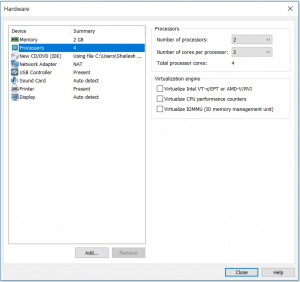
- To increase the CPU, enter the number of processors and cores values in the Processors section on the hardware setup page.
- After adding the RAM and CPU, click the Close button.
- Finally, click the Finish button to start the installation process.
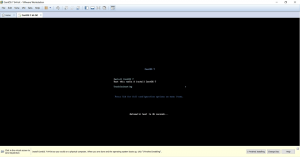
Step 8: Begin the Installation Process
If we see the below screen, press i on the keyboard and press the Enter key.
Step 9: CentOS Setup Wizard
- The CentOS installation setup wizard will open up. First, select the language of choice and click Continue.
- On the next page, users can see the installation summary. If we see any grayed-out areas, please wait for a second until the below screen appears.

- Click Software Selection and select the Gnome Desktop as the base environment setup. After that, click Done and then click the Begin Installation button.
- On the next page, configure the root password and create a user, as shown below.
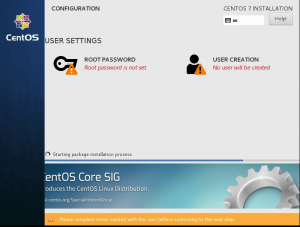
- Click the Root Password button and enter the root password in the dialog box. Click the Done button. If a weak password warning is displayed, double-click the Done button.
- Once the root password is set up, click the User Creation button. Enter the user name and password in the next dialog box and check the Make the User Administrator checkbox. If a weak password warning is displayed, double-click the Done button.
- After setting up the user and root password, click the Reboot button.
- Once the system restarts, the user will see the below initial setup screen.
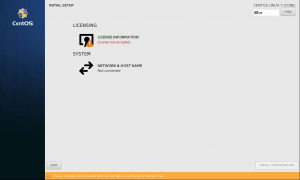
- Click the License Information option. After that, read and accept the License Agreement.
- After that, click on the user name and enter the password set up earlier.
- Now, users can see the CentOS desktop’s welcome screen.
- Select the default language from the drop-down in the welcome screen and click Next.
- Next, set up the keyboard preferences.
- Next, set the privacy and click Next to continue.
- Next, accept or deny the give color access to your location settings.
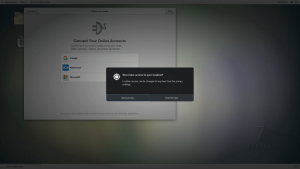
- Optionally, set up online accounts, such as Gmail, Microsoft, etc., for setting up mail and other services.
- Finally, click the start using CentOS button.
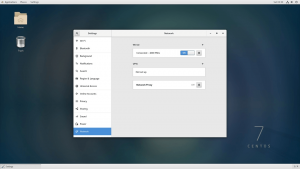
Step 10: CentOS: Network Setup
If CentOS is not able to access the internet, follow the below steps to enable network settings:
- Go to the Application section and click Settings.
- Select the Network option and turn on the Wireless connection setting.
Conclusion
This tutorial presents the steps to install CentOS 8.2 in VMware workstation 15 Pro. Hope this tutorial was helpful, and do reach out to us if you have any query or suggestions.


