Linode is an American-based cloud hosting company that offers Virtual Private Servers (VPS). The company’s name, “Linode”, is a portmanteau of the words “Linux” and “node”. Linode is the most comprehensive and independent open cloud provider serving businesses of all sizes. Cloud computing delivers computing services, such as storage, servers, networking, databases, intelligence, software, analytics, etc., over the cloud. The mission of Linode cloud is to accelerate innovation by making cloud computing simple and accessible to everyone. Linode cloud offers flexible resources, faster innovation, and economies of scale to all their customers. While using Linode cloud services, customers only need to pay for what they use, helping reduce the operating costs. In addition, Linode also helps to run the application infrastructure more efficiently. All the users of Linode cloud can scale up or down the resources whenever the business asks for them.
In this tutorial, we will learn the steps to enable and work with Linode Backup Service. The Backup Service offered by Linode is a subscription service add-on service provided by Linode that automatically performs the user’s daily, weekly, and bi-weekly backups. Linode Backup Services are easy to use, affordable, and provide peace of mind. Some of the features offered by Linode are:
Availability
The Linode’s Infrastructure as a Service (IaaS) platform is deployed across 11 global markets from its data centers around the globe. Linode Backup Services are available across all regions.
Easy and Configurable
Users can enable the Backup Service with a single click in Linode. It activates instantly, and the user’s first backups are scheduled automatically. Users can choose and configure when the Linode should generate their backups. It is recommended to select a two-hour window that is suitable for the user.
Fully Managed
Linode Backup Services is a managed service that automatically backs up the user’s Linode disks at regular intervals. It uses full-system backups to guard against accidental deletions or misconfiguration.
Enable the Backup Service
Users can use the Linode Cloud Manager to enable the Backup Service on a Linode. To enable the Backup services in Linode, follow the below steps:
1. First, log in to the Linode Cloud Manager and select the Linode that the user wants to back up from the Linodes page.
2. Click the Backups tab.
3. Finally, Click the Enable Backups option.
Now, the Linode Backup Service will be enabled for the selected Linode.
Manage Backups
Users can manage their backups with a simple web interface in the Linode Cloud Manager. Users no need to add any additional software to run the Backup services as it is an add-on service offered by Linode. To manage the backups, log in to the Linode Cloud Manager and go to the Linodes page by clicking on the link provided in the sidebar. After that, select a Linode, and then click the Backups tab.
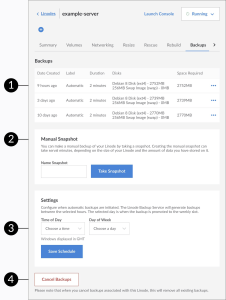
1. The backups interface will list all the available backups. Users can view the details of a backup, such as the created date, the label, the disks imaged, how long the backup took to be created, and the size of the resulting image.
2. Users can manually create a Linode backup by taking a manual snapshot.
3. Users can configure backup from the Schedule Backups section.
4. Also, users can cancel backups at any time. After canceling the user’s backups, they will have to wait 24 hours before re-enabling them again.
Schedule Backups
Users can configure Linode backups when automatic backups are initiated. To schedule backups in Linode, follow the below steps:
1. Select the Linode for which the user wants to schedule backups from the Linodes page.
2. Then, click the Backups tab.
3. Under Settings, select a time interval to schedule the backups from the Time of Day menu. The Linode Backup Service will generate all the backups between these chosen hours.
4. Then, from the Day of Week menu, choose a day. This day will promote backups to the weekly slot. Linode will perform the backup within the time period that the user’s specified in step 3.
5. Finally, click the Save Changes button.
The Linode Backup Service will backup the user’s Linode according to their specified schedule.
Take a Manual Snapshot
Users can make a manual backup of their Linode by taking a snapshot. To take a manual snapshot, follow the below steps:
1. First, choose the Linode for which we want to take a snapshot from the Linodes page.
2. Click the Backups tab.
3. Provide a snapshot name and click the Take Snapshot option under the Manual Snapshot section.
>> Note: Taking a new snapshot will overwrite the snapshot previously saved.
The Linode Backup Service can initiate manual snapshots. Creating the manual snapshot can take several minutes, depending on the size of the user’s Linode and the amount of data they have stored on it. Other Linode Cloud Manager jobs for this Linode will not run during this process.
Conclusion
This tutorial presents the basics of enabling and working with the Linode Backup Service. Hope this tutorial was helpful, and do reach out to us if you have any queries or suggestions.


