Hetzner Cloud is a well-known Internet hosting company and data center operator from Gunzenhausen, Germany. It provides best-in-class performance with the help of Intel® Xeon® Gold processor, AMD EPYC second Generation, and speedy NVMe SSDs. Hetzner Cloud also offers services that are good to go in seconds with incredible performance.
Uncomplicated Firewall, commonly known as UFW, provides an additional application wrapper for iptables for end-users to manage a Netfilter firewall. UFW has already been available on all Ubuntu installations since version 8.04 LTS. Users can also install it on any other Linux distribution. In this tutorial, we are going to the steps to set up simple firewall management with UFW in Hetzner Cloud.
Prerequisites
- Any server the user has at least root-access for with a Linux-based distribution. The recommended operating system to install UFW is Ubuntu or Debian.
- If the users are not working with the server’s root user, they may add the sudo command in front of all following console commands.
Set Up Simple Firewall Management with UFW
Step 1: Installing UFW
Ubuntu
By default, UFW is included in all operating system builds since Ubuntu 8.04 LTS and does not need to be installed later. If UFW is not available in the system or has to be reinstalled, this is possible by executing the following command:
$ apt-get install ufw
Debian
The installation package for UFW (Uncomplicated Firewall) is already in the official Debian package repository and can also be easily installed by executing the following package manager command:
$ apt-get install ufw
CentOS
Unfortunately, UFW is not included in the CentOS package repository by default. However, users can quickly install the package via the EPEL repository by executing the following command:
$ yum install epel-release -y
After the EPEL repository has been installed successfully, users can install UFW by executing the following EPEL repository command:
$ yum install --enablerepo="epel" ufw
Step 2: Getting Started with UFW
After successfully installing UFW in the user’s operating system, it is necessary to activate the UFW service, ensuring that UFW is also perfectly reactivated when the server is restarted. To set up UFW in Hetzner Cloud, follow the below steps:
Set up Default Policies
When getting started with UFW, there did not exist any rules. Setting up the default policies used as fallback rules is recommended once there is no explicit rule. We need to configure UFW (Uncomplicated Firewall) with the following commands to deny all incoming connections but allow all outgoing connections.
$ ufw default deny incoming
$ ufw default allow outgoing
These rules are not active yet, because we did not enable the UFW service at this point.
Allowing SSH Connections
If the users are working on a remote system via SSH, we should allow the SSH port or SSH service first. Otherwise, the user may need to lock themselves out of the system.
If the users are using the default SSH configuration, the SSH daemon listens at port 22. The users can use a shortcut to allow the connections to this port by:
$ ufw allow ssh
However, if the user’s SSH server listens to a different port, they can create a manual rule by executing the following command. In this tutorial, we are using the example port: 2222, as shown below:
$ ufw allow 2222/tcp
After this step, we need to enable UFW on the server.
Enable UFW
Once the user has configured a rule for their SSH server, they can enable UFW by executing the following command:
$ ufw enable
Maybe, The users will get a warning message which reminds them about creating a rule for SSH connections, and if the users have created this rule, they can confirm it by pressing y and clicking the ENTER button.
Now, the UFW firewall is enabled in the system, and the UFW service is active. Users can check the current status of UFW by executing the following command at any time:
$ ufw status
(Optional) Enable IPv6 with UFW
If the user is using IPv6, it is recommended to check the UFW configuration file for the option settings that enable the IPv6 component. For most systems, this option is already set. Users can open the UFW settings file using nano or any other text editor:
$ nano /etc/default/ufw
In the file, search for the key named IPV6 and set the value to yes as shown by the example down below:
IPV6=yes
Users can leave the file unchanged if the value is already set to yes as IPv6 for UFW is already enabled.
Step 3: Configure UFW
Adding a Rule
After setting up the basics for UFW, users can continue to add the connection rules, which may be important for the user. Users can do this in two different methods:
Option 1:
Users need to use this option when they are not using the application’s default ports or don’t want to take advantage of the pre-configured profiles from UFW.
The below example rule does open port 25 on top of the TCP protocol:
$ ufw allow 25/tcp
By modifying the port or protocol, for example, to UDP, when users need to allow a port for UDP connections, they can add every network-related application to the firewall list.
Option 2:
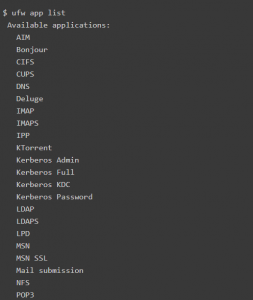
If the user is using default application ports, they can also use the shortcut configurations. To list the available services, users can execute the following command:
$ ufw app list
To enable one of the profiles listed in the output of the above command, users just need to call the UFW enable command using the service name as an argument, such as:
$ ufw allow IMAP
After executing the above command as a confirmation, UFW will inform the user of the rules/ports added to the list.
List Rules
To view all the enabled rules, users can execute the following command:
$ ufw status
Delete a Rule
The easiest way to delete a rule in UFW is to display the “List Rules” ‘s numbed version and apply the delete command.
First, execute the following command to list the numbed version:
$ ufw status numbered
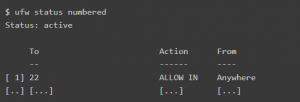
Then, execute the following command to delete the rule by inserting the number of the rule, such as:
$ ufw delete 1
Disable UFW
If the user needs to disable the UFW firewall for any debug purposes, they can trigger this by executing the following command:
$ ufw disable
Once the user wants to enable the firewall again, they can follow the instructions listed in Step 2.
Resetting UFW
To reset all rules and settings of UFW to the default values, execute the following command:
$ ufw reset
Conclusion
This tutorial presents the steps to set up simple firewall management with UFW in Hetzner Cloud. Hope this tutorial was helpful, and do reach out to us if you have any queries or suggestions.


