Microsoft Azure App Service is an HTTP-based service for REST APIs, hosting web applications, and mobile back ends. Users can develop these apps in their favorite language like Java, Ruby, .NET, .NET Core, Node.js, Python, or PHP. In addition, azure applications can scale and run on both Linux and Windows-based environments with ease.
ASP.NET web apps are cross-platform, and users can host them on both Windows and Linux. Azure App Service supports various versions of .NET apps and provides a self-patching and highly scalable web hosting service. In this tutorial, we will create and deploy an ASP.NET web app (.NET Core 3.1) to Azure App Service via the command-line interface. After this tutorial, you will have an Azure resource group consisting of an Azure App Service hosting plan and an App Service with a deployed ASP.NET web application.
Prerequisites
- An Azure account with an active subscription.
- The Azure Command Line Interface (CLI).
- The .NET Software Development Kit (SDK), including CLI and runtime. To install the latest .NET Core 3.1 SDK, visit: https://dotnet.microsoft.com/download/dotnet/3.1.
Create an ASP.NET Web Application
To create an ASP.NET web application, follow the below steps:
- First, log in to the system and open a terminal window to the working directory.
- Next, create a new .NET web app by executing the following dotnet new webapp command.
- After the installation, switch directories into the newly created app.
dotnet new webapp -n <app-name> -f netcoreapp3.1 && cd <app-name>
- From the same terminal session, run the application locally by executing the below command.
dotnet run
- Open a web browser and navigate to the app by using the following URL. If the creation was successful, Users could view the template ASP.NET Core 3.1 web app displayed on the page.
https://localhost:5001
Publish the Web App
To publish the web app, the user must first create and configure a new App Service to publish the app. Azure will create the following as part of setting up the App Service:
- A new hosting plan that specifies the size, location, and features of the web server farm that hosts the user app.
- A resource group to contain all of the Azure resources for the service.
To create the App Service and publish the web app, follow these steps:
- Deploy the code in the local directory (For example: MyFirstAzureWebApp) by executing the following az webapp up command.
az webapp up --sku F1 --name <app-name> --os-type <os>
– If the az command isn’t recognized, ensure that the Azure CLI is already installed. If not, install Azure Command Line Interface.
– In the above command, replace <app-name> with a unique name across all Azure (valid characters are 0-9, a-z, and -).
– The –-sku F1 argument creates the web app on the free pricing tier. Users can omit this argument to use a faster premium tier, which incurs an hourly cost.
– Replace <os> in the above command with either Windows or Linux. Users must use windows when they are targeting ASP.NET Framework 4.8.
– Users can also optionally include the argument –location <location-name> where <location-name> is an available Azure region.
- The above command may take a few minutes to complete. While running, it provides messages about creating the App Service Plan, the resource group, the hosting app, configuring logging, and then performing ZIP deployment. This will then outputs a message with the app’s URL, as shown below:
You can launch the app at http://<app-name>.azurewebsites.net
- Open a web browser and navigate to the above URL. In the above URL, replace <app-name> with the name of the web app.
Update the Web App and Redeploy
To update and redeploy the web app, follow the below steps:
- Open the Index.cshtml file in the local directory.
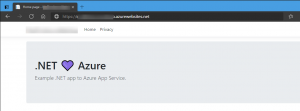
- Then, replace the first <div> element with the data, for example:
<div class="jumbotron">
    <h1>.NET   Azure</h1>
    <p class="lead">Example .NET app to Azure App Service.</p>
</div>
- Save the changes and redeploy the web app by executing the following az webapp up command. In the below command, replace <os> with either Windows or Linux.
az webapp up --os-type <os>
- The above command uses the cached values in the .azure/config file, including the resource group, app name, and App Service plan.
- Once deployment has completed, return to the browser window that opened in the Browse to the app step, and hit refresh.
Manage the Azure App
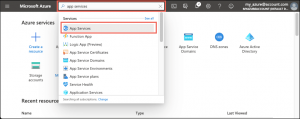
- To manage the web app, log into the Azure portal, and search and select App Services.
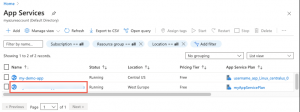
- Choose the name of the web app from the App Services page.
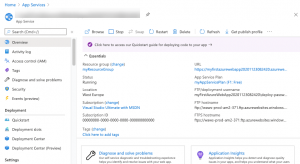
- The Overview page for the web app contains options for basic management like stop, start, restart, browse, and delete. The left menu provides further pages for configuring the app.
Clean Up Resources
In the steps mentioned above, the user has created Azure resources in a resource group. If they don’t expect to need these resources in the future, delete them by executing the following command in the Cloud Shell:
az group delete --name myResourceGroup
Conclusion
This tutorial presents the steps to create and deploy an ASP.NET web app (.NET Core 3.1) to Azure App Service via the command-line interface. Hope this tutorial was helpful, and do reach out to us if you have any query or suggestions.
