Docker is a centralized platform for packaging, running, and deploying applications. Before Docker, many users face the problem of a particular code running in the developer’s system but not in the user’s system. The main reason for developing Docker is to help developers develop applications quickly, ship them into containers, and deploy them wherever they want. Firstly, Docker was released in March 2013. Users mainly use Docker at the Deployment stage of the software development life cycle; that is why Docker can efficiently resolve issues related to the application deployment. Docker is an open-source centralized platform that helps to create, run, and deploy applications. In order to run applications on the host’s operating system, Docker uses containers. Docker allows applications to use the same Linux kernel rather than create a whole virtual operating system on the host system. Its containers ensure that the user’s application works in development, QA, test, or production environments. Docker offers components such as Docker client, Docker machine, Docker server, Docker composes, Docker hub, etc. In this tutorial, we will learn about the advantages of Docker and the steps to install it on Ubuntu and Windows systems.
Advantages of Docker
Some of the benefits offered by Docker are:
- Docker helps to run the container in seconds rather than minutes.
- Uses less memory and does not require an entire operating system to run applications.
- Offers lightweight virtualization.
- Uses application dependencies to reduce the risk.
- Allows users to use a remote repository to share their containers with others.
- It provides a continuous deployment and testing environment.
Docker Installation on Ubuntu
Users can install docker on any operating system, such as Mac, Linux, Windows, or any cloud. Natively, Docker Engine runs on Linux distributions. In order to install the Docker engine for Linux Ubuntu Xenial-16.04 [LTS], follow the below steps:
Prerequisites:
Docker needs two important installation requirements to work properly:
- It only works on a 64-bit Linux installation.
- Docker requires Linux kernel version 3.10 or higher. In order to check the user’s current kernel version, open a terminal and execute the following command to display the user’s kernel version:
$ uname -r
Step 1: Update apt Sources
Follow the below instructions to update apt sources:
1. First, open a terminal window and log in as a user with sudo privileges.
2. Next, update the package information and install the CA certificates by executing the following commands:
$ apt-get update
$ apt-get install apt-transport-https ca-certificates
3. Then, add and download the new GPG key by executing the following command:
$ sudo apt-key adv \
--keyserver hkp://ha.pool.sks-keyservers.net:80 \
--recv-keys 58118E89F3A912897C070ADBF76221572C52609D
4. Execute the following command to substitute the user’s operating system entry for the file.
$ echo "<REPO>" | sudo tee /etc/apt/sources.list.d/docker.list
5. Open the /etc/apt/sources.list.d/docker.list file and paste the following line into the file.
deb https://apt.dockerproject.org/repo ubuntu-xenial main
6. After that, update the apt package index by executing the following command:
$ sudo atp-get update
7. Then, verify that apt packages are pulling from the right repository by executing the following command:
$ apt-cache policy docker-engine
8. Finally, install the recommended packages by executing the following command:
$ sudo apt-get install linux-image-extra-$(uname -r) linux-image-extra-virtual
Step 2: Install the latest Docker Version
1. First, update the apt packages index by executing the following command:
$ sudo apt-get update
2. Execute the following command to install the Docker engine:
$ sudo apt-get install docker-engine
3. Next, start the docker daemon by executing the following command:
$ sudo service docker start
4. Finally, verify the Docker installation by running the hello-world image by executing the following command:
$ sudo docker run hello-world
The above command will download a hello-world (test) image and run it in a container. When the container runs, it will print a message and exit.
Docker Installation on Windows
Users can install Docker on any operating system, such as Windows, Mac, or Linux. The primary advantage of using Docker on Windows is that it can run natively on Windows without any virtualization. In order to install Docker on Windows, users need to download and install the Docker Toolbox. In order to install Docker on Windows, follow the below instructions:
1. First, download the Docker Toolbox by clicking on the below link:
https://download.docker.com/win/stable/DockerToolbox.exe
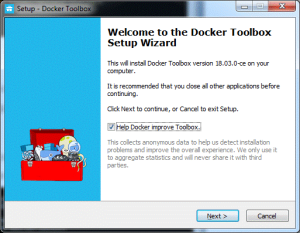
2. After downloading the DockerToolbox.exe file, double click on that file. When the following window appears on the screen, click the Next button.
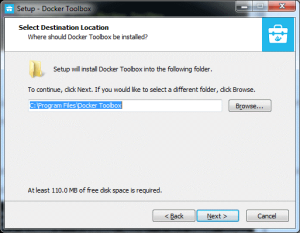
3. Next, browse the location where the user wants to install the Docker Toolbox and click the Next button.
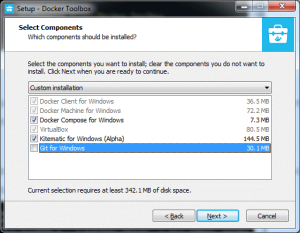
4. Then, select the components according to the user’s requirement and click the Next button.
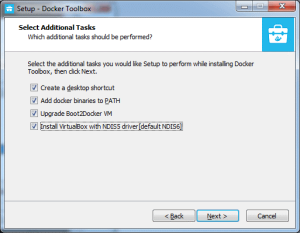
5. After that, select additional tasks from the next window and click the Next button.
6. Now, the Docker Toolbox is ready to install. Click the Install button.
7. Once the installation is completed, click the Finish button.
8. After the successful installation of the Docker Toolbox, the below three icons will appear on the screen:
- Docker Quickstart Terminal
- Kitematic (Alpha)
- OracleVM VirtualBox
9. After that, double-click on the Docker Quickstart Terminal icon.
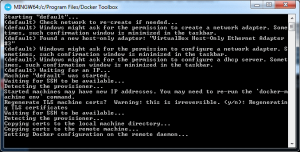
10. A Docker Quickstart Terminal window will appear on the screen, as shown below:
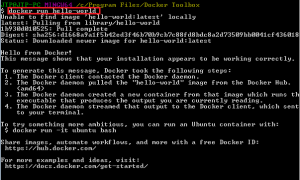
11. After successful installation of Docker, verify the installation by executing the below command and press the Enter key.
docker run hello-world
12. The below output would be visible on the screen if the installation were successful:
13. Finally, execute the following command to check the Docker version:
docker -version
Conclusion
This tutorial presents the advantages of Docker and the steps to install it on Ubuntu and Windows systems. Hope this tutorial was helpful, and do reach out to us if you have any queries or suggestions.


