Amazon Elastic Compute Cloud (EC2) offers scalable computing capacity for AWS Cloud users. Amazon EC2 eliminates the need to invest in hardware up front to deploy and develop applications faster. Users can use Amazon EC2 to launch, configure, and manage virtual servers, security networking, and storage. Amazon Elastic Compute Cloud also offers virtual computing environments, known as instances, for its users. Amazon EC2 enables users to scale down or up instances to handle changes in requirements or spikes in popularity, reducing the need to forecast traffic.
Prerequisites
Before setting up an Amazon Elastic Compute Cloud Windows instance, make sure the following is completed:
- Sign in to the AWS Account
- Create a key pair
- Create a security group
Launch a Windows Instance
Users can launch a Windows instance using the AWS Management Console by following the below procedure:
1. Open the Amazon EC2 console, and from the console dashboard, select Launch Instance.
2. The Choose an Amazon Machine Image (AMI) page shows a list of Amazon Machine Images (AMIs) that serve as templates for the user instance. From the list, choose the AMI for Windows Server 2016 Base or later.
3. Next, select the hardware configuration of the instance from the Choose an Instance Type page. By default, the t2.micro instance type is selected.
4. After selecting the instance type, click the Review and Launch button to let the wizard complete the other configuration settings for the user.
5. Click Next to go to the Review Instance Launch page.
6. Under the Security Groups section, customers can see that the wizard has created and selected a security group for the user. Customers can use this security group or select the security group they have created in the previous steps. Follow the below steps to choose the created security group:
– Go to the Edit security groups section.
– On the Configure Security Group page, make sure that the Select an existing security group option is enabled.
– Select the security group from the existing security groups drop-down and then select Review and Launch.
7. After selecting the security group, click Next to go to the Review Instance Launch page and click Launch.
8. When the system prompts for a key pair, select the Choose an existing key pair option and select a key pair.
>> Note: Don’t select the Proceed without a key pair option as the user can’t connect to the instance later.
9. Finally, select the acknowledgment check box and then click the Launch Instances button.
10. Users can view the status of the launch from the Instances screen. A confirmation page will notice that the instance is launching. Select View Instances to close the confirmation page and return to the console.
11. After the instance starts, the instance’s state changes to running and receives a public DNS name. (If the Public IPv4 DNS detail is hidden, click on the Settings icon in the top-right corner, toggle on Public IPv4 DNS, and click Confirm).
12. Customers can go to the Status check column to check the current status of the instance.
Connect to the Windows Instance
To connect to the Windows instance using an RDP client, follow the below steps:
1. Open the Amazon EC2 console, and from the console dashboard, select Launch Instances.
2. Select the instance and then choose the Connect button.
3. Next, choose the RDP client tab on the Connect to instance page, and then click Get password.

4. Choose Browse and navigate the private key (.pem) file that the user-created when they launched the instance. Select the file and choose Open to copy the entire contents of the file to this window.
5. Next, select Decrypt Password. The console will display the default administrator password for instance under the Password section, replacing the Get password link shown earlier. Save the password in a safe location. Note that this password is required to connect to the Windows instance.

6. Next, select the Download remote desktop file option. The user’s browser will prompt to either open or save the RDP shortcut file. When the user has finished downloading the file, click the Cancel button to return to the Instances page.
· If the user opened the RDP file, they would see the Remote Desktop Connection dialogue box.
· If the user saved the RDP file, navigate to their downloads directory, and open the RDP file to display the dialogue box.
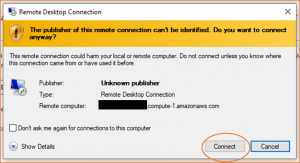
7. Users may get a warning that the publisher of the remote connection is unknown. Then, select the Connect button to continue to connect to the instance.
8. The administrator account is chosen by default. Copy and paste the password that the user has saved previously.
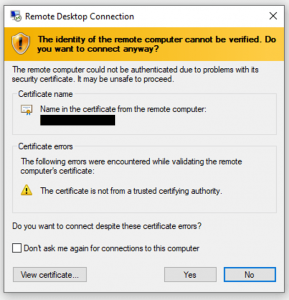
9. Due to the nature of self-signed certificates, users may get a warning that the security certificate could not be authenticated. Use the following steps to verify the remote computer’s identity, or choose Yes (Windows) or Continue (Mac OS X) if they trust the certificate.
a) If the users are using Remote Desktop Connection on a Windows computer, choose View certificate. If they are using Microsoft Remote Desktop on a Mac, choose Show Certificate.
b) Choose the Details tab, and scroll down to SHA1 Fingerprints (Mac OS X) or Thumbprint (Windows). This is the unique identifier for the remote system’s security certificate.
c) In the Amazon EC2 console, select the instance and choose Actions >> Monitor and troubleshoot >> Get system log.
d) In the system log output, look for RDPCERTIFICATE-THUMBPRINT. If this value matches the fingerprint of the certificate or thumbprint, verify the remote system’s identity.
e) If the users use Remote Desktop Connection on a Windows system, return to the Certificate dialogue box and choose OK. If they use Microsoft Remote Desktop on a Mac, return to the Verify Certificate and select Continue.
f) [Windows] Select Yes in the Remote Desktop Connection window to connect to the instance.
[Mac OS X] When prompted, log in using the default administrator account and the default administrator password recorded or copied earlier. Note that the user might need to switch spaces to see the login screen.
Terminate an Instance
To terminate an EC2 instance, follow the below steps:
- Login to Amazon Management Console and choose Instances from the navigation panel.
- Select the instance that you want to terminate from the list of instances.
- Choose Instance state >> Terminate instance.
- Click Terminate when prompted for confirmation.
Conclusion
This tutorial presents the process to set up, connect, and terminate an Amazon EC2 Windows instance in AWS. Hope this tutorial was helpful, and do reach out to us if you have any query or suggestions.


