
OVHcloud offers services for which the customers are responsible for their management and configuration. So, the customers are therefore responsible for ensuring they function correctly.
The failover IPs offered by OVHCloud allows user to associate multiple IP addresses with a single network interface. It is recommended to configure failover IP addresses on their instances, such as international services or hosting multiple websites. In this tutorial, you will learn how to add failover IP addresses to the network configuration in OVHCloud.
Prerequisites
The requirements to add failover IP addresses to the networking configuration are:
- an OVHCloud Account
- a Public Cloud instance
- a failover IP block or a failover IP address
- root/administrative access via SSH or GUI access to the instance
- basic administration and networking knowledge
Note: The first step is to log in to the instance via a GUI login session (RDP for a Windows instance) or SSH. The below process presumes that you are logged in as a user with elevated permissions (sudo/Administrator).
Some of the common terminologies that will be used in the code examples and instructions of this tutorial are:
| Term | Description | Example |
| IP_FAILOVER | A failover IP address assigned to the server | 162. 245. 10. 250 |
| NETWORK_INTERFACE | The name of the network interface | ens3, eth0 |
| ID | ID of the IP alias, starting with 0 (depending on the number of additional IPs there are to configure) | 0,1,2 |
Configure a Failover IP
Debian 10
The process to configure a failover IP in OVHCloud with Debian 10 instance is:
Step 1: Disable automatic network configuration.
- First, open the following file path using any of the text editors:
sudo nano /etc/cloud/cloud.cfg.d/99-disable-network-config.cfg
- Enter the following line on the file, then save and exit.
network: {config: disabled}
The above step will create the configuration file that will prevent automatic network configuration changes.
Step 2: Edit the Network Configuration File
- First, verify the network interface name by executing the below command.
ip a
- Open the network configuration file using any of the text editors.
sudo nano /etc/network/interfaces.d/50-cloud-init
- Add the following lines to the network configuration file.
auto NETWORK_INTERFACE:ID
iface NETWORK_INTERFACE:ID inet static
address IP_FAILOVER
netmask 255.255.255.255
Step 3: Restart the Interface
- After making the changes, restart the networking interface to apply the changes by executing the following command.
sudo systemctl restart networking
Ubuntu 20.04
The configuration file of the failover IP addresses is located in /etc/netplan/. In this example, it is called “cloud-init.yaml”. Before making changes on your server, verify the actual file name in the /etc/netplan/ folder. The user needs to add each failover IP address as a new line within the file. The process to configure a failover IP in OVHCloud with Ubuntu 20.04 instance is:
Step 1: Disable automatic network configuration.
- First, open the following file path using any of the text editors:
sudo nano /etc/cloud/cloud.cfg.d/99-disable-network-config.cfg
- Enter the following line on the file, then save and exit.
network: {config: disabled}
The above step will create the configuration file that will prevent automatic network configuration changes.
Step 2: Edit the Network Configuration File
- First, verify the network interface name by executing the below command.
ip a
- Open the network configuration file using any of the text editors.
sudo nano /etc/netplan/cloud-init.yaml
- Add the failover IP address according to the below example to the network configuration file without replacing the existing lines.
version: 2
ethernets:
    NETWORK_INTERFACE:
        dhcp4: true
        match:
            macaddress: fa:xx:xx:xx:xx:63
        set-name: NETWORK_INTERFACE
        addresses:
        - IP_FAILOVER/32
It is essential to respect the alignment of each element in this file, as represented in the above example. Do not use the tab key to create your spacing.
- After adding all the failover IP addresses, save and exit the file.
Step 3: Apply the new network configuration
- To test the configuration, execute the following command:
sudo netplan try
- If everything is working fine, apply the changes using the following command:
sudo netplan apply
- Repeat this procedure for each failover IP address.
Windows Server 2016
The process to configure a failover IP in OVHCloud with Windows Server 2016 instance is:
Step 1: Verify the Network Configuration
- Right-click on the Start Menu button and open Run. Type cmd and click OK to open the command line application.
- Retrieve the current IP configuration by executing the following at the command prompt.
ipconfig

Step 2: Change IPV4 Properties
- Now, change the IP properties to a static configuration. To open the adapter settings in the Windows control panel and then open the Properties of Internet Protocol Version 4 (TCP/IPv4).
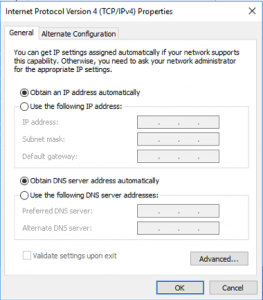
- In the IPv4 Properties window, select the Use the following IP address setting. Enter the IP address that you retrieved in the first step, and then click Advanced.
Step 3: Add the failover IP in the “Advanced TCP/IP Settings”
- In the new window, click on the Add button under the “IP addresses” section. Enter the failover IP address and the subnet mask (255.255.255.255).
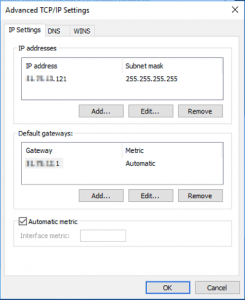
- Confirm the selection by clicking the Add button.
Step 4: Restart the Network Interface
- Back in the control panel (Network Connections), right-click on the network interface and select Disable.
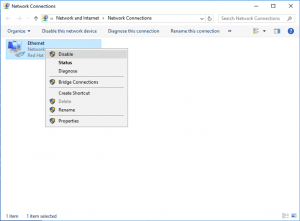
- Right-click on it again and then select Enable to restart it.
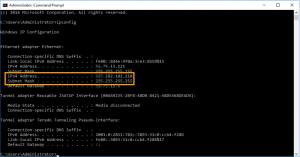
Step 5: Test the new Network Configuration
- To test the network configuration, open the command prompt (cmd) and enter ipconfig. The configuration should now include the new failover IP address.
Conclusion
This tutorial presents the steps to configure a failover IP address in OVHCloud. Hope this tutorial was useful, and do reach out to us if you have any queries or suggestions.


