
Hetzner Cloud, also commonly known as Hetzner Online, is a well-known data center operator and internet hosting company from Germany. Hetzner Cloud provides best-in-class performance with the help of Intel® Xeon® Gold processor, AMD EPYC second Generation, and speedy NVMe SSDs.
IPFire is a dedicated firewall that users can install in any network, like data center, home, etc. It is a fast, versatile, and secure open-source firewall based on Linux. Besides being a stateful inspection firewall, it can also analyze data packets with its Intrusion Prevention System (IPS) and work as a VPN gateway. In addition, IPFire comes with many add-ons that can extend its functionality further. Users can run IPFire in their new cloud products to protect the servers.
Installation of IPFire
However, Hetzner Cloud does not provide a ready-to-use IPFire image, so it needs to be installed manually. To install IPFire on Hetzner Cloud, follow the below steps:
Step 1: Register the Account
- First, register an account at https://www.hetzner.com/cloud.
- Set up the new account as per the user requirements.
- If required, create a new project.
Step 2: Set up Network
- To install IPFire as a firewall between the Internet and a local network, the user should create a new network. The user first needs to choose an IP address range and name for the network.
- It is always recommended to use a network size of something larger than /24. This recommendation helps to create subnets with /24 size inside the newly created network.
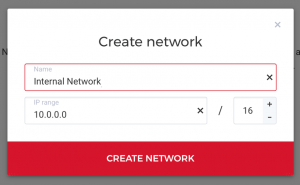
In the above screenshot, we will use the default size of 10.0.0.0/16, which will create a subnet 10.0.0.0/24 automatically. Also, the newly created network is named Internal Network.
Step 3: Create a new Server
- Users need to create a new server that will become an IPFire firewall later with the help of the default image. Users can use the default Ubuntu image or any other available in Hetzner Cloud.
- Users can select any instance size when creating the server, as that works fine with IPFire. If required, they can later upgrade the instance size but cannot downgrade it.
- As the following process, select the network we created in the previous step so that the server will have a second interface of the network configured.
- Finally, please provide a name for the server and run it.
- During server boot up, go to the ISO Images tab and mount the IPFire image by clicking the MOUNT button.
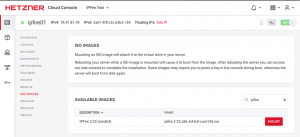
- After that, go to the Power tab and power cycle the server.
Step 4: Install IPFire
- After the previous step, the server will boot into the IPFire installer.
- Next, open the console to run the installer.
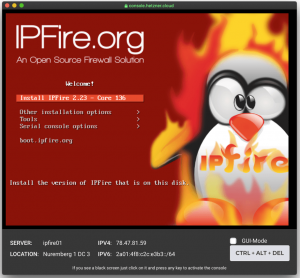
- Run the installation process like every other software installation:
– Select the language,
– Accept the license agreement,
– Create a partition and format the hard disk
– Extract the system to disk.
- After that, the system will reboot, and the user will be greeted with the installation boot menu again.
- Then, go back to the ISO Images tab again and click the UNMOUNT button to unmount the ISO image.
- Finally, power cycle the server again to boot it with the freshly installed system.
Step 5: Setting up IPFire
This routine will greet you to select the keyboard layout and other setups.
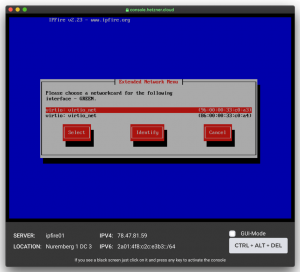
At the network configuration setup, select GREEN + RED, and assign the network interfaces as shown below. Unfortunately, there is no way to figure out which MAC address belongs to which networks, so the user may need to select something and swap them later.
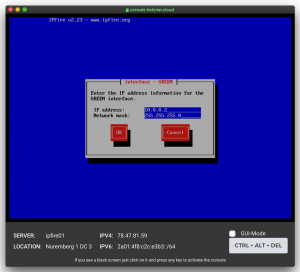
The GREEN Network Interface
In the GREEN network interface setup page, assign the IP address you observe in the Networking tab of the server for the internal network. In this example, it is 10.0.0.2. Of course, 10.0.0.1 will always be used as the default gateway, which we will need to configure in the upcoming steps.
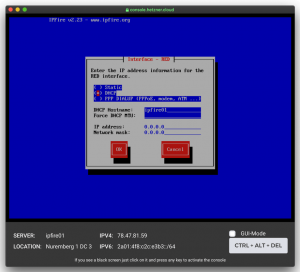
The RED Network Interface
Users can use DHCP to configure the RED interface automatically. A DHCP Server is a network server that automatically offers and assigns default gateways, IP addresses, and other network parameters to the server.
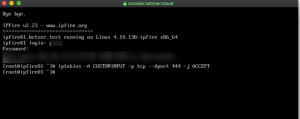
Enabling Temporary Web User Interface Access
Since the user does not have any services running on the GREEN network instance yet, they need to enable access to the Web User Interface over the Internet. This operation is done by opening port 444 temporarily by executing the following command:
iptables -A CUSTOMINPUT -p tcp --dport 444 -j ACCEPT
The above set rule will disappear after a reboot. So, it is recommended to set up IP-restricted access or an OpenVPN access to the web user interface. After that, the user will be able to log in to the web user interface by accessing the below URL. In the below URL, replace <your public IP> with the public IP address of the user.
https://<your public IP address>:444
If the user cannot log in to the web user interface, they likely need to swap the network card assignments mentioned above.
Static Routes for Green Network Interface
Since Hetzner is routing all the traffic over its cloud infrastructure, it does not allow access between the hosts on the internal network. Therefore, the user needs to send all the packets they need to the lowest address in their subnet, such as 10.0.0.1 in this case.
To reach hosts on the GREEN network interface from the IPFire system, the user needs to create a static route on the web User Interface routing everything destined to the network created to this address.
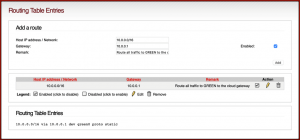
Users should configure all hosts on the GREEN network interface with their respective addresses, a subnet mask of 255.255.255.255. Also, the default gateway needs to be set to the gateway address, i.e., 10.0.0.1.
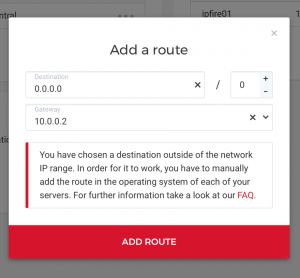
To let the Hetzner cloud know that all the traffic needs to be redirected to the firewall, users need to go back to the network settings and add a new route for 0.0.0.0/0 to the GREEN IP address of the firewall (10.0.0.2).
Conclusion
This tutorial presents the steps to get IPFire running on a Hetzner Cloud. Hope this tutorial was helpful, and do reach out to us if you have any query or suggestions.


