IBM Cloud platform combines Infrastructure as a Service (IaaS) with Platform as a Service (PaaS) to offer an integrated experience for their customers. IBM Cloud platform scales and supports both large enterprise businesses and small development organizations and teams. IBM Cloud is deployed across data centers around the globe, which helps customers reduce their website latency. The solutions deployed or built on IBM cloud accelerate fast and perform reliably in both supported and test environments that they can trust. IBM Cloud offers solutions that enable higher security, compliance, and management levels, with proven architecture methods and patterns for rapid delivery. IBM Cloud also helps to run mission-critical workloads with ease.
With the help of Satellite Link endpoints in IBM Cloud, users can connect to a server, application, or service that runs outside of the location from a client that runs within the user’s Satellite location, or vice versa. In this tutorial, we will learn how to link a database service on the IBM Cloud to a Satellite location and verify the connection by sending and receiving data.
Prerequisites
- An IBM Cloud Subscription or Pay-As-You-Go account.
- IBM Cloud administrator or IBM Cloud account owner access.
- An existing instance in IBM Cloud Object Storage service.
Steps:
To link a database service on the IBM Cloud to a Satellite location, follow the below steps. Also, note that approximately 30 minutes is required to complete the below steps successfully.
Step 1: Create a Satellite Location
In IBM Cloud Satellite, a satellite location represents a data center that users can fill with their infrastructure resources to run IBM Cloud services or other workloads on the Cloud infrastructure. To create a location, follow the below steps:
· Log in to the Satellite Locations dashboard and click the Create a Satellite location button.
· Click Edit in the Satellite location section of the page.
· Within the Name field, enter a custom name for the Satellite location.
· Next, select the region that the user wants to use to manage their Satellite location in the Managed from the list.
· After that, click Done editing.
· Finally, click the Create location button.
Step 2: Attach Hosts from the On-Premises Data Centers
Identify or create at least three host machines that meet the minimum hardware requirements in the on-premises environment. Hosts are machines that reside within the infrastructure. Ensure these host machines are located in physically separate racks (these are called zones in Satellite).
Follow the steps mentioned in the Getting Started with IBM Cloud Satellite tutorial to attach the hosts.
Step 3: Assign the hosts to the Satellite location control panel
· Click Assign host from the action’s menu of each host machine that the user attached.
· For the Cluster, select the Control panel.
· Next, select a unique zone such as zone-1 for the Zone.
· Click the Assign host button.
>> Note: IBM bootstraps the user machine when we assign the hosts to the control panel. The above process might take a few minutes to complete. During the bootstrapping process, the Health of the user system changes from Ready to Provisioning.
· Repeat these above steps for each host. Ensure that we assign each host to a different zone to spread all three hosts across three zones, such as zone-1, zone-2, and zone-3.
· Finally, verify that the user hosts are successfully assigned to the Satellite control panel from the Hosts tab. The assignment is successful when an IP address is added to the user’s host and the Health status changes to Normal.
Step 4: Create the OpenShift cluster
To create the Red Hat OpenShift on the IBM Cloud cluster that will live on the Satellite location, follow the steps mentioned in the “Creating OpenShift clusters in IBM Cloud Satellite” tutorial.
Step 5: Create a PostgreSQL database and link it to Satellite
A Cloud endpoint allows the user to securely connect to a server, application, or service that runs outside of the location from a client within the user’s Satellite location. For this tutorial, create a PostgreSQL database service and then link that service to the Satellite location.
5.1 Create the database service
· Choose the Databases for PostgreSQL service from the IBM Cloud catalog and click the Create button.
· Enter a name for the database and click the Create button.
· Then, click Service credentials in the navigation panel after the service is ready.
· Choose the New credential option and click Create.
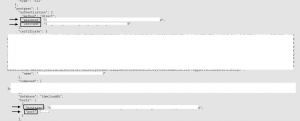
· Copy the hostname, username, password, and port, as shown in the following screen capture image. Users can use these service credentials to create an endpoint link for the Satellite location.
5.2 Link the database service to the Satellite location
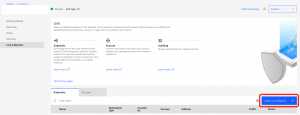
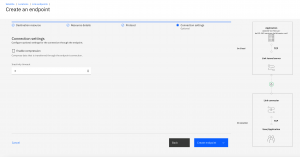
· As shown in the following screen capture, choose the Link endpoints tab.
· Next, click the Create an endpoint button.
· Select Cloud as the destination resource on the Create an endpoint page.
· After that, click the Next button.
· Mention a name in the Endpoint name field.
· Paste the hostname we copied when we created the PostgreSQL service credentials in the Destination URL or IP field.
· Paste the port number that we copied when we created the PostgreSQL service credentials in the Destination port field.
· After that, click the Next button.
· As demonstrated in the below screen capture image, leave the default values in the TLS options section and click the Next button.
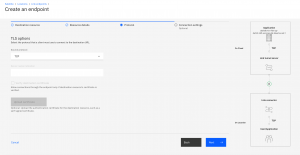
· Finally, click the Create endpoint button.
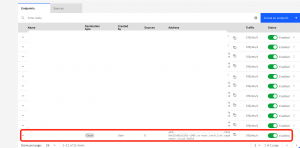
· It may take few moments to create an endpoint. After the endpoint is created, users can view it by clicking the Endpoints tab.
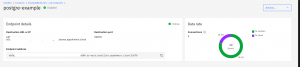
Step 6: Send data to the PostgreSQL database by using the Satellite endpoint
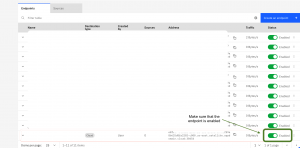
Ensure that the Satellite endpoint is enabled, as shown in the below screen. If the endpoint is not enabled, the user will not be able to send or receive data by using these endpoints.
· Copy the Satellite endpoint link that we created in Step 5.2.
· Copy the hostname, username, password, and port from the credentials we created in Step 5.1.
· Finally, go to the Satellite Link example GitHub repo and follow the steps mentioned in that repo to send and receive data using the Satellite endpoint.
Conclusion
With IBM Cloud Satellite, users can quickly address unforeseen challenges, innovate quickly, and leverage cloud computing benefits in any location. This document presents the steps to ink a database service on the IBM Cloud to a Satellite location and verify the connection by sending and receiving data. Hope this tutorial was helpful, and do reach out to us if you have any query or suggestions.


