The Cloud computing services offered by Oracle Corporation are commonly known as Oracle Cloud. The Oracle Cloud offers servers, storage services, networks, and more that get delivered to the customers using a global network that consists of several data centers managed by Oracle Corporation. To accomplish the database migration, follow the below steps:
- On the on-premises database host, import Data Pump Export (expdp) and export the on-premises database.
- Then, create a new databases service in Oracle Cloud.
- After that, connect to the Oracle Database Cloud Service compute node and use a secure copy utility to transfer the dump file to the Database Cloud Service node.
- Request Data Pump Import (impdp) and import the data into the database on the Oracle Database Cloud Service compute node.
- After importing the data successfully, delete the dump file.
The following tutorial shows an example of the entire process. The example illustrates a schema import and export. However, this procedure applies to exporting and importing a complete database, a table, or a tablespace. In this tutorial, we are assuming that the on-premises database is on a Linux host.
Export the On-Premises Database
To export the schemas on the on-premises database host, perform the following steps:
1. Create an Operating System (OS) directory on the on-premises database host to use for the on-premises database export files by executing the following command:
[oracle@cloud ~]$ mkdir -p /u01/app/dbpump
2. Next, invoke SQL*Plus and log in to the on-premises database as the SYS user by executing the following commands on the on-premises database host:
[oracle@cloud ~]$ sqlplus sys@PDB_PREM as sysdba
SQL*Plus: Release 12.1.0.2.0 Production on Sun Jul 18 16:05:26 2021
Copyright (c) 1982, 2014, Oracle. All rights reserved.
Enter Password:
Connected to:
Oracle Database12c Enterprise Edition Release 12.1.0.2.0 - 64bit Production
With the partitioning, OLAP, Advanced Analytics, and Real Application Testing options
3. Create a directory object in the on-premises database to reference the operating system directory:
SQL> create directory prem_to_cloud as '/u01/app/dpdump';
Directory created
4. After that, type exit to exit from SQL*Plus.
SQL> exit;
5. Finally, invoke the Data Pump Export utility as the SYSTEM user or another user with the DATAPUMP_EXP_FULL_DATABASE role on the on-premises database host and export the on-premises schemas. Enter the password for the user when prompted.
[oracle@cloud ]$ expdp system@PDB_PREM full=y directory=prem_to_cloud
Export: Release 12.1.0.2.0 - Production on Sun Jul 18 16:06:26 2021
Copyright (c) 1982, 2014, Oracle and/or its affiliates. All rights reserved.
Password:
Connected to: Oracle Database 12c Enterprise Edition Release 12.1.0.2.0 - 64bit
Production
With the Partitioning, OLAP, Advanced Analytics and Real Application Testing options
...
Create a New Instance of Oracle Database Cloud Service
To create a new instance of Oracle Database Cloud service, follow the below steps:
1. Log in to the Oracle Cloud services account and go to the Oracle Database Cloud Service page.
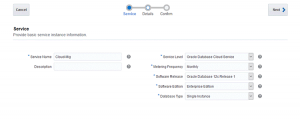
2. Next, create a new service:
a) For Service Name, enter Cloud-Mig.
b) From the Service Level list, choose Oracle Database Cloud Service.
c) Select whatever frequency is appropriate for the environment from the Metering Frequency list.
d) Choose Oracle Database 12c Release 1 from the Software Release list.
e) Next, select Enterprise Edition from the Software Edition list.
f) From the Database Type list, choose Single Instance.
3. Then, click Next to continue.
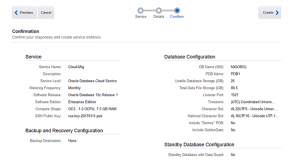
4. After that, do the following in the Service Details screen:
a) For DB Name (SID), enter MIGORCL.
b) Set an administrative password of the user’s choice and confirm the password (Note that this will be the user’s sys password).
c) Enter 25 as the value for Usable Database Storage (GB).
d) Select OC3 -1 OCPU, 7.5 GB RAM (this is the bare minimum required) from the Compute Shape list.
e) For SSH Public Key, enter the SSH Public key name. For example, rsa-key-20170111.pub.
5. Then, click Next to continue.

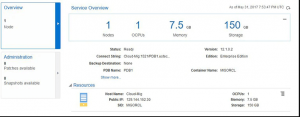
6. Finally, review all the configurations and click Create to create the Cloud database.
7. The Cloud database creation will take some time to complete successfully.
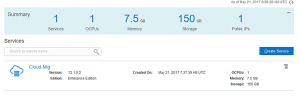
8. After that, click the service name (Cloud-Mig) to open the main page of the database.
9. Before connecting to the database instance on the cloud machine, enable the dblistener access rule and do the following:
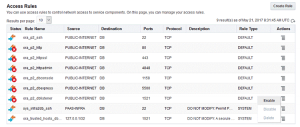
a) Open the database service and choose Access Rules from the menu.
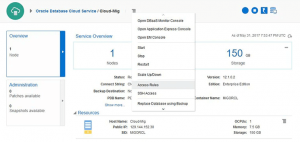
b) For the ora_p2_dblistener rule, select Enable from the Actions menu.
Connect to the Oracle Cloud Database, Transfer the Dump File, and Import the Data
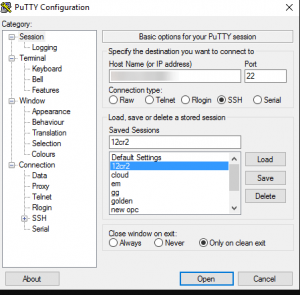
1. Open a PuTTY executable instance and connect to the Oracle Database Cloud Service compute node using the SSH public key.
2. Check the pluggable databases (PDBs) and the pmon process on the Oracle Database Cloud Service compute node:
[oracle@Cloud-Mig ~]$ ps -ef|grep pmon
oracle    311 32724 0 10:31 pts/1    00:00:00 grep pmon
oracle   7695     1 0 07:57 ?        00:00:00 ora_pmon_MIGORCL

[oracle@Cloud-Mig ~]$ sqlplus sys as sysdba
SQL*Plus: Release 12.1.0.2.0 Production on Sun Jul 18 10:31:42 2021
Copyright (c) 1982, 2014, Oracle. All rights reserved.
Enter Password:
Connected to:
Oracle Database 12c Enterprise Edition Release 12.1.0.2.0 - 64bit Production
With the Partitioning, Oracle Label Security, OLAP, Advanced Analytics
and Real Application Testing options

SQL> show pdbs
   CON_ID   CON_NAME     OPEN MODE      RESTRICTED
----------  	----------   		-----------    ------------
     2      PDB$SEED     READ ONLY      NO
     3      PDB1         READ WRITE     NO
3. Use the secure copy utility offered by Oracle Cloud to transfer the dump file to the Cloud Database Cloud Service compute node. In this below example, the dump file is copied to the /u01 directory. Users can choose an appropriate location on their server based on the file size that will get transferred.
a. Next, create a directory for the dump file on the Oracle Database Cloud Service compute node:
[oracle@Cloud-Mig admin]$ mkdir -p /u01/app/dump
b. Ensure that the SSH private key that provides access to the Oracle Database Cloud Service compute node is available on the on-premises host before using the scp command to copy the exported dump file.
c. After that, use the scp command on the on-premises database host to transfer the dump file to the Oracle Database Cloud Service.
[oracle@cloud dpdump]$ ls
expdat.dmp   export.log

[oracle@cloud dpdump]$ scp -i /home/oracle/rsa-key-20170111.ssh expdat.dmp oracle@129.157.129.107:/u01/app/dump

Enter passphrase for key '/home/oracle/rsa-key-20170111.ssh':
expdat.dmp               4%  2704KB 856.1KB/s   01:12 ETA
4. Import the data into the database on the Oracle Database Cloud Service compute node:
a. Invoke SQL*Plus on the Oracle Database Cloud Service compute node and log in to the database as the SYSTEM user.
[oracle@Cloud-Mig admin]$ sqlplus sys@pdprem2 as sysdba
SQL*Plus: Release 12.1.0.2.0 Production on Sun Jul 18 11:56:53 2021
Copyright (c) 1982, 2014, Oracle. All rights reserved.
Enter Password:
Connected to:
Oracle Database 12c Enterprise Edition Release 12.1.0.2.0 - 64bit Production
With the Partitioning, Oracle Label Security, OLAP, Advanced Analytics and Real Application Testing options
b. After that, create a directory object in the Oracle Database Cloud Service database.
SQL> create directory cloud_mig as '/u01/app/dpump';
Directory created.
c. If the directory object does not exist, create the tablespace(s) for the objects that will get imported.
d. Then, type exit to exit from SQL*Plus.
SQL> exit;
e. Next, invoke the Data Pump Import utility on the Oracle Database Cloud Service compute node and connect to the database. Import the data into the database.
[oracle@Cloud-Mig admin] $ impdb system@pdbprem2 full=y directory=cloud_mig
Import: Release 12.1.0.1.0 - Production on Sun Jul 18 12:24:39 2021
Copyright (c) 1982, 2014, Oracle and/or its affiliates.  All rights reserved.
Password:
Connected to: Oracle Database 12c Enterprise Edition Release 12.1.0.2.0 - 64bit Production
With the Partitioning, OLAP, Advanced Analytics and Real Application Testing options
...
5. After successfully importing the data, users can delete the expdat.dmp file.
Conclusion
This document presents the steps to migrate an on-premises source database, schema, tablespace, or table to an Oracle Database Cloud Service database deployment using Data Pump. Hope this tutorial was helpful, and do reach out to us if you have any query or suggestions.


