Windows Azure, lately renamed Microsoft Azure in 2014, is a public cloud computing platform offered by Microsoft to build, manage, and deploy services and applications through a global network of data centers. Azure provides a range of cloud services, such as analytics, computing, networking, storage, and much more. Azure is a public cloud provider with solutions including Software as a Service (SaaS), Infrastructure as a Service (IaaS), and Platform as a Service (PaaS).
Azure is a flexible, fast, affordable, and reliable cloud computing platform. The capabilities and pricing of this platform make it one of the best public cloud offerings in today’s market. Microsoft Azure App Service is an HTTP-based service for REST APIs, hosting web applications, and mobile back ends. Users can develop these apps in their favorite language like Java, Ruby, .NET, .NET Core, Node.js, Python, or PHP. In addition, azure applications can scale and run on both Linux and Windows-based environments with ease.
Users can create Azure Virtual Machines (VMs) through the command-line interface. The Azure command-line interface (CLI) creates, deletes, and manages Azure resources from the command line or scripts. This tutorial shows how to use the Azure command-line interface (CLI) to deploy a VM (virtual machine) in Azure that runs Windows Server 2016. To view the virtual machine in action, users need to RDP to the VM and install the IIS web server.
Launch Microsoft Azure Cloud Shell
The Microsoft Azure Cloud Shell is a free interactive shell that a user can use to run the steps in this tutorial. It has standard Azure tools preinstalled and configured to use with the user’s account.
To open the Cloud Shell, select Try it from the upper right corner of a code block. Users can also launch Azure Cloud Shell in a separate web browser tab by visiting https://shell.azure.com/bash. Select Copy to copy the code blocks, paste it into the Azure Cloud Shell, and press Enter to run it.
Create a Resource Group
Users can create a resource group with the az group create command. A Microsoft Azure resource group is a logical container that helps to deploy and manage Azure resources. The below example creates a resource group named testResourceGroup in the East-US location:
az group create --name testResourceGroup --location eastus
Create Virtual Machine
Users can create a virtual machine with the az vm create command. The below example creates a virtual machine named testVM. This example uses azure_user for an administrative user name.
The user will need to supply a password that meets the password requirements for Azure VMs. Users will be prompted to enter a password at the command line. They could also add the –admin-password parameter with a value for the user password. This user name and password created will be used later when the user connects to the Virtual Machine (VM).
az vm create \
    --resource-group testResourceGroup \
    --name testVM \
    --image win2016datacenter \
    --admin-username azureuser
It will take a few minutes to create the virtual machine and supporting resources. The below sample output shows the VM create operation was successful.
{
  "fqdns": "",
  "id": "/subscriptions/<guid>/resourceGroups/myResourceGroup/providers/Microsoft.Compute/virtualMachines/testVM",
  "location": "eastus",
  "macAddress": "00-0D-3A-23-9A-49",
  "powerState": "VM running",
  "privateIpAddress": "10.0.0.4",
  "publicIpAddress": "52.174.34.95",
  "resourceGroup": "testResourceGroup"
}
>> Note: Users need to note down the publicIpAddress in the output from the user’s VM. This address is used to access the VM in the next steps.
Open port 80 for web traffic
By default, only Remote Desktop Protocol (RDP) connections are opened when the user creates a Windows virtual machine in Microsoft Azure. Users can run the az vm open-port to open TCP port 80 for use with the IIS web server:
az vm open-port --port 80 --resource-group testResourceGroup --name testVM
Connect to the Windows Virtual Machine
Users can use the following command to create a remote desktop session from their local system. In the below command, replace the IP address with the public IP address of the user’s virtual machine (VM). When prompted, enter the credentials used when the VM was created:
mstsc /v:publicIpAddress
Install Web Server
To view the Windows virtual machine in action, install the IIS web server. Open a PowerShell prompt on the VM and execute the following command:
Install-WindowsFeature -name Web-Server -IncludeManagementTools
After that, close the Remote Desktop Protocol (RDP) connection to the virtual machine.
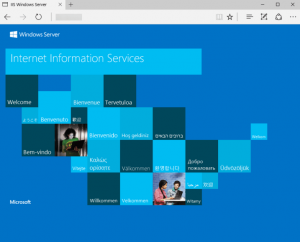
View the Created Web Server in Action
With Internet Information Services (IIS) installed and port 80 now open on the user’s virtual machine (VM) from the Internet, use a web browser of their choice to view the default IIS welcome page. Users can use the user’s virtual machines (VM) public IP address obtained in a previous step. The below example shows the default IIS website:
Delete or Clean Up Resources
When no longer required, users can use the az group delete command to remove the resource group, virtual machine, and all related resources:
az group delete --name testResourceGroup
Conclusion
This tutorial presents the steps to create and manage Microsoft Azure resources from the command-line interface or scripts. Hope this tutorial was helpful, and do reach out to us if you have any query or suggestions.


