First, let’s talk about why we decided to move away from the legacy ways of accessing the servers. When we say legacy server access methods, most organizations and companies still use password-based and key-based authentications, and it’s not that outdated. For our technicians to access the servers, we thought we needed something better and advanced because the number of servers that we manage and maintain keeps increasing day by day. In our new system, we are using the SSH key-based authentications to connect client servers, but from a fully secured gateway platform and our automation platforms are also using SSH key-based authentication securely. Our technicians won’t get access to the private key file on our secured gateway, and we even have a feature of automated rotation of SSH keys on the new system. In the past, we were using direct login to the client servers using shared private keys or passwords, but that has a lot of security threats and we developed a new setup based on an open-source software by customizing it and named it as SHConnect during our v2 launch. However, that open-source system also had drawbacks with failure in frequent updates and also a service agent must be installed on client servers. We were developing an in-house SSH gateway system due to these reasons, and finally this is ready and we replaced the SHConnect with our own home tool.
The first thing we did was listed out all the important features of our old SHConnect system to implement in our new in-house system and also connected it with our centralized SSO (Single Sign-On) system to secure our staff access with 2FA. Also, we wanted to provide few more layers of security for our customers, better logging, screen recordings of server activities that we perform, and also a uniform and more secured access using the new SHConnect.
SHConnect – Our new and advanced way to access servers securely.
SHConnect is an advanced and more secure server authentication method that our team uses to remotely access servers, web applications, Kubernetes clusters, and databases across all environments.
The features offered by this new authentication method are:
- This new approach is more secure than the commonly used shared SSH key-based and password-based authentication methods.
- There is no need for clients to provide server root passwords.
- The ServerHealers team will create a sudo user by running a script, and all the access to the server will be through this dedicated sudo user. No direct root access is allowed in the servers.
- This new tool uses the default SSH service installed on your server to access, but in a secure way of fully protected private keys. There is no need of any extra agent to be installed as before.
- All staff-level activities are logged on our system, along with access logs, per-staff history logs, restricted commands, and even video screen recordings of all the server activities that we perform.
- The staff-level access to our new SHConnect gateway is set up through our SSO (Single Sign-On) system with two-factor authentication (2FA) for better security.
- The SHConnect shell environment only allows limited commands.
- The staff server access sessions and access logs are kept remotely.
- The system will monitor client server access daily basis and report if there are any issues to our chat system.
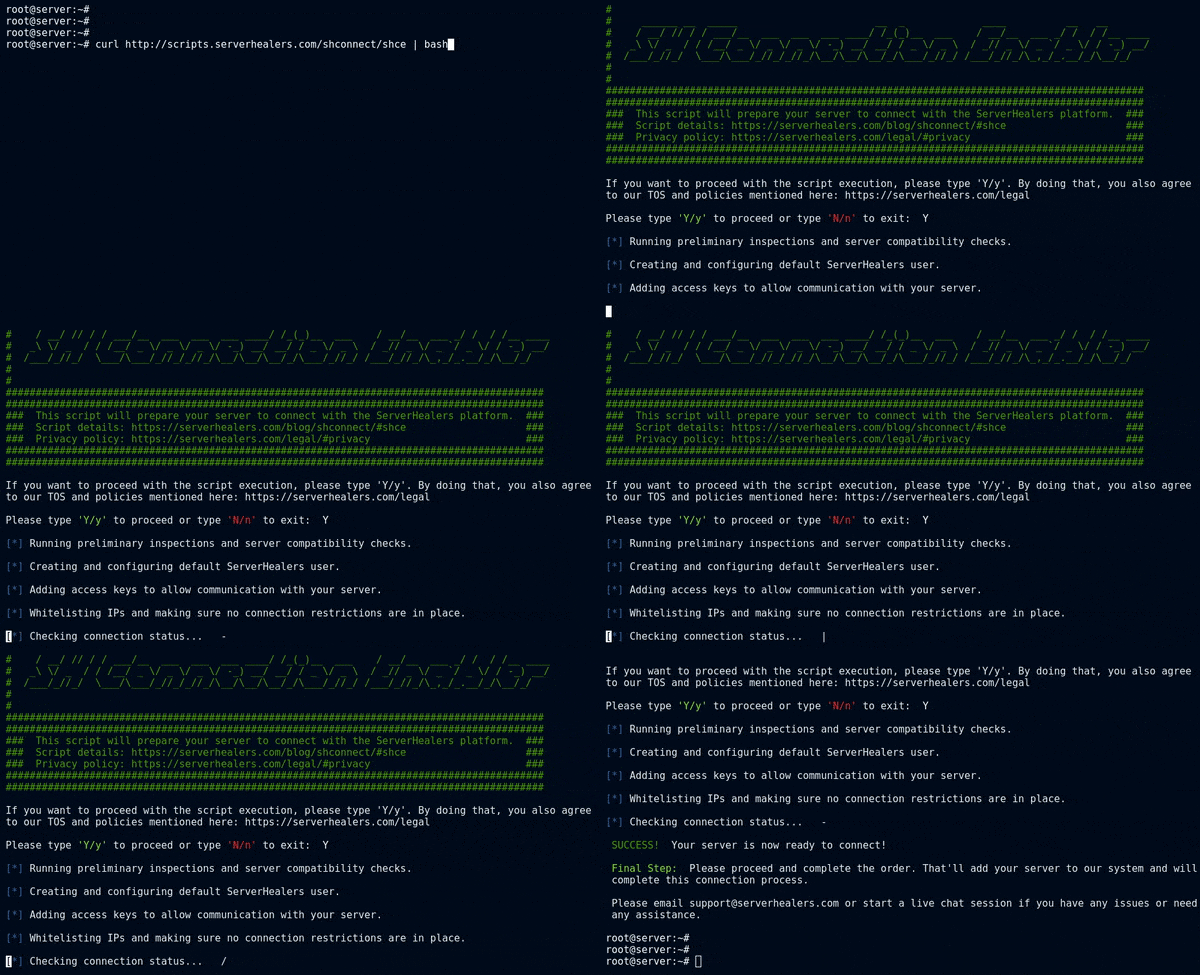
“SH Connection Enabler” Script
You will need to log in to your Linux-based server as the root user and execute the “SH Connection Enabler” script given below to make your server ready to connect with the ServerHealers Ansible-based automation platform. ( After running the script given below, please proceed and complete the order and that’ll complete the connection process. )
curl -s scripts.serverhealers.com/shconnect/shce | bash

This script will modify a few files on your server. Those are given below and the reason for the modification.
| File | Modification |
| /home/shconnect | Create a home directory for the ServerHealers dedicated user. |
| /etc/passwd | Add the newly created dedicated user in this file. |
| /etc/groups | Add the newly created dedicated user in this file. |
| /etc/sudoers.d/serverhealers | Add sudo privileges to the created dedicated user. |
| /home/shconnect/.ssh/authorized_keys | Add ServerHealers system backup keys to this file. |
| /etc/ssh/sshd_config | Modify this file only if the below entry/restriction exists: AllowUsers variable adjustment |
| /etc/hosts.allow | Modify this file only if the below entry/restriction exists: Host Access Control adjustment |
| /var/log/serverhealers_connect.log | Create this log file to store the ServerHealers Connection Enabler script. |
| Whitelist ServerHealers IP address (CSF/APF/Imunify360/UFW/Firewalld) | Whitelist the ServerHealers office/system IP addresses on the firewall. |
“SH Connection Remover” Script
Log in to your Linux-based server as the root user and execute the “SH Connection Remover” script below to remove and disconnect your server from all ServerHealers platforms. This script will also revert all the changes made by the “SH Connection Enabler” script.
curl -s scripts.serverhealers.com/shconnect/shcr | bash

We hope this article was helpful, and do reach out to us if you have any queries or suggestions.


