
Linode is an American-based cloud hosting company that offers Virtual Private Servers (VPS). The company’s name, “Linode”, is a portmanteau of the words “Linux” and “node”. Linode is the most comprehensive and independent open cloud provider serving businesses of all sizes. Cloud computing is the delivery of computing services, such as storage, servers, networking, databases, intelligence, software, analytics, etc., over the cloud. The mission of Linode cloud is to accelerate innovation by making cloud computing simple and accessible to everyone.
Linode Kubernetes Engine (LKE) is a fully managed container orchestration engine for managing and deploying containerized applications and workloads. Linode Kubernetes Engine combines Linode’s simple pricing and ease of use with the infrastructure efficiency of Kubernetes. With the help of LKE, users can get their workloads and infrastructure up and running in minutes instead of days. In this tutorial, we will learn the steps to create and delete a Linode Kubernetes Engine (LKE) cluster.
Install Kubernetes Command-line Tool (kubectl)
Before creating a cluster with Linode Kubernetes Engine, we need to install kubectl on the local system. To install kubectl, follow the below steps:
macOS:
To install kubectl on macOS, execute the following command:
brew install kubernetes-cli
Linux:
In order to install kubectl on a Linux-based system, follow the below steps:
1. First, download the latest Kubectl release by executing the following command:
curl -LO https://storage.googleapis.com/kubernetes-release/release/$(curl -s https://storage.googleapis.com/kubernetes-release/release/stable.txt)/bin/linux/amd64/kubectl
2. Next, run the following command to make the downloaded kubectl file executable:
chmod +x ./kubectl
3. Finally, move the command into the user’s path by executing the following command:
sudo mv ./kubectl /usr/local/bin/kubectl
Windows:
Visit the Kubernetes Documentation page for the link to the latest kubectl Windows release.
Create a Linode Kubernetes Engine (LKE) Cluster
To create an LKE cluster, follow the below steps:
1. Log in to the Linode Cloud Manager account.
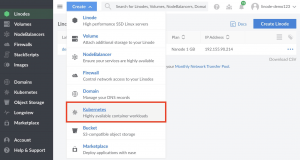
2. From the Linode dashboard, click the Create button on the top right-hand side of the screen.
3. Select Kubernetes from the drop-down menu.
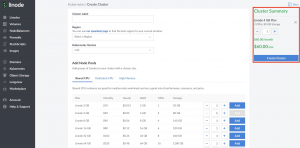
4. At the top of the Create a Kubernetes Cluster page, users are required to select the following options:
· In the Cluster Label field, enter a name for the LKE cluster. This name is how the user identifies their cluster in the Cloud Manager’s Dashboard. The LKE cluster name must be unique between all of the clusters on the account.
· Select the Region where the user would like their cluster to reside from the Region drop-down.
· From the Version drop-down menu, select a Kubernetes version to deploy to the LKE cluster.
5. Select the hardware resources for the Linode worker node(s) that make up the LKE cluster in the Add Node Pools section. To the right of each plan, select the minus – or plus + to remove or add a Linode to a node pool one at a time.
6. After adding the desired number of nodes in a node pool, click the Add button to include it in the configuration. If the user decides they need more or fewer hardware resources after deploying their LKE cluster, they can always edit the Node Pool.

7. After adding the pool to the configuration, it gets listed in the Cluster Summary on the right-hand side of the Linode Cloud Manager, detailing the cluster’s hardware resources and monthly cost.
8. Users can add additional pools before finalizing the cluster creation process by repeating the previous step for each additional pool.
9. Finally, click the Create Cluster button on the right-hand side of the screen. On the next page, the cluster’s detail page appears along with Node Pools details. Users can access their Kubeconfig file, edit their existing Node Pools, and view an overview of the cluster’s resource details from this page.
Access and Download the Kubernetes Configuration
Anytime after the LKE cluster is created, users can download its kubeconfig file. The kubeconfig is a YAML file that will allow the user to use kubectl to communicate with the LKE cluster. To interact with the LKE cluster with kubectl from the command line, download the kubeconfig file by following the below steps:
1. To access the cluster’s kubeconfig, log into the Cloud Manager account and navigate to the Kubernetes section.
2. From the Kubernetes listing page, click on the cluster’s more options ellipsis and select Download kubeconfig. This will save the kuberconfig file into the computer’s Downloads folder.

3. To improve security, change the file permissions to be only accessible by the current user by executing the following command:
chmod go-r /Downloads/kubeconfig.yaml
4. Next, open a terminal shell and save the kubeconfig file’s path to the $KUBECONFIG environment variable by executing the following command:
export KUBECONFIG=~/Downloads/kubeconfig.yaml
> Note: It is standard practice to store the kubeconfig files in the ~/.kube directory. By default, kubectl will search for the configuration file named config in the ~/.kube directory. But users can specify other kubeconfig files by setting the $KUBECONFIG environment variable, as done in the step above.
5. Finally, execute the following command to view the cluster’s nodes.
kubectl get nodes
Delete an LKE Cluster
Users can delete an entire LKE cluster using the Linode Cloud Manager. Note that these changes cannot be reversed once completed. To delete an LKE cluster, follow the below steps:
1. First, log into the Cloud Manager and click the Kubernetes link in the sidebar. The Kubernetes listing page will display all the clusters.
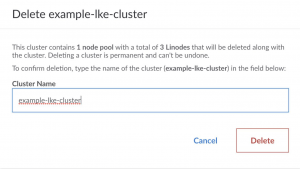
2. Select the More Options Ellipsis to the right of the cluster that the user wants to delete, and select the Delete option:

3. Enter the cluster’s name and click the Delete button in the pop-up window to confirm.
4. After the deletion, users can no longer see the cluster name in the Kubernetes listing page.
Conclusion
This tutorial presents the steps to create and delete a Linode Kubernetes Engine (LKE) cluster. Hope this tutorial was helpful, and do reach out to us if you have any query or suggestions.


