VMware is a California-based company that develops a virtualization platform for IT infrastructure. VMware was established in 1998 and is well known for its vSphere VMware Hypervisor. The vSphere VMware Hypervisor enables Virtualization for any type of architecture. Five different IT experts developed VMware software in the year 1998.
VMware develops various software applications related to Virtualization and is one of the leading virtualization software providers in today’s market. VMware formally launched VMware Workstation as its first product in 1999.
Later in 2001, VMware released their server application, “VMware GSX Server”. VMware then started launching additional products and services related to Virtualization to their inventory. VMware products and services are categorized into two types:
- Server application
- Desktop applications
VMware is a virtualization program that helps to introduce multiple operating systems on a single system or server. VMware customers can run or test different operating systems without modifying anything in the system.
VMware-workstation is compatible with all versions of Linux and Windows and can also be installed on 64-bit systems. Running a VM (virtual machine) on a system has never been simpler. With the help of a hypervisor, users can use a server to share their resources to create multiple virtual ones.
VMware Workstation Pro is a virtualization software or application that works as a hosted hypervisor. Users can install Hosted hypervisors on top of the operating system. This installed hypervisor will support the user to add multiple guest operating systems using the resources of the physical system.
To install and configure VMware Workstation Pro on Ubuntu 18.04, follow the below steps:
Prerequisites
The requirements to install a VMware Workstation Pro on Ubuntu 18.04 system are the following:
- A system installed with Ubuntu.
- A user with sudo permissions or privileges
- Terminal or command-line access
- Ubuntu system with pre-loaded apt tool.
Install and Configure VMware Workstation Pro on Ubuntu 18.04
To install and configure VMware Workstation Pro on Ubuntu 18.04, follow the below steps:
Step 1: Update the System
- First, open a terminal and execute the following command to make sure that the system is up to date :
$ sudo apt update
$ sudo apt -y upgrade
$ sudo apt -y dist-upgrade
- After that, reboot the system. To reboot the system, execute the following command :
$ sudo reboot
or
$ init 6
Step 2: Download VMware Workstation Pro
To install VMware Workstation Pro, first, download the binary package of VMware Workstation Pro onto the system. The advised practice is to find the latest stable version on the official VMware website and then download that version. To install the newest version of VMware Workstation Pro, follow the below process:
- Open any web browser on the system and visit the official VMware website.
- Next, navigate to the Try VMware Workstation Pro page by following the below path: Apps & Cloud >> All Products >> Workspace>> Desktop Hypervisor >> Workstation Pro >> Try VMware Workstation Pro
- Since we are installing on Ubuntu 18.04, find the installation software that supports Linux distributions and click the Download Now button.
- Select the Save File option and wait until the download is complete.
Step 3: Install Prerequisites
The main prerequisites needed to install VMware Workstation on a system are GNU Compiler Collection and Build Essential. If these are not available in the system, install them with the following steps:
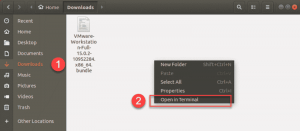
- First, go to the Downloads folder.
- Right-click on the window and select the Open in Terminal option from the drop-down.
- Before installing any application or software, ensure to update the package repository of Ubuntu by executing the following command:
$ sudo apt update
- After that, install the prerequisites, GNU Compiler Collection and Build Essential, which we will later use during the installation process. To install the prerequisites, execute the below command:
$ sudo apt install gcc build-essential
- Press y and hit the ENTER key to confirm the installation.
Step 4: Extract VMware Installer
Before proceeding on with the formal installation process, extract the downloaded VMware file. For the same, follow the below steps:
- First, list all the files in the Downloads directory by executing the following command:
$ ls
- Copy the full file name from the output of the above command.
- Next, extract the file by executing the below command. In the below command, replace <file name> with the full VMware file name that the user has copied in the above step.
$ sudo ./<file name>
Example: $ sudo ./VMware-workstation-Full-16.0.2-10961185_64.bundle
- The command output will be:
- When the file extraction is completed, the system will automatically open the VMware Workstation Installer window.

Step 5: Install VMware WorkStation
- Once the VMware Workstation Installer is launched, go through the steps by selecting the configuration preferences and click Next.
- After the installation is completed, the system will display an Installation was successful notification.
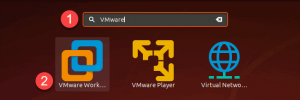
- Next, search and open the VMware Workstation by typing the name in Ubuntu Dash and clicking on the icon.
- Before it opens the VMware Workstation’s Home window, the system will ask for the following:
– Enter a license key
– Try the software for 30 days for free.
- Once the preference is selected, it will open VMware Workstation, and users can start creating and managing their VMs.

Conclusion
This tutorial presents the steps to install and configure VMware Workstation on Ubuntu 18.04. Hope this tutorial was helpful, and do reach out to us if you have any query or suggestions.


