
Kernel-based Virtual Machine (KVM) is an accessible, free, open-source virtualization technology built into Linux. Kernel-based Virtual Machine (KVM) is a virtualization module that allows the kernel to function as a hypervisor. KVM allows a host system to run multiple, isolated virtual environments named virtual machines (VMs) or guests. KVM was merged with the mainline Linux kernel from version 2.6.20, released on February 5, 2007. Kernel-based Virtual Machine (KVM) requires a processor with hardware virtualization extensions, such as AMD-V or Intel VT. KVM can also be ported to other operating systems such as illumos and FreeBSD as loadable kernel modules. As a Linux-based operating system, Ubuntu supports a wide range of virtualization solutions. A type 2 hypervisor helps users run isolated instances of other operating systems inside a host system. Aside from typical third-party applications, such as VMWare and VirtualBox, the Linux kernel has its own virtualization module called KVM (Kernel-based Virtual Machine). In this tutorial, we will learn the steps to install and set up KVM on Ubuntu 20.04 system.
Prerequisites
- A system running Ubuntu 20.04.
- A user with sudo privileges.
- Access to the command-line or terminal.
Check Virtualization Support
1. Before installing Kernel-based Virtual Machine (KVM) on Ubuntu system, ensure that the system’s CPU supports hardware Virtualization (server virtualization) by executing the following command:
egrep -c '(vmx|svm)' /proc/cpuinfo
Sample Output:

If the above command returns the value as 0, the system’s processor cannot run Kernel-based Virtual Machine (KVM). On the other hand, any other number indicates that we can proceed with the installation.
2. Check if the system can use Kernel-based Virtual Machine (KVM) acceleration by executing the following command:
sudo kvm-ok
Sample Output:

If the kvm-ok command returns an error, users cannot use KVM acceleration in the system. Before proceeding, try solving the problem by installing the cpu-checker.
3. To install the cpu-checker, execute the following command:
sudo apt install cpu-checker
4. After the installation, restart the terminal.
Install Kernel-based Virtual Machine (KVM)
To enable KVM Virtualization on Ubuntu 20.04 system, perform the following steps:
Step 1: Install KVM and its Related Packages
In order to install KVM and its related packages using apt package manager, follow the below steps:
1. First, update the system repositories by executing the following command:
sudo apt update
2. Then, execute the following command to install essential KVM packages:
sudo apt install qemu-kvm libvirt-daemon-system libvirt-clients bridge-utils
3. The above command will start the installation of four KVM packages.

4. When prompted, type y and press the ENTER key.
5. Finally, wait for the installation to complete.
Step 2: Authorize Users to Run Virtual Machines
To authorize users to run virtual machines, follow the below steps:
1. Only members of the libvirt and kvm user groups can run virtual machines in the system. To add a user to the libvirt group, execute the following command. Replace <username> with the user’s actual name in the below command.
sudo adduser ‘<username>’ libvirt
2. After that, execute the following command to add the same user to the kvm user group. Replace <username> with the user’s actual name in the below command.
sudo adduser ‘<username>’ kvm
>> Note: To delete a user from either libvirt or kvm user group, replace adduser with deluser in the above commands.
Step 3: Verify the Installation
1. To confirm if the KVM installation was successful, execute the following virsh command:
virsh list --all
Sample Output:

2. Also, users can use the systemctl command to check the status of libvirtd:
sudo systemctl status libvirtd
If the installation were successful, the output would return an active (running) status as shown below:
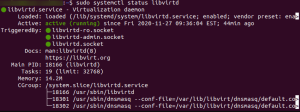
3. Then, press Q to quit the status screen.
4. If the Virtualization daemon is not active, execute the following command to activate it:
sudo systemctl enable --now libvirtd
Create a Virtual Machine on Ubuntu 20.04
1. Before creating the VMs, execute the following command to install virt-manager, a tool for managing and creating virtual machines.
sudo apt install virt-manager
2. When prompted, type y and press the ENTER key. After that, wait for the installation to complete.
3. Finally, make sure to download an ISO containing the operating system that the user wishes to install on a VM and proceed with any methods below to start the installation.
Method 1: Create VM using Virt Manager GUI
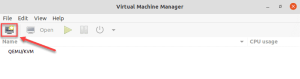
1. First, execute the following command to start the Virt Manager.
sudo virt-manager
2. Click the computer icon in the upper-left corner of the first window.
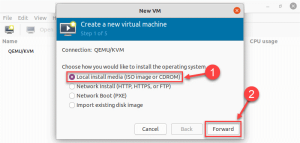
3. On the next page, select the installation option as Local install media (ISO image or CDROM) from the options. Then, click the Forward button.
4. Click the Browse Local button in the next dialog box and navigate to the user’s path to store the ISO that they wish to install.
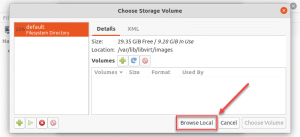
5. After selecting the ISO image, click the Forward button.

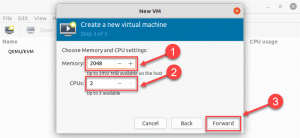
6. Specify the memory (RAM) and CPU settings and click the Forward button.
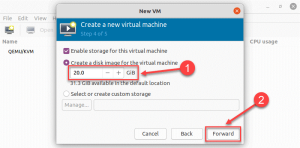
7. On the next page, allocate the hard disk space for the VM and click the Forward button.
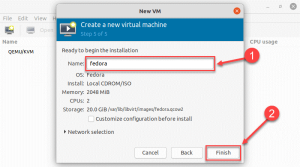
8. Next, specify the virtual machine’s name and click the Finish button.
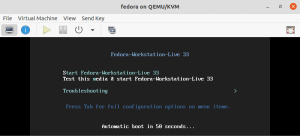
9. The virtual machine will start automatically, prompting the user to install the ISO file’s operating system.
Method 2: Create VM using Command-Line
To create a virtual machine using a Linux terminal, use the following syntax:
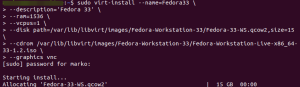
virt-install --option1=value --option2=value ...
Example: The below screenshot displays the command to install Fedora 33 Workstation.
Options:
| Option | Description |
| — name | Specify the name of the VM. |
| — description | Enter a short description of the VM. |
| — vcpus | Mention the number of virtual CPUs that the user wishes to allocate to the VM. |
| — ram | Specify the memory (RAM) that the user wishes to allocate to the VM. |
| — disk | Specify the VM location on the user’s disk. (If the user mentions a disk file that does not exist, the system will automatically create them.) |
| — graphics | Specify the display type. |
| — cdrom | Mention the location of the downloaded ISO file. |
Conclusion
This tutorial presents the steps to install and set up a Kernel-based Virtual Machine (KVM) on Ubuntu 20.04 system. Hope this tutorial was helpful, and do reach out to us if you have any queries or suggestions.


