
Short Proxmox VE or Proxmox Virtual Environment is a free, Open Source server virtualization software based on Debian Linux with an RHEL kernel, modified to allow the user to deploy and create new virtual machines for private servers and containers. Proxmox offers two types of virtualization: full virtualization with KVM and containers with LXC. It gives the user an easy way to install and configure virtual machines (VMs) from a web browser with Iced tea, a Java plugin. Proxmox offers excellent user-friendly command-line tools and a REST API for third-party applications. If the user wants to install Proxmoxon on a server, they have physical access, then download the Proxmox ISO image from the official website. In this tutorial, we will learn the steps for installing Proxmox on a server that runs a minimal Debian 8 installation, such as in a data center.
Features of Proxmox
- Proxmox supports local storage with the help of LVM groups, ZFS, and directories.
- It supports network storage with iSCSI, NFS, Fiber Channel, GlusterFS, DRBD, and CEPH.
- Proxmox offers High Availability clusters for their users.
- Using Proxmox, users can move live migration and virtual machines from one host to another without downtime.
- Proxmox provides pre-packaged server software appliances which users can download via the graphical user interface (GUI).
Prerequisites
- A system with Debian Jessie (Version 8) 64-bit installation.
- A user with root privileges.
Install Proxmox
Step 1: Configure FQDN (Fully Qualified Domain Name)
To configure the server FQDN (Fully Qualified Domain Name), follow the below steps:
1. First, check the server hostname by executing the following command:
hostname
Sample Output:
test
In this tutorial, the server hostname is test.
2. Next, edit the /etc/hosts file using any text editors and add the server “IP address + hostname.domain-name.com + hostname” to the file. Replace the hostname and FQDN with the one that the user likes to use for their server, then save the configuration and exit.
Example:
192.168.1.101
test.myproxmox.co test
3. After that, reboot the server by executing the following command.
Reboot
4. Log in to the server again and check the FQDN and hostname by executing the following command:
hostname
Sample Output:
test
Or
hostname -f
Sample Output:
test.myproxmox.co
Step 2: Add the Proxmox Repository
1. First, add the Proxmox repository to the sources.list.d directory by executing the following command:
echo "deb http://download.proxmox.com/debian jessie pve-no-subscription" > /etc/apt/sources.list.d/pve-install-repo.list
2. Then, add the Proxmox key to authenticate the packages by executing the following command:
wget -O- "http://download.proxmox.com/debian/key.asc" | apt-key add -
3. After that, update the Debian repository by executing the following command:
apt-get update
4. Then, run a dist-upgrade on the system by executing the following command:
apt-get dist-upgrade
5. Finally, reboot the server to reflect the changes by executing the following command:
reboot
Step 3: Install Proxmox
To install Proxmox VE and some other required packages by executing the following command:
apt-get install proxmox-ve ntp ssh postfix ksm-control-daemon open-iscsi systemd-sysv
>> Note:
Postfix configuration during the installation of Proxmox:
- System mail name: type the domain name.
- Type of mail configuration: Mention “Internal Site”.
After the installation, reboot the server by executing the following command:
reboot
Step 4: Connect to the Proxmox Interface and Configure the Network
After the server restart, we can now access the Debian Proxmox from a web browser. To access the Proxmox web interface, type in the server IP with HTTPS and port 8006 in the URL bar. In the case of this tutorial, type:
https://192.168.1.101:8006/
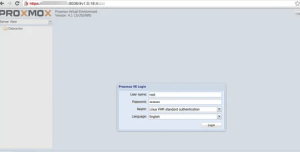
After that, log in to Proxmox as an admin user with their username (root) and password.
Configure the Networking for Proxmox:
If we have one network interface, “eth0” for outgoing connections with the IP address ‘192.168.1.101’ and my gateway is ‘192.168.1.254’. We will create a new network interface (bridge) ‘vmbr0’, then we enable routing on this network interface and enable proxy-arp on the outgoing interface ‘eth0’ in this step. In this tutorial, Vmbr0 is the interface for the Virtual Machines(VMs) in Proxmox. Users can use this option if they only have one public IP and wants to hide the VMs behind the host IP. For the same, do the following:
1. First, go to the /etc/network directory and edit the interfaces file using any text editor.
cd /etc/network/
vim interfaces
2. Go to the eth0 configuration section in the file and enable proxy-arp by adding the following lines:
auto eth0
iface eth0 inet static
        address  192.168.1.101
        netmask  255.255.255.0
        gateway  192.168.1.254
        post-up echo 1 > /proc/sys/net/ipv4/conf/eth0/proxy_arp
3. Then, configure a new bridge vmbr0 and enable routing on this interface by adding the following lines to the configuration:
auto vmbr0
iface vmbr0 inet static
        address  192.168.2.9
        netmask  255.255.255.0
        bridge_ports none
        bridge_stp off
        bridge_fd 0
        post-up echo 1 > /proc/sys/net/ipv4/ip_forward
        post-up iptables -t nat -A POSTROUTING -s '192.168.2.0/24' -o eth0 -j MASQUERADE
        post-down iptables -t nat -D POSTROUTING -s '192.168.2/24' -o eth0 -j MASQUERADE
4. After that, save and exit the configuration file.
5. Finally, reboot the server.
reboot
Step 5: Add a New ISO or Virtual Machine Template
We are going to add a new ISO file for the virtual machine installation in this step. Users can add an ISO file from within the web interface by uploading the file or using the command line to download the ISO file directly to the server (recommended).
Download the ISO file to the /var/lib/vz/template/iso directory with either curl or wget command.
In this tutorial, we are downloading a Ubuntu 15.04 image:
cd /var/lib/vz/template/iso/
wget http://releases.ubuntu.com/15.04/ubuntu-15.04-server-amd64.iso
Step 6: Create the first Virtual Machine
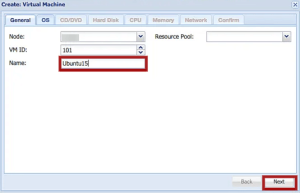
1. First, log in to the Proxmox web interface as an admin user.
2. Click the Create VM button from the top-right corner.
3. On the next page, enter a name for the new VM under the Name section and click the Next button.
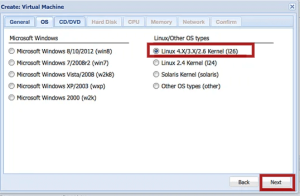
4. Select the OS type from the list on the next page and click the Next button. In this tutorial, we are selecting Ubuntu Linux with kernel version 4.
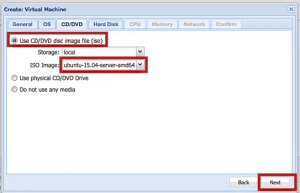
5. Select the downloaded ISO file and click the Next button.
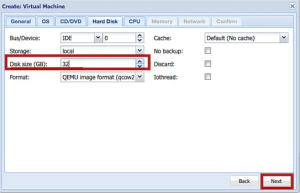
6. Select the VMs disk size and click the Next button on the next page.
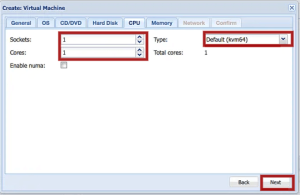
7. Next, configure the CPU settings, such as sockets, core, and type of VM. After that, click the Next button.
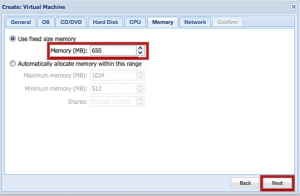
8. Specify the RAM size for the VM on the next page and click the Next button.
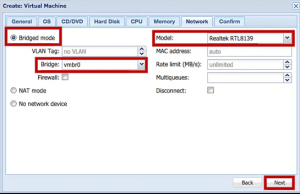
9. Next, configure the network and click the Next button.
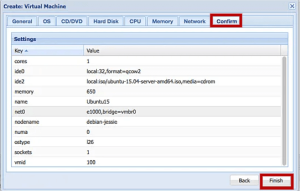
10. Next, verify all the settings under the Confirm section and click the Finish button.
11. Now, we can start the created VM installation by clicking on the Start button. We can also access the VM by clicking on the Console button.
Step 7: Configure the New VMs Network
After the VM installation, we still have to configure the network so that the virtual machine can access the internet. for the same:
1. First, edit the interfaces file in the virtual machine using any text editor.
cd /etc/network/
vim interfaces
2. Add a new interface ‘eth0’ in the virtual machine by adding the following lines to the file:
auto eth0
iface eth0 inet static
        address 192.168.2.10
        netmask 255.255.255.0
        gateway 192.168.2.9
3. Then, save and exit the file.
>> Note: The gateway IP is the IP address of vmbr0 on the host machine.
4. Finally, reboot the VM and try to access the internet by updating the repository or ping a server.
Now, the Proxmox installation and setup are completed.
Conclusion
This tutorial presents the steps to install and set up Proxmox on a server that runs a minimal Debian 8 installation. Hope this tutorial was helpful, and do reach out to us if you have any queries or suggestions.


