OVH, legally known as OVH Groupe SAS, is a cloud computing that offers dedicated servers, Virtual Private Server (VPS), and other web resources. OVHcloud Public Cloud infrastructure is set up in such a way that customers can harness the on-demand resources offered by OVHcloud for both small-scale and large-scale deployments. The OVHcloud Public Cloud offers numerous cloud solutions that can be billed on a pay-as-you-go basis. The OVHcloud Public Cloud is very flexible and scalable, making it easy for customers to use them on any scale of projects and deployments. It also offers a range of storage and machine learning solutions to its customers. In addition to that, OVHcloud Public Cloud provides a portfolio of services like data analytics services to analyze user data effortlessly.
OVHcloud Public Cloud has built clear solutions from data ingestion to usage to help users control the expensive and start using the services quickly. The OVHcloud Public Cloud also offers managed Kubernetes services, manages private registry, ultra-fast IOPS, on-demand storage, and more. Customers can easily manage all these features and services offered by OVHcloud Public Cloud via the OVHcloud control panel. Customers can also manage their Cloud infrastructure, such as backups, instances, SSH keys, disks, etc., and storage projects from the control panel.
In this tutorial, we are going to explain the first steps with an OVHcloud Public Cloud instance.
Requirements
- An OVHcloud account with a Public Cloud Instance.
- An SSH key
Getting Started with a Public Cloud Instance
Access the Management Interface for the Instance
To access the management interface for the OVHcloud Public Cloud Instance, follow the below steps:
1. First, log in to the OVHcloud Control Panel as an admin user.
2. Navigate to the Public Cloud section and select the Public Cloud service concerned.
3. Then, click on the Instances tab on your left.
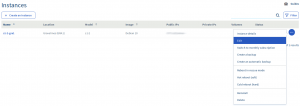
4. On the Instances page, the user will be able to view a summary of all the Instances. On this page, users can see several pieces of information, such as:
- Instance name,
- The model of the instance,
- Instance region,
- Details of the image,
- The IP address of the instance,
- Hard disks details, and
- Its state.

Edit the Configuration of an Instance
To edit the configuration of an OVHcloud Public Cloud Instance, follow the below steps:
1. First, log in to the OVHcloud control panel as an admin user.
2. Navigate to the Public Cloud section and select the Public Cloud service concerned.
3. Then, click on the Instances tab on your left.
4. On the Instances page, the user will be able to view a summary of all the Instances.
5. Click on the three dots on the right of the instance, and select Edit from the drop-down.
6. In the next window that opens up, users can perform the following:
· Rename the instance,
· Update or upgrade the model of the instance,
· Reinstall the instance on a different operating system (please note that if the user choose to perform this, all the data that is currently stored on the instance will get deleted), and
· Switch from the hourly billing plan to a fixed monthly rate (If the user performs this action, the bills will be sent on a pro-rata basis, based on the day of the month they switch).
Create a Backup of an Instance
To create a backup of an instance from the admin page, follow the below steps:
1. First, log in to the OVHcloud control panel as an admin user.
2. Navigate to the Public Cloud section and select the Public Cloud service concerned.
3. Then, click on the Instances tab on your left.
4. On the Instances page, the user can view a summary of all the Instances.
5. Click on the three dots on the right of the instance name and select the Create a backup option from the drop-down.
6. On the next page, mention a name for the backup and click the Confirm button.
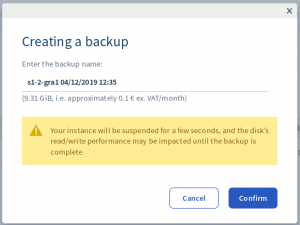
7. After the confirmation, the backup completion will take some time. The instance may get suspended during this time, and the read/write performance may also get impacted until the backup is completed.
8. After the confirmation, the users can view the following screen:

9. Once the backup is completed, the users can view the backup in the Instance Backup section.
Create an Automatic Backup of an Instance
To create an automatic backup of an instance, follow the below step:
1. First, log in to the OVHcloud control panel as an admin user.
2. Navigate to the Public Cloud section and select the Public Cloud service concerned.
3. Then, click on the Instances tab on your left.
4. On the Instances page, the user can view a summary of all the Instances.
5. Click on the three dots on the right of the instance name and select the Create an automatic backup option from the drop-down.
6. The following page will be displayed:
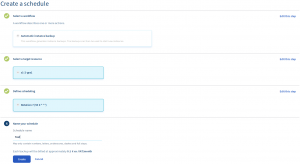
7. Select the necessary information, and click the Create button. After that, the system will redirect the user to the following page:
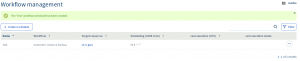
8. Users can go to the Workflow management at any time to delete the current automatic backup process. For that, click the three dots at the right of the instance name and select the Delete button.
Retrieve the Login Information
To retrieve the login information, follow the below steps:
1. First, log in to the OVHcloud control panel as an admin user.
2. Navigate to the Public Cloud section and select the Public Cloud service concerned.
3. Then, click on the Instances tab on your left.
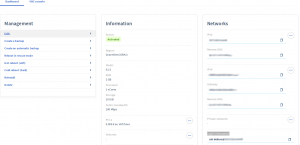
4. On the Instances page, click on the three dots at the right of the instance and select Instance details from the drop-down.
5. Check the information mentioned in the Login information section to retrieve the login details. There, users can also retrieve the SSH commands they need to connect to the instance.
Access the Virtual Network Computing (VNC) Console
Using the VNC console, users can access their instances directly. Please note, however, that the user will need to have configured a password for the root user. In order to access the Virtual Network Computing (VNC) console, follow the below steps:
1. First, log in to the OVHcloud control panel as an admin user.
2. Navigate to the Public Cloud section and select the Public Cloud service concerned.
3. Then, click on the Instances tab on your left.
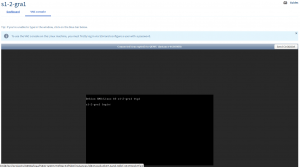
4. Select the instance and click on the VNC console in the Instances dashboard.

5. The above step will open the VNC console:
Reboot an Instance
There are two different ways to reboot an instance:
- Hot reboot (software)
- Cold reboot (hardware)
In order to reboot an instance, follow the below steps:
1. First, log in to the OVHcloud control panel as an admin user.
2. Navigate to the Public Cloud section and select the Public Cloud service concerned.
3. Then, click on the Instances tab on your left.
4. On the Instances page, click on the three dots at the right of the instance and select either Cold reboot (hardware) or Hot reboot (software).
5. Click the Confirm button on the pop-up window to confirm the reboot.
Reinstall an Instance
In order to reinstall an instance, follow the below steps:
1. First, log in to the OVHcloud control panel as an admin user.
2. Navigate to the Public Cloud section and select the Public Cloud service concerned.
3. Then, click on the Instances tab on your left.
4. On the Instances page, click on the three dots at the right of the instance and select the Reinstall option.
5. Click the Confirm button on the pop-up window to confirm the reboot.
Delete an Instance
Note that this process will permanently delete the instance along with all of the data stored on it. In order to delete an instance, follow the below steps:
1. First, log in to the OVHcloud control panel as an admin user.
2. Navigate to the Public Cloud section and select the Public Cloud service concerned.
3. Then, click on the Instances tab on your left.
4. On the Instances page, click on the three dots at the right of the instance and select the Delete option.
6. Click the Confirm button on the pop-up window to confirm the reboot.
Conclusion
This tutorial presents some of the processes to familiarize with the OVHcloud Public Cloud Instance. Hope this tutorial was helpful, and do reach out to us if you have any query or suggestions.


