
Vultr offers cloud servers with elastic SSD storage for all their customers. Vultr provides an advanced cloud platform to deliver hosting services and cloud infrastructure for businesses and developers. Vultr fascinates users with 100% SSD storage, One-click deployment, and fully automated and dedicated servers. Vultr also offers a user-friendly dashboard with a very reasonable price tag when compared to its competitors. Vultr’s features and the affordable price tag make it a trustworthy option for limited-budget and small-scale ventures.
Let’s Encrypt is an open, automated certificate authority that offers free TLS/SSL certificates for the public’s benefit. This service is offered by the Internet Security Research Group (ISRG). In this tutorial, we will learn the steps to install a wildcard Let’s Encrypt SSL certificate using lego on the Vultr One-Click LAMP applications.
After completing this tutorial, the domain will have a valid wildcard certificate, and the web server will redirect all HTTP requests to HTTPS. The lego method is favored because certbot does not support automatic updates with Vultr DNS (Domain Name System).
Prerequisite Steps
Ensure that the user has all of the following items completed before proceeding with this tutorial.
- First, deploy a new Vultr One-Click LAMP application (Ubuntu 18.04) on the server.
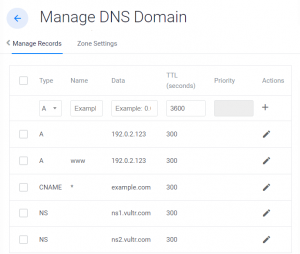
- Then, add a domain to Vultr DNS. In this tutorial, we will be using the domain example.com and IP address 192.0.2.123. At a minimum, assuming that the user’s VPS is named www, their DNS will look similar to the one shown below:
- Enable the user Vultr API key.
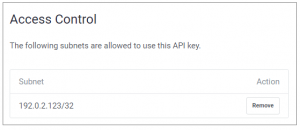
- Next, allow the IP address of the user VPS in the API access control.
- After that, SSH to the Virtual Private Server (VPS) as a root user.
- Finally, update the Virtual Private Server (VPS).
Install Wildcard Let’s Encrypt SSL with Lego
The lego installation method allows the server to update the wildcard Let’s Encrypt SSL automatically. Users can choose this method if they plan to update their certificate before it expires each 90 days automatically.
Step 1: Install Lego
The lego version available in the Ubuntu 18.04 repository is old and does not support the Domain Name System (DNS) challenge method required for the wildcard. So in this tutorial, we will be installing the latest lego version manually by following the below steps:
1. First, execute the following command to download the latest lego version from GitHub automatically:
# curl -Ls https://api.github.com/repos/go-acme/lego/releases/latest | \

        grep browser_download_url | grep linux_amd64 | cut -d '"' -f 4 | \

        wget -i -
2. Users can manually download the latest lego version by visiting the following URL:
https://github.com/go-acme/lego/releases
3. After the installation, extract the tar.gz file by executing the following command:
# tar xf lego_v*_linux_amd64.tar.gz
4. Next, move the lego file to the /usr/local/sbin directory by executing the following command:
# mv lego /usr/local/sbin/
5. Finally, verify the lego version by executing the following command:
# lego -v
lego version 3.7.0 linux/amd64
Step 2: Get a New Certificate
To generate a new certificate, follow the below steps:
1. First, retrieve the API key from the following URL:
https://my.vultr.com/settings/#settingsapi
2. Next, execute the following command to create the get-cert.sh script in the /usr/local/sbin directory:
# nano /usr/local/sbin/get-cert.sh
3. Paste the following content in the get-cert.sh script. Replace the below details in the following content with the user’s detail, such as:
- Replace the EXAMPLE_API_KEY parameter with the user’s API key.
- Replace the example email address with the user’s email address.
- Replace example.com with the user’s domain name. The domain is listed twice in the below content, once for the wildcard and once for the bare domain. If the user is not using the bare domain URL (https://example.com), they can remove that value and only request the wildcard.
#!/bin/sh

export VULTR_API_KEY=xxxx_EXAMPLE_API_KEY_xxxx

export VULTR_HTTP_TIMEOUT=60
export VULTR_POLLING_INTERVAL=60
export VULTR_PROPAGATION_TIMEOUT=300
export VULTR_TTL=300

lego --dns vultr \
   --domains *.example.com \
   --domains example.com \
   --email admin@example.com \
   --path="/etc/letsencrypt/example.com" \
   --accept-tos run
4. Exit and save the file. After that, run the following command to make the script executable:
# chmod +x /usr/local/sbin/get-cert.sh
5. Then, run the get-cert.sh script by executing the following command:
# /usr/local/sbin/get-cert.sh
6. Finally, execute the following command to verify the issued certificates. In the below command, replace example.com with the actual domain name.
# ls -l /etc/letsencrypt/example.com/certificates/
Sample Output
total 16
-rw------- 1 root root 3307 May 20 14:15 _.example.com.crt
-rw------- 1 root root 1648 May 20 14:15 _.example.com.issuer.crt
-rw------- 1 root root  230 May 20 14:15 _.example.com.json
-rw------- 1 root root  288 May 20 14:15 _.example.com.key
Step 3: Install SSL Certificate for Apache
To install SSL Certificate for Apache, follow the below steps:
1. First, execute the following commands to archive the existing Apache certificate:
# mv /etc/apache2/ssl/server.crt /etc/apache2/ssl/server.crt.old
# mv /etc/apache2/ssl/server.key /etc/apache2/ssl/server.key.old
2. Then, link the Apache certificate to the Let’s Encrypt certificate by executing the following command:
# ln -s /etc/letsencrypt/example.com/certificates/_.example.com.crt /etc/apache2/ssl/server.crt
# ln -s /etc/letsencrypt/example.com/certificates/_.example.com.key /etc/apache2/ssl/server.key
3. After that, execute the following command to restart Apache:
# service apache2 restart
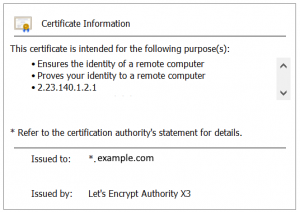
4. Finally, navigate to the website in a browser and verify that the certificate is precise and issued to the wildcard domain name.
Set up Automatic Certificate Renewal
To set up automatic renewal of certificates before it expires every 90 days, follow the below steps:
1. First, retrieve the API key from the following URL:
https://my.vultr.com/settings/#settingsapi
2. Next, execute the following command to create the renew-cert.sh script in the /usr/local/sbin directory: renew-cert.sh
# nano /usr/local/sbin/renew-cert.sh
3. Paste the following content in the renew-cert.sh script. Replace the below details in the following content with the user’s detail, such as:
- Replace the EXAMPLE_API_KEY parameter with the user’s API key.
- Replace the example email address with the user’s email address.
#!/bin/sh

export VULTR_API_KEY=xxxx_EXAMPLE_API_KEY_xxxx

export VULTR_HTTP_TIMEOUT=60
export VULTR_POLLING_INTERVAL=60
export VULTR_PROPAGATION_TIMEOUT=300
export VULTR_TTL=300

lego --dns vultr \
   --domains *.example.com \
   --domains example.com \
   --email admin@example.com \
   --path="/etc/letsencrypt/example.com" \
   --accept-tos renew
4. Save and exit the file. After that, run the following command to make the script executable:
# chmod +x /usr/local/sbin/renew-cert.sh
5. Then, edit the crontab by executing the following command:
# crontab -e
6. Add the following lines to the crontab. Users can adjust the setting to their preferences. The below example will run the cron job at 04:10 AM each Monday.
10 4 * * 1 /usr/local/sbin/renew-cert.sh 2> /dev/null
Conclusion
This tutorial presents the steps to install a wildcard Let’s Encrypt SSL certificate using lego on the Vultr One-Click LAMP applications. After the above set-up is completed successfully, the server will automatically check the certificate each Monday and renew it before it expires. Hope this tutorial was helpful, and do reach out to us if you have any query or suggestions.


