OpenStack is a free, open-source cloud computing platform. OpenStack is a cloud Operating System used to control the deep pools of computing, networking, and storage resources within a data center. OpenStack is primarily used and implemented as an Infrastructure as a Service (IaaS) for cloud computing. OpenStack is an open-source platform that offers many options to deploy and install it through different software distributions. OpenStack provides various deployment models for their customers. OpenStack also provides pre-installed ISO images of its platform for its customers.
OpenStack is a famous technology, but it can be cumbersome to manage and deploy without the proper tools. One easy solution is to deploy OpenStack services using pre-built Docker containers with Kolla and Hyper-V.
OpenStack offers a set of deployment tools, such as Kolla, to generate OpenStack Docker projects and images to deploy the Docker containers and OpenStack. The most mature deliverable offered by Kolla is kolla-ansible. As the name implies, kolla-ansible uses Ansible playbooks to automate the deployment.
Set up Hyper-V
On the Windows host, we need a Virtual Machine to host the Linux OpenStack controller. In this tutorial, we have an Ubuntu 16.04 VM with 8GB of RAM, 20GB of disk, and 4 virtual cores. All the controller services run here and are deployed with Kolla in Docker containers. Also, the same Hyper-V serves as a compute host for the OpenStack deployment. This can be achieved by installing the Cloudbase OpenStack components. Additional Hyper-V computes nodes can be added later as needed.
Set up Network
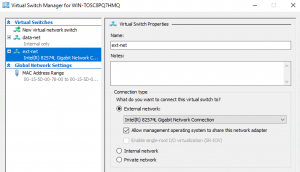
We will need 2 virtual switches on the Hyper-V host that will be connected to the OpenStack controller Virtual Machines. ext-net is the external network bridged to the Windows physical external interface. We will be using this network also for the management of the VM. data-net is the data network, a simple private virtual switch for now (an external one is only needed when adding more compute nodes).
On the OpenStack Controller Virtual Machine, there are three interfaces. The first two (eth1 and eth0) are connected to the external network. The former is used for management, such as SSH, and OpenStack uses the latter for external traffic. It is managed by Open vSwitch. Finally, eth2 is the data/overlay network used for tenant traffic between the Neutron components in the controller and the instances.
eth2 and eth1 do not have an IP address and are set as “manual” in the /etc/network/interfaces file. The reason for this is that OpenvSwitch manages them. Also, on these interfaces, we need to enable MAC address spoofing from the “Advanced Features” tab on the adapter.
The scripts we will be using will automatically configure the Linux network interfaces, so we do not need to bother with that. The only interface we have already configured is eth0 so that the user can SSH into the system.
OpenStack Controller Deployment
First, clone a Git repository that contains the scripts for the Kolla OpenStack deployment from https://github.com/cloudbase/kolla-resources. At the end of the deployment, it will also create some common flavors, a Neutron virtual router, a Cirros VHDX Cinder image, and 2 networks, one private for tenants (VLAN based) and one external (flat). For the same, execute the following commands:
git clone https://github.com/cloudbase/kolla-resources.git
cd kolla-resources
Next, configure the management and external network details by setting some variables in the deploy_openstack.sh script:
vim deploy_openstack.sh
Add the following lines in the deploy_openstack.sh script file, and exit and save the file.
# deploy_openstack.sh
MGMT_IP=192.168.0.60
MGMT_NETMASK=255.255.255.0
MGMT_GATEWAY=192.168.0.1
MGMT_DNS="8.8.8.8"

# neutron external network information
FIP_START=192.168.0.80
FIP_END=192.168.0.90
FIP_GATEWAY=192.168.0.1
FIP_CIDR=192.168.0.0/24
TENANT_NET_DNS="8.8.8.8"

# used for HAProxy
KOLLA_INTERNAL_VIP_ADDRESS=192.168.0.91
In this tutorial, we are using the same subnet for external floating IPs and management.
Next, run the deployment script by executing the following command. Here, we are using the Linux “time” command to understand how long the deployment will take:
time sudo ./deploy_openstack.sh
First, this script will pull the Docker images for each OpenStack service. The great thing with Kolla is that the user needs to create the images once, sparing significant time during deployment. This will reduce potential errors due to updated dependencies as the container images already contain all the required components. The images that we are going to use during the deployment are available in the DockerHub (https://hub.docker.com/u/cloudbaseit/). Users can also create and use their images.
After the deployment is completed, we have a fully functional OpenStack controller. It will take around 13 minutes to complete the deployment.
real 12m28.716s
user 3m7.296s
sys 1m4.428s
Next, run the following command to view all the docker containers running on the server.
sudo docker ps

Finally, we can source the Admin credentials by executing the following command:
source /etc/kolla/admin-openrc.sh
Nova Hyper-V Compute Node Deployment
First, edit the Ansible inventory to add my Hyper-V host (named “hyperv-host” in this tutorial) and the credentials needed to access it:
vim hyperv_inventory
Add the following lines in the Ansible inventory file, and exit and save the file.
[hyperv]
hyperv-host

[hyperv:vars]
ansible_ssh_host=192.168.0.120
ansible_user=Administrator
ansible_password=Passw0rd
ansible_port=5986
ansible_connection=winrm
ansible_winrm_server_cert_validation=ignore
After that, configure an HTTPS WinRM listener on the Hyper-V host, which users can easily create with the PowerShell script mentioned in GitHub (https://github.com/ansible/ansible/blob/devel/examples/scripts/ConfigureRemotingForAnsible.ps1).
Now, execute the scripts to deploy and configure Nova compute on Hyper-V fully. The first parameter is the data bridge that we configured earlier, data-net. The third and fourth parameters are the Hyper-V credentials that FreeRDP needs to access the Hyper-V host when connecting to a Nova instance console.
sudo ./deploy_hyperv_compute_playbook.sh data-net Administrator Passw0rd
Next, we need to set trunk mode for the OpenStack controller. There are two reasons for doing this: first, we have a tenant network with type VLAN, and second, the controller is a Virtual Machine in Hyper-V, so the hypervisor needs to allow Virtual local area networks (VLAN) tagged packets on the controller VM data interface. For that, start an elevated PowerShell and execute the following command:
Set-VMNetworkAdapterVlan -Trunk -AllowedVlanIdList 500-2000 -NativeVlanId 0 openstack-controller
Finally, the Virtual Machine controller with the name “openstack-controller” is created in Hyper-V.
Spawning a Virtual Machine
Now, we will boot a Virtual Machine and test its connectivity to the Internet by executing the following command.
NETID=`neutron net-show private-net | awk '{if (NR == 5) {print $4}}'`
nova boot --flavor m1.nano \
--nic net-id=$NETID \
--image cirros-gen1-vhdx hyperv-vm1
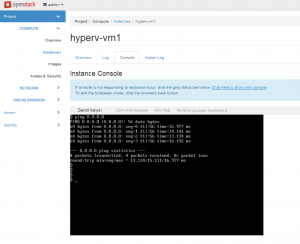
Also, we can check the same from the Horizon:

The FreeRDP console access from Horizon works as well. We can also access the Virtual Machine directly from Hyper-V if required.
Conclusion
This tutorial presents the steps to deploy OpenStack services using pre-built Docker containers with Hyper-V and Kolla. Hope this tutorial was helpful. Do reach out to us if you have any queries or suggestions.


