SolusIO is a virtual infrastructure management solution that offers simplicity, choice, and performance for Internet service providers (ISPs) and enterprises. Also, SolusIO offers blazing fast, a simple API, on-demand virtual machines, and an easy-to-use self-service control panel for their customers to unleash their full growth potential. In this tutorial, we will learn the steps to create custom bootable rescue ISO images for SolusIO. This tutorial is given as an example, and the customers can customize it according to their needs.
>> Note: The below instruction is applicable for Ubuntu 20.04 servers. The resulted rescue ISO image will also be Ubuntu 20.04.
This instruction can be used on a SolusIO Compute Resource, inside Virtual Private Server (VPS), or any other servers not related to SolusIO.
Create Custom Bootable Rescue ISO Image
Step 1: Prepare the Environment for Rescue Image
To prepare the environment for the rescue image, follow the below steps:
1. First, access the user’s server via SSH.
2. Then, execute the following commands to download the rescue system using debootstrap.
# apt-get install -y binutils debootstrap squashfs-tools xorriso grub-pc-bin grub-efi-amd64-bin mtools
# mkdir $HOME/rescue-iso
# debootstrap --arch=amd64 --variant=minbase focal $HOME/rescue-iso/chroot
3. After that, prepare the mounts by executing the following commands:
# mount --bind /dev $HOME/rescue-iso/chroot/dev
# mount --bind /run $HOME/rescue-iso/chroot/run
Step 2: Working Inside the Environment
1. First, chroot into the created environment by executing the following:
# chroot $HOME/rescue-iso/chroot
2. Now, all the below steps are executed inside chroot.
3. Then, execute the following commands to mount sysfs and proc:
# mount none -t proc /proc && mount none -t sysfs /sys
# mount none -t devpts /dev/pts && export HOME=/root && export LC_ALL=C
4. Next, configure the default repositories. In this example, we will configure the default repositories for Ubuntu 20.04.
cat <<EOF > /etc/apt/sources.list
deb http://archive.ubuntu.com/ubuntu/ focal main restricted universe multiverse
deb-src http://archive.ubuntu.com/ubuntu/ focal main restricted universe multiverse
deb http://archive.ubuntu.com/ubuntu/ focal-updates main restricted universe multiverse
deb-src http://archive.ubuntu.com/ubuntu/ focal-updates main restricted universe multiverse
deb http://archive.ubuntu.com/ubuntu/ focal-security main restricted universe multiverse
deb-src http://archive.ubuntu.com/ubuntu/ focal-security main restricted universe multiverse
deb http://archive.ubuntu.com/ubuntu/ focal-backports main restricted universe multiverse
deb-src http://archive.ubuntu.com/ubuntu/ focal-backports main restricted universe multiverse
EOF
5. After that, install the required packages by executing the following commands:
# apt update -y
# apt install -y uuid-runtime
# uuidgen > /etc/machine-id
# dpkg-divert --local --rename --add /sbin/initctl
# ln -s /bin/true /sbin/initctl
# apt update -y
# apt install -y ssh cloud-init netplan.io vim less nano iputils-ping curl qemu-guest-agent ubuntu-standard casper lupin-casper linux-generic
# systemctl enable systemd-networkd
>>Note: Users should install cloud-init and qemu-guest-agent. Also, they should not use network manager, and they should enable systemd-networkd on the system. All this is required for SolusIO to configure network and SSH during rescue boot.
6. After installing the required packages, execute the following commands to remove autologin for the root user and rebuild initramfs:
# rm -f /usr/share/initramfs-tools/scripts/casper-bottom/25adduser
# rm -f /usr/share/initramfs-tools/scripts/casper-bottom/01integrity_check
# update-initramfs -u
7. Next, ensure that the virtual machines can be properly rebooted without waiting for any actions by executing the following command:
# sed -i '+s+read x < /dev/console+echo "\\n" | read x+' /usr/sbin/casper-stop
8. Finally, execute the following command to clean up the environment and exit it:
# apt upgrade -y
# apt-get autoremove -y
# truncate -s 0 /etc/machine-id
# rm /sbin/initctl
# dpkg-divert --rename --remove /sbin/initctl
# apt clean
# umount /proc
# umount /sys
# umount /dev/pts
# export HISTSIZE=0 && exit
Step 3: Creating a Bootable ISO Image from the Prepared Rescue Environment
1. First, remove the bash history by executing the following command:
# rm -f $HOME/rescue-iso/chroot/root/.bash_history
2. Then, execute the following command to unmount previously mounted system directories:
# umount $HOME/rescue-iso/chroot/dev
# umount $HOME/rescue-iso/chroot/run
3. Create boot layout for ISO by executing the following commands:
# cd $HOME/rescue-iso
# mkdir -p image/{casper,isolinux,install}
# cp chroot/boot/vmlinuz-**-**-generic image/casper/vmlinuz
# cp chroot/boot/initrd.img-**-**-generic image/casper/initrd
# touch image/ubuntu
4. Next, execute the following to create grub.cfg for ISO:
search --set=root --file /ubuntu

set default="0"
set timeout="0"

menuentry "Rescue mode iso" {
linux /casper/vmlinuz boot=casper ---
initrd /casper/initrd
}
EOF
5. Execute the following commands to create manifests to comply with bootable ISO standards:
# cd $HOME/rescue-iso
# chroot chroot dpkg-query -W --showformat='${Package} ${Version}\n' | sudo tee image/casper/filesystem.manifest
# cp -v image/casper/filesystem.manifest image/casper/filesystem.manifest-rescue
# sed -i '/ubiquity/d' image/casper/filesystem.manifest-rescue
# sed -i '/casper/d' image/casper/filesystem.manifest-rescue
# sed -i '/discover/d' image/casper/filesystem.manifest-rescue
# sed -i '/laptop-detect/d' image/casper/filesystem.manifest-rescue
# sed -i '/os-prober/d' image/casper/filesystem.manifest-rescue
6. Then, create squashfs layout by executing the following commands:
# mksquashfs chroot image/casper/filesystem.squashfs
# printf $(sudo du -sx --block-size=1 chroot | cut -f1) > image/casper/filesystem.size
7. Next, create README.diskdefines by executing the following command:
# cat <<EOF > image/README.diskdefines

#define DISKNAME Rescue mode iso
#define TYPE binary
#define TYPEbinary 1
#define ARCH amd64
#define ARCHamd64 1
#define DISKNUM 1
#define DISKNUM1 1
#define TOTALNUM 0
#define TOTALNUM0 1
EOF
8. Execute the following commands to prepare for grub finalization:
# cd $HOME/rescue-iso/image && grub-mkstandalone \
--format=x86_64-efi \
--output=isolinux/bootx64.efi \
--locales="" \
--fonts="" \
"boot/grub/grub.cfg=isolinux/grub.cfg"
9. Then, create .img and vfat on top of that by executing the following:
# (
cd isolinux && \
dd if=/dev/zero of=efiboot.img bs=1M count=10 && \
sudo mkfs.vfat efiboot.img && \
LC_CTYPE=C mmd -i efiboot.img efi efi/boot && \
LC_CTYPE=C mcopy -i efiboot.img ./bootx64.efi ::efi/boot/
)
10. Execute the following command to finalize the grub configuration:
# grub-mkstandalone \
--format=i386-pc \
--output=isolinux/core.img \
--install-modules="linux16 linux normal iso9660 biosdisk memdisk search tar ls" \
--modules="linux16 linux normal iso9660 biosdisk search" \
--locales="" \
--fonts="" \
"boot/grub/grub.cfg=isolinux/grub.cfg"

# cat /usr/lib/grub/i386-pc/cdboot.img isolinux/core.img > isolinux/bios.img

# /bin/bash -c "(find . -type f -print0 | xargs -0 md5sum | grep -v "\./md5sum.txt" > md5sum.txt)"
11. Finally, create ISO by executing the following:
# sudo xorriso \
-as mkisofs \
-iso-level 3 \
-full-iso9660-filenames \
-volid "Rescue mode iso" \
-eltorito-boot boot/grub/bios.img \
-no-emul-boot \
-boot-load-size 4 \
-boot-info-table \
--eltorito-catalog boot/grub/boot.cat \
--grub2-boot-info \
--grub2-mbr /usr/lib/grub/i386-pc/boot_hybrid.img \
-eltorito-alt-boot \
-e EFI/efiboot.img \
-no-emul-boot \
-append_partition 2 0xef isolinux/efiboot.img \
-output "../rescue-latest.iso" \
-graft-points \
"." \
/boot/grub/bios.img=isolinux/bios.img \
/EFI/efiboot.img=isolinux/efiboot.img
12. Now, users can find the created ISO image in the $HOME/rescue-iso/ directory.
Step 4: Adding a New Custom Rescue ISO to SolusIO
1. Upload the newly created image to any file share, such as AWS Simple Storage Service (S3).
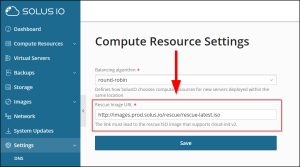
2. After that, log into SolusIO and navigate to Settings.
3. Finally, go to Compute Resources and replace the Rescue Image URL with a new one.
Conclusion
This tutorial presents the steps to create a custom bootable rescue ISO image for SolusIO in Ubuntu 20.04. Hope this tutorial was helpful, and do reach out to us if you have any queries or suggestions.


