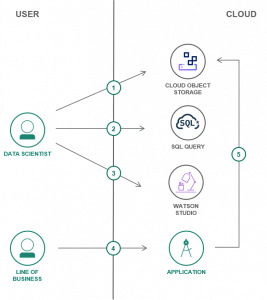
A data lake is an approach to store data in its native format for organizational use. By combining SQL Query and Object Storage, data analysts can query data where it lies using SQL. Users can create a data lake for their organization using Object Storage by following this tutorial. The main objectives of this tutorial are:
- Use Object Storage to store data files.
- Query raw data directly from Object Storage using SQL Query.
- Analyze and refine data in IBM Watson™ Studio.
Prerequisite:
- IBM Cloud Command-line Interface (CLI)
- Download and Install Aspera Connect for high-speed data upload to Object Storage.
Build a Data Lake
To build a data lake using Object Storage in IBM Cloud infrastructure, follow the below steps:
Step 1: Create a Service
1. First, log in to IBM Cloud via the command line and target the user’s Cloud Foundry account.
ibmcloud login
ibmcloud target --cf
2. Next, initialize and set the default resource group used by the command line.
ibmcloud resource groups
ibmcloud target -g <your-default-resource-group>
3. Create an Object Storage instance with a Cloud Foundry alias. If the Object Storage instance with a lite plan already exists, use the standard one instead of lite.
ibmcloud resource service-instance-create data-lake-cos cloud-object-storage lite global
4. Next, create an SQL Query instance. In the below command, replace “us-north” with the region that you want to specify.
ibmcloud resource service-instance-create data-lake-sql sql-query lite us-north
5. Create a Watson Studio instance.
ibmcloud resource service-instance-create data-lake-studio data-science-experience free-v1 us-south
Step 2: Data Upload
This section helps users to upload data to an Object Storage bucket. They can do this by utilizing the built-in Cloud High-Speed Transfer Service or using regular http upload. Cloud High-Speed Transfer Service protects data uploaded to the bucket and quickly reduces the transfer time.
1. Download the Traffic Collision Data from the 2010/City of Los Angeles CSV file. This is an 81MB file and may take a few minutes to download.
2. After the download, go to a browser and access the data-lake-cos service instance from the Resource List under the storage section.
3. Next, create a new bucket to store the raw data. For the same:
- Click Create a bucket.
- Select Custom bucket.
- Select Regional from the Resiliency drop-down.
- Select a Location.
- Provide a bucket Name and click Create. If the user receives an AccessDenied error, try with a unique bucket name.
4. After creating the bucket, upload the CSV file to Object Storage.
- From the bucket, click Upload > Files.
- Select the Aspera high-speed transfer or Standard Upload to use regular http file transfer. Click on the radio button to start the installation.
- In the case of Aspera upload, click Install Aspera connect > Download Connect. This will download the Aspera plugin to the user’s machine, and once the plugin is successfully installed, they may have to refresh the browser.
- After that, click Select files > Browse and select the previously downloaded CSV file.
Step 3: Working with Data
Users can convert the raw dataset into a targeted cohort based on age and time attributes by following this section. This is helpful for data lake users who would struggle with very large datasets or have specific interests.
Users can use SQL Query to manipulate the data in Object Storage using familiar SQL statements. In addition, SQL Query has built-in support for JSON, CSV, and Parquet, with no additional computation services or extract-transform-load is necessary. For the same, follow the below steps:
1. First, access the “data-lake-sql” SQL Query service instance from the list of resources.
2. Go to the Manage section and click Launch SQL Query UI.
3. Create a new dataset by executing the SQL query directly on the previously uploaded CSV file.
- Replace the <your-bucket-name> section in the URL of the FROM clause with the specific bucket’s name.
- Next, enter the following SQL query into the Type SQL here section.
SELECT
  `Dr Number` AS id,
  `Date Occurred` AS date,
  `Time Occurred` AS time,
  `Area Name` AS area,
  `Victim Age` AS age,
  `Victim Sex` AS sex,
  `Location` AS location
  FROM cos://us-south/<your-bucket-name>/Traffic_Collision_Data_from_2010_to_Present.csv
  WHERE
  `Time Occurred` >= 1700 AND
  `Time Occurred` <= 2000 AND
  `Victim Age` >= 20 AND
  `Victim Age` <= 35
- Then, click Run.
4. An Object Storage bucket will be auto-created to hold the result in the target location.
5. On the Query Details tab, click on the URL under Result Location to view the intermediate dataset, which is also stored on Object Storage.
Step 4: Combine Jupyter Notebooks with SQL Query
1. First, create Jupyter Notebook in Watson Studio.
- Access the Watson Studio service instance (data-lake-studio)from the Resource List.
- Click Projects under Quick navigation, then New project + followed by Create an empty project.
- Use Data lake project as Name.
- Under Define storage, select data-lake-cos.
- Click Create.
- In the resulting project, click Add to project and Notebook.
- From the Blank tab, enter a Data lake notebook as Name.
- Leave the Language and Runtime to defaults and click Create Notebook.
2. From the Notebook, install and import PixieDust and ibmcloudsql by adding the below commands to the In [ ]: input prompt and then click Run.
!pip install --user --upgrade pixiedust
!pip install --user --upgrade ibmcloudsql
import ibmcloudsql
from pixiedust.display import *
3. Add an Object Storage API key to the Notebook. This will allow the system to store SQL Query results in Object Storage.
- Add the following commands in the next cell, the In [ ]: input prompt, and then click Run.
import getpass
cloud_api_key = getpass.getpass<Enter your IBM Cloud API Key>
- From the terminal, create an API key.
ibmcloud iam api-key-create data-lake-cos-key
- Next, copy the API Key, paste it into the box in the Notebook, and hit enter.
- It would help store the API Key in a secure, permanent location, as the Notebook does not store the API key.
4. Add the SQL Query instance’s Cloud Resource Name(CRN to the Notebook.
- In the next cell, assign the CRN to a variable in the Notebook and copy the following into it. Do not run it yet.
sql_crn = '<SQL_QUERY_CRN>'
- From the terminal, copy the CRN available in the ID property to the clipboard.
ibmcloud resource service-instance data-lake-sql
- Replace and paste the CRN between the single quotes and then Run.
5. Add another variable to the Notebook to specify the Object Storage bucket and click Run.
sql_cos_endpoint = 'cos://us-south/<your-bucket-name>'
6. Enter the following commands in another cell and click Run to view the result set. Users will also have new accidents/jobid=<id>/<part>.csv* file added to their bucket that includes the result of the SELECT.
sqlClient = ibmcloudsql.SQLQuery(cloud_api_key, sql_crn, sql_cos_endpoint + '/accidents')

 data_source = sql_cos_endpoint + "/Traffic_Collision_Data_from_2010_to_Present.csv"

 query = """
 SELECT
     `Time Occurred` AS time,
     `Area Name` AS area,
     `Victim Age` AS age,
     `Victim Sex` AS sex,
     `Location` AS location
 FROM  {}
 WHERE
     `Time Occurred` >= 1700 AND `Time Occurred` <= 2000 AND
     `Victim Age` >= 20 AND `Victim Age` <= 35
 """.format(data_source)

 traffic_collisions = sqlClient.run_sql(query)
 traffic_collisions.head()
Step 5: Visualize data using PixieDust
1. Create a common table expression to convert the location column to separate longitude and latitude columns. For the same, run the following from another Notebook cell.
query = """
 WITH location AS (
     SELECT
         id,
         cast(split(coordinates, ',')[0] as float) as latitude,
         cast(split(coordinates, ',')[1] as float) as longitude
     FROM (SELECT
             `Dr Number` as id,
             regexp_replace(Location, '[()]', '') as coordinates
         FROM {0}
     )
 )
 SELECT
     d.`Dr Number` as id,
     d.`Date Occurred` as date,
     d.`Time Occurred` AS time,
     d.`Area Name` AS area,
     d.`Victim Age` AS age,
     d.`Victim Sex` AS sex,
     l.latitude,
     l.longitude
 FROM {0} AS d
     JOIN
     location AS l
     ON l.id = d.`Dr Number`
 WHERE
     d.`Time Occurred` >= 1700 AND
     d.`Time Occurred` <= 2000 AND
     d.`Victim Age` >= 20 AND
     d.`Victim Age` <= 35 AND
     l.latitude != 0.0000 AND
     l.latitude != 0.0000
 """.format(data_source)

 traffic_location = sqlClient.run_sql(query)
 traffic_location.head()
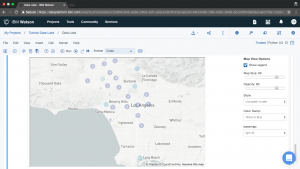
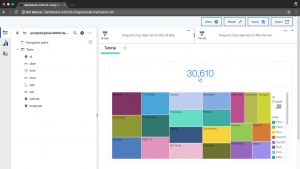
2. In the next cell, execute the display command to view the result using PixieDust.
display(traffic_location)
3. Click on the chart drop-down button, and select Map.
4. Then, add longitude and latitude to the Keys. After that, add age and ID to the Values. After that, click OK to view the Map.
5. Finally, click File > Save to save the Notebook to Object Storage.
Step 6: Share your dataset with the organization
Not every user that uses data lake is a data scientist. Customers can allow non-technical users to gain insight from the data lake. Visualization tools or Tools with analytic capabilities can import data stored in CSV files. Application developers can make use of IBM Cognos Dashboard Embedded to let users build and use feature-rich dashboards.
Conclusion
This document presents a brief introduction on how to build a data lake using Oracle Storage in IBM Cloud. Hope this tutorial was useful, and do reach out to us if you have any query or suggestions.


