
Vultr offers cloud servers with elastic SSD storage for all their customers. Vultr provides an advanced cloud platform to deliver hosting services and cloud infrastructure for businesses and developers. Vultr fascinates users with 100% SSD storage, One-click deployment, and fully automated and dedicated servers. Vultr also offers a user-friendly dashboard with a very reasonable price tag when compared to its competitors. Vultr’s features and the affordable price tag make it a trustworthy option for limited budget and small-scale ventures.
Vultr supports IPv6 for all of its Virtual Private Servers (VPS) and Bare Metal instances. To enable IPv6, users can either use any of these methods:
- Select the Enable IPv6 option in the Additional Features section when deploying a new instance.
- Use this tutorial to add IPv6 support or add a secondary address to a deployed instance.
This tutorial teaches the steps to configure IPv6 on Windows, Fedora, and Debian servers in Vultr.
Add IPv6 to an Instance
To add IPv6 to a Virtual Private Server instance in Vultr, follow the below steps:
1. Verify that the ICMP protocol is not blocked in the OS firewall as the IPv6 autoconfiguration depends on the ICMP protocol.
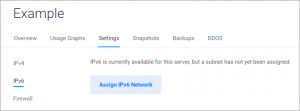
2. Log in to the Vultr console and navigate to the Settings tab for the instance.
3. From the settings page, select the IPv6 menu.
4. Next, click the Assign IPv6 Network button.
5. Finally, restart the server via the Vultr Customer Portal. Note that rebooting the server via SSH doesn’t activate the new network.
Configure IPv6 on Windows Server
The following procedure applies to the below Windows versions:
- Windows Server 2012 R2
- Windows Server 2016
- Windows Server 2019
1. First, find the public interface name on the server. Users can execute the following command to verify the public interface name.
ipconfig /all
2. Navigate to the Windows Control Panel and execute the following commands to configure IPv6 on Windows servers. Replace the address interface (Ethernet) parameter with the public interface name that Windows has chosen in the below commands.
netsh interface ipv6 set global randomizeidentifiers=disabled
netsh interface ipv6 add address interface="Ethernet" address="2001:db8:1000::100/64"
netsh interface ipv6 add address interface="Ethernet" address="2001:db8:1000::200/64"
- 2001:db8:1000::100 is the primary IPv6. Replace this address with an address in the user’s IPv6 subnet.
- 2001:db8:1000::200 is the optional secondary IPv6. Skip this command if a secondary address is not required for the user, or replace this address with an address in the user’s IPv6 subnet.
Configure IPv6 on Fedora Server
Fedora 29 through 32
1. In order to add IPv6 configuration on Fedora 29 through 32, add the below lines to the /etc/sysconfig/network-scripts/ifcfg-ens3 file.
nmcli con mod 'Wired connection 1' ipv6.method 'auto' ipv6.addresses ''
nmcli con mod 'Wired connection 1' +ipv6.addresses '2001:db8:1000::200/128'
nmcli con up 'Wired connection 1'
- The primary IPv6 is dynamic.
- 2001:db8:1000::200 in the above text is the optional static secondary IPv6. Remove the addresses and the example IPv6 section from the above text if the secondary address isn’t required. Users can replace the example IPv6 address with an address in their IPv6 subnet.
2. Save and exit the file.
3. Reboot the instance to ensure that the changes are reflected.
systemctl restart network.service
Fedora 26 through 28
1. In order to add IPv6 configuration on Fedora 26 through 28, add the below lines to the /etc/sysconfig/network-scripts/ifcfg-ens3 file.
IPV6INIT="yes"
IPV6ADDR="2001:db8:1000::100/64"
IPV6_AUTOCONF="yes"
IPV6ADDR_SECONDARIES="2001:db8:1000::200/64"
- 2001:db8:1000::100 is the primary IPv6. Replace this address with an address in the user’s IPv6 subnet.
- 2001:db8:1000::200 is the optional secondary IPv6. Remove the IPV6ADDR_SECONDARIES line if a secondary address isn’t required, or replace this address with an address in the user’s IPv6 subnet.
4. Save and exit the file.
5. Reboot the instance to ensure that the changes are reflected.
systemctl restart network.service
Configure IPv6 on Debian Server
Debian 9 through 10
1. To add IPv6 dynamic configuration, add the below lines to the /etc/network/interfaces file.
iface ens3 inet6 auto
2. After that, restart networking or reboot to ensure that the changes are reflected.
systemctl restart networking.service
3. To add IPv6 static configuration, add the following lines to the /etc/network/interfaces file.
iface ens3 inet6 static
address 2001:db8:1000::100
netmask 64
up /sbin/ip -6 addr add dev ens3 2001:db8:1000::200
- 2001:db8:1000::100 is the primary IPv6. Replace this address with an address in the user’s IPv6 subnet.
- 2001:db8:1000::200 is the optional secondary IPv6. Remove the example IP address line if a secondary address isn’t required, or replace this address with an address in the user’s IPv6 subnet.
4. Save and exit the file.
5. Finally, restart networking or reboot the instance to reflect the changes.
systemctl restart networking.service
Debian 8
1. To add IPv6 dynamic configuration, add the below lines to the /etc/network/interfaces file.
iface eth0 inet6 auto
2. Restart networking or reboot the instance to reflect the changes.
systemctl restart networking.service
3. To add IPv6 static configuration, add the following lines to the /etc/network/interfaces file.
iface eth0 inet6 static
address 2001:db8:1000::100
netmask 64
up /sbin/ip -6 addr add dev eth0 2001:db8:1000::200
- 2001:db8:1000::100 is the primary IPv6. Replace this address with an address in the user’s IPv6 subnet.
- 2001:db8:1000::200 is the optional secondary IPv6. Remove the example IP address line if a secondary address isn’t required, or replace this address with an address in the user’s IPv6 subnet.
4. Save and exit the file.
5. Finally, restart networking or reboot.
systemctl restart networking.service
Conclusion
This tutorial presents the process to configure IPv6 on Windows, Fedora, and Debian servers in Vultr. Hope this tutorial was helpful, and do reach out to us if you have any query or suggestions.


