Compute Engine is a hosting and computing service that lets users run and create virtual machines on Google infrastructure. Compute Engine offers performance, value, and scale that efficiently helps users launch large compute clusters on Google’s infrastructure. In addition, compute Engine does not provide any upfront investments, and users can run thousands of virtual CPUs on a system that offers consistent performance and is quick.
Compute Engine instances helps customers to run the public images for Windows and Linux Server offered by Google. Customers can also use Compute Engine to run private custom images created or imported from an existing system. Customers can also deploy Docker containers that get automatically launched on instances running Container-Optimized OS public images.
Users can choose the virtual machine properties of their instances, such as the amount of memory and the number of virtual CPUs, with the help of a set of predefined machine types. Customers can also define properties by creating their own custom machine types.
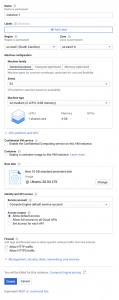
Create a Linux Virtual Machine (VM) in Compute Engine
To create a Linux Virtual Machine (VM) instance in Compute Engine using the Google Cloud Console, follow the below steps:
Prerequisite:
1. A new Google Cloud customer needs to create an account first. Customers can use this Google Cloud account to evaluate how the products offered by Google performs in the real world. In addition, the new customers will also get a free credit of $300 to run, deploy, and test their workloads.
2. Next, go to the Google Cloud Console.
3. On the project selector page, create or select a Google Cloud project.
> Note: If a customer only uses these resources for a trial purpose and does not wish to keep the ones they created in this procedure, it is recommended to create a new project instead of selecting an existing one. After they finish these steps, users can delete the project to remove all the resources associated with that project.
4. Next, enable the billing for that Cloud project. To enable billing, go to Navigation Menu under the project and select Billing. After that, click on the Link a billing account option to facilitate billing.
5. Finally, make sure that the Compute Engine API is enabled.
Create a Linux VM instance:
1. First, Log in to the Google Cloud Console and go to the VM instances page.
2. Click on the Create instance option.
3. In the Boot disk section, select Change to configure the boot disk.
4. Next, choose Ubuntu 20.04 LTS from the public images drop-down and click select.
5. In the Firewall section, choose the Allow HTTP traffic option.
6. Click the Create button to create the Linux VM instance.

7. The instance will take a short period of time to start. Once the instance is live and ready, it will be listed with a green status icon on the VM instances page.
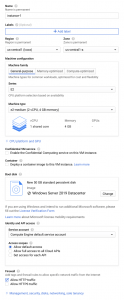
Create a Windows Virtual Machine (VM) in Compute Engine
To create a Windows Virtual Machine (VM) instance in Compute Engine using the Google Cloud Console, follow the below steps:
Prerequisite:
1. A new Google Cloud customer needs to create an account first. Customers can use this Google Cloud account to evaluate how the products offered by Google performs in the real world. In addition, the new customers will also get a free credit of $300 to run, deploy, and test their workloads.
2. Next, go to the Google Cloud Console.
3. On the project selector page, create or select a Google Cloud project.
> Note: If a customer only uses these resources for a trial purpose and does not wish to keep the ones they created in this procedure, it is recommended to create a new project instead of selecting an existing one. After they finish these steps, users can delete the project to remove all the resources associated with that project.
4. Next, enable the billing for that Cloud project. To enable billing, go to Navigation Menu under the project and select Billing. After that, click on the Link a billing account option to facilitate billing.
5. Make sure that the Compute Engine API is enabled.
6. If the user is not using Windows on their local machine, then they need to install a third-party RDP (Remote Desktop Protocol) client such as Chrome RDP offered by FusionLabs.
Create a Windows Server Virtual Machine Instance:
1. First, Log in to the Google Cloud Console.
2. In the Cloud Console, go to the VM instances page.
2. Click on the Create instance option.
3. In the Boot disk section, select Change to configure the boot disk.
4. Next, choose Windows Server 2019 Datacenter from the public images drop-down and click select.
5. In the Firewall section, choose the Allow HTTP traffic option.
6. Click the Create button to create the Windows Server VM instance.

7. The instance will take a short period of time to start. Once the Window Server Virtual Machine instance is live and ready, it will be listed with a green status icon on the VM instances page.
Connect to the Virtual Machine Instance
To connect to the Virtual Machine instance using the Google Cloud Console, the user must follow the below steps. After following this step, you will be connected to the Virtual Machine as you used to access the VM instances page.
1. First, log in to the Google Cloud Console and go to the VM instances page.
2. Select SSH in the row of the instance they want to connect to in the list of virtual machine instances.

Clean Up
Follow these steps to avoid incurring charges to the user’s Google Cloud account for the resources used in this process.
1. Log in to the Google Cloud Console, and go to the VM instances page.
2. Select the name of the VM instance created from the list.
3. Click the Delete button at the top of the instance’s details page.
Conclusion
In this tutorial, users can learn the steps to create both Linux and Windows Virtual Machine in Cloud Engine using Google Cloud Console. Hope this tutorial was helpful, and do reach out to us if you have any query or suggestions.


