OnApp Cloud offers a complete set of cloud management, storage, virtualization management, networking, billing, provisioning, DevOps, and automation tools. Users can create OnApp clouds on almost any commodity x64 infrastructure and across storage hardware and heterogeneous compute. All cloud functionality of OnApp is controlled via a customizable HTML5 web interface and is also accessible via OnApp’s full REST API.
OnApp offers a fully customizable HTML5 control panel that enables self-service, streamlines workload management, and uses GUI controls and intuitive wizards to make cloud management and provisioning as efficient and straightforward as possible. Users can control everything from the system architecture to virtual server root access via the user interface (UI).
Once the OnApp Control Panel server has been installed successfully, users can follow one of the following two processes to set up Xen or KVM compute resources:
- Install CloudBoot Compute Resources: the OnApp CloudBoot method where compute resources are installed over the user network.
- Install Static Compute Resources: standard static installation process to each compute resource’s local disk.
In this tutorial, we will learn the steps to enable CloudBoot for the OnApp compute resources using the install CloudBoot compute resources method.
Install CloudBoot Compute Resources
Follow this installation method to enable CloudBoot for the user’s compute resources. OnApp CloudBoot compute resource installation enables dynamic boot of the compute resource servers without any persistent installation requirements. The servers must have and support PXE boot enabled on the Network Interface Card (If not already enabled by default, set up in the BIOS). It is recommended to deploy one or more backup servers for backups and VS provisioning when using the CloudBoot functionality.
1. In order to enable CloudBoot in the OnApp Control Panel, follow the below process:
a) First, log in to the OnApp Control Panel and go to the Settings >> Configuration >> System >> CloudBoot.
b) Then, scroll down to the CloudBoot section and check the Enable box to enable CloudBoot.
2. In order to enable storage in the OnApp Control Panel server, follow the below process:
a) First, log in to the OnApp Control Panel and go to Settings >> Configuration >> System >> OnApp Storage.
b) Then, scroll down to the OnApp Storage section and check the Enable OnApp Storage
c) Tick the Use Local Read Path check box to minimize the network throughput dependency for the read-heavy workloads.
3. Next, enter the IP addresses for static content target and Control Panel server CloudBoot interface. Users can host static content (such as kernels, CloudBoot images, and virtual server templates) on a standalone NFS server. The default configuration is to install everything on the OnApp Control Panel server. Users can enter the relevant IPs in Settings >> Configuration >> System >>
4. In order to add CloudBoot IP addresses for compute resources, follow the below process:
a) First, create a CloudBoot IP net from Settings >> Compute Resources >> CloudBoot IPs tab >> New IP Net.
b) Then, add an IP range to the newly created IP Net from Settings >> Compute Resources >> CloudBoot IPs >> Actions icon next to the IP net >> Add New IP Range.
c) Finally, add the CloudBoot IP Addresses from Settings >> Compute Resources >> CloudBoot IPs >> Create IP Address.
5. Next, power on the servers and allow them to boot the default image. For that, follow the below process:
- In order to add servers to the OnApp Control Panel by selecting MAC addresses and assigning the IP address from Settings >> Compute resources >> Add a new CloudBoot Compute resource.
- If the user wants to expose drives in compute resources to OnApp Storage (the integrated storage platform), then select them at this point.
- Next, in order to increase the dom0 memory for all new Xen compute resources, edit the dom0 value in the /tftpboot/pxelinux.cfg/template-xen file on the OnApp Control Panel server.
- In order to increase the dom0 memory for a single Xen compute resource, edit the /tftpboot/pxelinux.cfg/xx-xx-xx-xx-xx-xx file, where the user has to replace the x‘s with their compute resource’s management NIC MAC address.
6. CloudBoot compute resources should mount the following locations automatically at boot:
- /tftpboot/images/centos7/ramdisk-default/ to /.ro (This path may vary depending on the compute resource template that the user has used.)
- /data to /onapp/tools/recovery
The Static Config target parameter defines the NFS server from which these are mounted. Users can set the default OnApp Control Panel server IP to any other server. This change will affect all the CloudBoot compute resources.
The below paths should be available in the static config target to make it possible in order to use CloudBoot:
- /tftpboot/export
- /tftpboot/images
- /data
If the Use SSH file transfer configuration setting is disabled or the template has null backup_server_id, compute resources will use local templates (mounted from Static Config target) during the server provisioning.
7. If the user does not have a Dedicated Backup Server in place, please use the Custom Config to mount /onapp/templates and /onapp/backup from the OnApp Control Panel server or another NFS export.
8. After the installation of the CloudBoot compute resource, proceed to the Configure CloudBoot Settings in the BIOS
Configure CloudBoot Settings in the BIOS
If the user wants to use PXE boot, users must ensure that it is enabled in BIOS. In order to do so, follow the below steps:
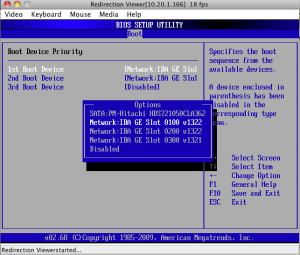
1. First, select the required ethernet card supporting PXE as a boot device:
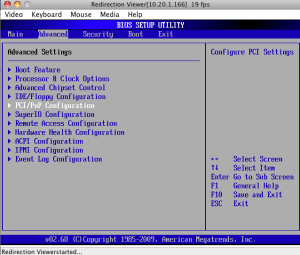
2. After that, go to the Advanced settings and click the PCI/PnP configuration option.
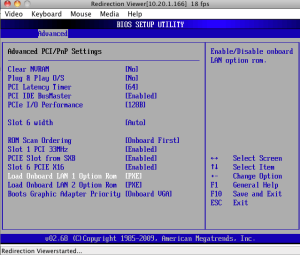
3. Select the first/primary Onboard LAN/NIC Option ROM in the Advanced settings and press the Enter key.
4. Next, use the up and down arrow keys to set and enable the Option ROM settings and press the Enter key.
5. Then, press the Escape key to return to the Advanced menu.
6. Finally, set the local disk as a second boot device.
Configure InfiniBand
>>Note: – Be aware that InfiniBand is not supported for CloudBoot CentOS7 image due to lack of integrated OFED stack.
– User’s hardware must meet the following requirements for Ethernet mode utilization:
- VPI adapter cards (HCAs).
- VPI enabled switches with a proper license key.
In order to enable the InfiniBand mode in OnApp Control Panel, follow the below steps:
1) First, log in to the Control panel and go to Settings >> Configuration.
2) Then, move the Enable InfiniBand boot slider in the CloudBoot section.
3) Finally, click the Save Configuration button.
Current Limitation:
- The InfiniBand in Ethernet mode is only supported for KVM nodes or CentOS 6. InfiniBand will not work with CentOS 5 or Xen.
- InfiniBand is only supported for the SAN (Storage Area Network) network, not PXE (Preboot Execution Environment) boot.
Conclusion
This tutorial presents the steps to enable CloudBoot for the OnApp compute resources using the install CloudBoot compute resources method. Hope this tutorial was helpful, and do reach out to us if you have any queries or suggestions.


