Kernel-based Virtual Machine (KVM) is a complete virtualization solution for Linux on AMD 64 and Intel 64 hardware. KVM has been included in the mainline Linux kernel since the 2.6.20 version. It is fast and stable for most workloads. Kernel-based Virtual Machine allows users to use the kernel to function as a hypervisor. It provides hardware-assisted virtualization for a wide variety of guest operating systems, including Linux, Solaris, BSD, Windows, Haiku, Plan 9, ReactOS, AROS Research Operating System, and macOS. Additionally, Kernel-based Virtual Machine provides paravirtualization support for Linux, Plan 9, OpenBSD, NetBSD, FreeBSD, and Windows guests using the VirtIO API.
In general, users can use storage devices with different file systems every day. We also have some storage techniques/technologies, such as SAN, ISCSI, NAS, etc. With the Kernel-based Virtual Machine environment, users can use block devices or files as local storage devices within the guest operating systems.
Users can use physical storage devices to create virtual machine’s volumes, and they could describe volumes as a VMs virtual disk, and also storage volumes are part of the Storage Pool. Users can not create storage volumes before having at least one storage pool. In this tutorial, we will learn about the steps to create and manage KVM Storage volumes and Pools using the virt-manager GUI (graphical user interface) tool.
Prerequisites
Ensure that the user system has the hardware virtualization extensions:
For Intel-based hosts, verify the CPU virtualization extension [vmx] are available by executing the following command:
[root@server ~]# grep -e 'vmx' /proc/cpuinfo
For AMD-based hosts, verify the CPU virtualization extension [svm] are available by executing the following command:
[root@server ~]# grep -e 'svm' /proc/cpuinfo
If there is no output, make sure that virtualization extensions are enabled in BIOS. In order to verify that KVM modules are loaded in the kernel (it should be loaded by default) by executing the following command:
[root@server ~]# lsmod | grep kvm
The output of the above command should contain kvm_intel for intel-based hosts or kvm_amd for amd-based hosts.

Before starting, the user will need the root account or non-root user with sudo privileges configured on their system and ensure that their system is up-to-date. For that, execute the following command:
[root@server ~]# yum update
Make sure that Selinux is in Permissive mode by executing the following command:
[root@server ~]# setenforce 0
Step 1: Create Storage Pools in KVM
First, display the available pools in the environment from the Details section after right-clicking on the localhost in the main window.

As a default, the Default storage pool will use the rootfs partition to store VMs volumes under the /var/lib/libvirt/images path.
In many cases, it is not recommended to use this pool to make this free space for the user’s system. In any way, create the first storage pool by clicking on the + button from the same window.
Next, users may provide the name of their new storage pool and select the type of storage that the users will use to deploy the storage pools. Kernel-based Virtual Machine (KVM) supports nine types of storage volumes, such as
1) -dir: Users can use Filesystem Directory to store storage volumes.
2) -fs: Users can use Pre-Formatted Partitions to store storage volumes.
3) -disk: Users can use Physical Hard Disks to store storage volumes.
4) -netfs: Users can use Network-shared storage like Network File System (NFS) to store storage volumes.
5) -gluster: Depends on Gluster filesystems storage.
6) -iscsi: Users can use Network-shared ISCSI (Internet Small Computer Systems Interface) storage to store storage volumes.
7) -scsi: Users can use local SCSI (Small Computer System Interface) storage to store storage volumes.
8) -lvm: Depends on LVM (Logical volume management) Volume groups to store storage volumes.
9) -mpath
The recommended type is -dir. (Dir) type does not require much modification in the current storage schema that the user has.
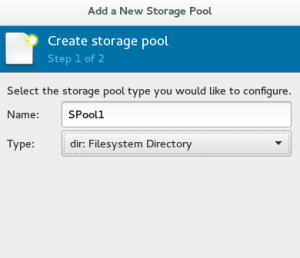
There is no restriction on where the user should create the storage pool, but creating the SPool1 directory on a separate partition is very recommended. Next, specify the permissions and ownership for this directory. In this tutorial, we will be using the /dev/sda3 as the partition. Make sure that we have mounted it properly by executing the following command:
[root@server ~]# mount -t ext4 /dev/sda3 /mnt/personal-data/
After mounting the partition under the /mnt/personal-data/ directory, provide the mount’s path to that storage directory (i.e. /mnt/personal-data/SPool1).
After that, users will be able to see the new storage pool SPool1 in the list.

Step 2: Create Storage Volumes
As we discussed before, users could consider the storage volumes as virtual disks for virtual machines. We also still have many formats for these volumes. In general, these formats allow users to use their volumes with QEMU, Oracle VirtualBox, VMware, and Hyper-V.
First, select the storage pool that the user wants to be part of by clicking the New Volume button to start.
Next, enter the name of the new volume and select the format. Also, set the proper size for the volume.
Now, the volume is ready to be attached to the virtual machines.
Conclusion
This tutorial presents the difference between Storage Pools and Volumes and the steps to create and manage them under the KVM environment using the virt-manager GUI tool. Hope this tutorial was helpful, and do reach out to us if you have any queries or suggestions.


